
This menu option is accessed by selecting the Settings menu option from the OrderAway menu in Venue Manager. Refer to How To Access The Configuration Menus for more information.
Notes …
DO NOT FORGET to select the Save button to ensure all changes made to configuration settings are saved.
Subjects

What Is It Used For?

This menu option is used to configure OrderAway. Refer to How To Configure OrderAway for more information.
What Is Required?
- When configuring OrderAway for a Venue, the following will need to be considered:
- Ensure the Payments have been configured. Refer to Payments for more information.
- Ensure the Trading Periods have been configured. Refer to Trading Periods for more information.
Appearance Tab

- Title – Displays/Enter a title that will be appear in the Header section above the Navigation bar. Generally, this would be the Venue name or the name of the Location within the Venue.
Notes …
The Title will only be displayed if NO Header Background and/or Header Logo image is selected.
Colours Section
Select from the colour options available to set the colours as required:
- Action
- Navigation bar
- Cancel
- Menu text

An example of the result of colour choices selected
Logos & Backgrounds Section
- Header Background
- Select – Displays/Select the image that will appear in the header section above the Navigation bar.
- Remove – Select to remove the image currently selected.
- Logo
- Select Logo – Displays/Select the image that will appear in the header section above the Navigation bar.
- Remove – Select to remove the image currently selected.
Notes …
If NO Header Background and/or Header Logo image is selected, then the header section will default to the Navigation bar colour selected and display the Title that is set below.
- Menu Background
- Select Logo – Displays/Select the image that will appear as the background image in the menus.
- Remove – Select to remove the image currently selected.
- Back Link Text – Displays/Enter the text to replace the default Back text, that will display when navigating menus and a patron wants to navigate to the previous menu they last visited. When appropriate the text is displayed in the top left-hand corner. For example in the Checkout screen.
- Enable V2 UI – Recommend this is always selected to ensure the Version 2 of the OrderAway UI is enabled.
URLs Section
- Terms and Conditions URL – Displays/Enter the URL that will be displayed when the Terms and Condition menu option is selected in the Navigation bar.
- Privacy Policy URL – Displays/Enter the URL that will be displayed when the Privacy Policy menu option is selected in the Navigation bar.
Layouts & Products Section
Displays/Select the images for Menus (Keyboard Layouts) and/or Products.
- Upload image for – Select from the drop down list one of the following:
- Layout – Select this option to ensure the ID assigned below is associated with either the ID of a Keyboard Layout OR the ID of the Product Family, depending on the Menu Mode selected here.
- Layout ID – Displays/Enter the ID of the Keyboard Layout.
- Layout Image
- Select – Select to locate and select an image for the Layout ID entered.
- Remove – Select to remove the image currently assigned to the Layout ID entered.
- Product – Select this option to ensure the ID assigned below is associated with the PLU of a Product.
- Product Code – Displays/Enter the Product Code of the Product.
- Product Image
- Select – Select to locate and select an image for the Product Code entered.
- Remove – Select to remove the image currently assigned to the Product Code entered.
- Layout – Select this option to ensure the ID assigned below is associated with either the ID of a Keyboard Layout OR the ID of the Product Family, depending on the Menu Mode selected here.
- Product Image Size – Select from the drop down list of options available to adjust the size of the Product images displayed in the menus.
- Product Image Shape – Select from the drop down list of options available to adjust the shape of the Product images displayed in the menus.
Confirmation Tab

- Send Order Success Message – Select to provide patrons with the option to select how they wish to receive their Order confirmation message. Once selected the following settings will be available:

- Send Order Success Message continued …
- Send SMS – Select to send via SMS. Once selected the following settings will be available:
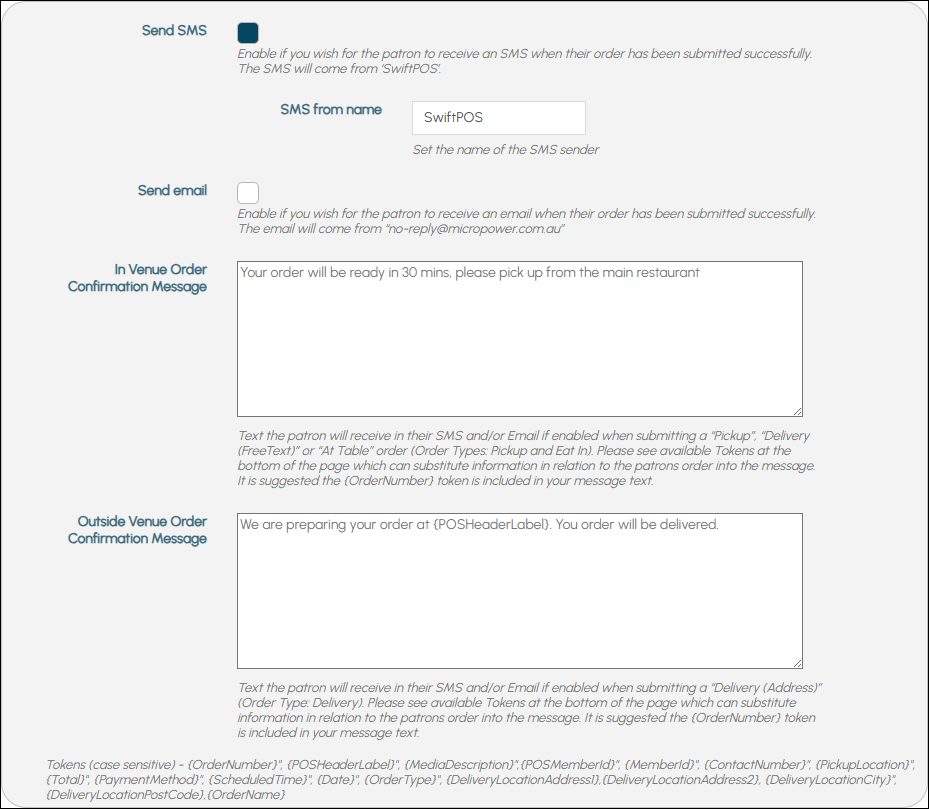
Configure the above to suit the Venue’s requirements.
- Send Order Success Message continued …
- Send Email – Select to send via Email. Once selected the following settings will be available:
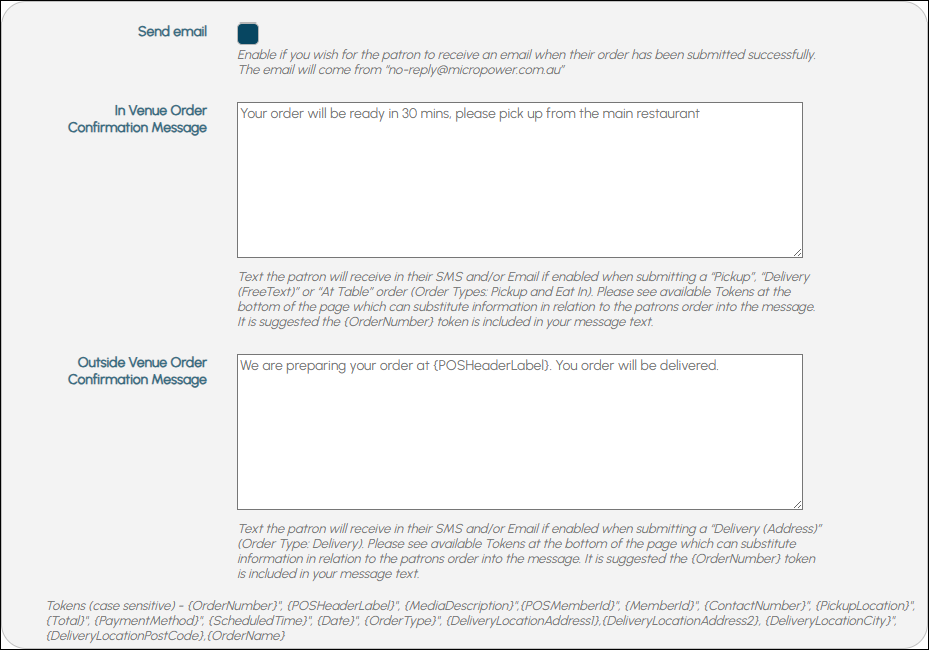
Configure the above to suit the Venue’s requirements.
- Enable Notify – Select to ensure system updates are notified on the order completed screen.
- Default Error Message – Displays/Enter the default message patrons will see when an error is encountered. It is recommended to include a contact number for support.
- Enable Order Confirmations To Venue – Select to send Orders and errors to Venue.
- Order Confirmations To Venue – Displays/Enter the Venue’s email address to which Orders and errors can be sent.
- Order Barcode – Select to generate a QR Code for the submitted Order. It can then be used to scan and retrieve the Order at the SwiftPOS Touch Terminal. Once selected the following settings will be available:

- Order Barcode continued …
- Order Barcode Message – Displays/Enter the message patrons will see when they submit the Order and a QR Code for the Order is generated.

Example of a QR Code and message generated at the time an Order is submitted.
Device Tab

- Enable OrderAway – Select to allow In-Venue and remote Ordering/Selling Products via the Web URL displayed below.
- OrderAway URL – Displays the selected Location’s OrderAway URL that provides access to the Venue’s OrderAway Menus.
Notes …
The URL displayed contains the Venue Location’s Tenant ID. This is the text displayed at the end of the URL. For example, in the screenshot above the Tenant ID is bngbar. A Location’s Tenant ID can also be located here.
Events Tab

Member Tab

- Allow guest orders – Select to allow non-Members to place/submit Orders/Sales. If selected, ensure a value has been entered against the Member for guest orders setting in the POS tab.
- Allow member sign In – Select to allow for the signing in of Members when placing Orders. This will ensure Members are offered Member Pricing and are able to earn/redeem Loyalty Points. Once selected the following settings will be available:

- Allow member sign In continued …
- Force login prompt – Select to ensure the Member login prompt is displayed when OrderAway is initially loaded. Once selected the following settings will be available:
- Allow to continue as guest – Select to ensure that patrons can continue to use OrderAway menus as a Guest and not have to login as a Member.
- Use a specific member price level – Select to ensure the Member Price Level set will be used for all signed in Members. Once selected the following settings will be available:
- Member price level – Select the Price Level to be applied to all Members. The default value of -2 ensures pricing is deferred to SwiftPOS to determine, which would normally be the normal price.
- Force login prompt – Select to ensure the Member login prompt is displayed when OrderAway is initially loaded. Once selected the following settings will be available:
- Allow member sign In continued …
- Use a specific member price level – Select to ensure the Member Price Level set will be used for all signed in Members. Once selected the following settings will be available:
- Use a specific member price level – Select to ensure the Member Price Level set will be used for all signed in Members. Once selected the following settings will be available:

- Allow member sign In continued …
- Use a specific member price level continued …
- Member price level – Select the Price Level to be applied to all Members. The default value of -2 ensures pricing is deferred to SwiftPOS to determine, which would normally be the normal price.
- Use a specific member price level continued …
Notes …
Either one or both of the Allow guest orders and the Allow member sign in options MUST be selected. That is, both CANNOT be be NOT selected.
Patron Experience Examples
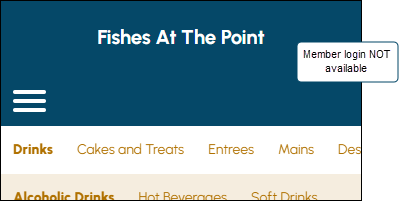
- With Allow guest orders SELECTED and Allow member sign in NOT SELECTED.
- With Allow guest orders SELECTED and Allow member sign in SELECTED.

- With Allow guest orders SELECTED and Allow member sign in SELECTED and Force login prompt SELECTED.

- With Allow guest orders NOT SELECTED and Allow member sign in SELECTED.
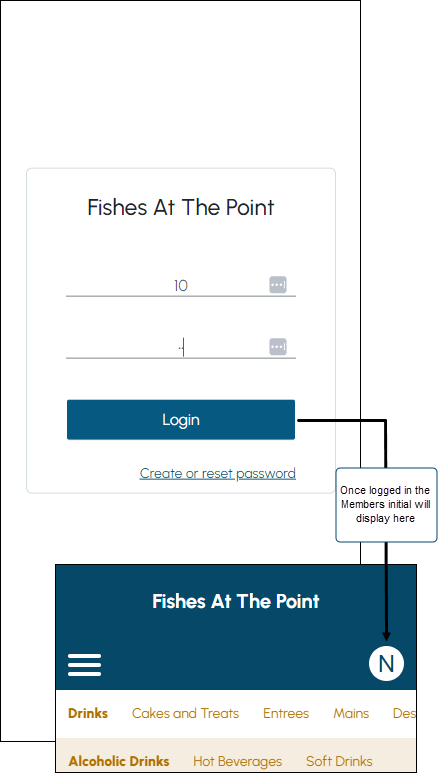
- With Allow guest orders NOT SELECTED and Allow member sign in SELECTED and Force login prompt SELECTED.
Payment Tab

- Card Payment – Select to enable the payment of Orders using a card. This will require the Payments to be configured. Once selected the following settings will be available:

Configure the above to suit the Venue’s requirements.
- Card Payment continued …
- Media No – Displays/Enter the Media No the payment will be assigned to when the Order is submitted.
- Card Payment continued …
- Online Payment Fee
- PLU Number – Displays/Enter the PLU Number the payment fee will be assigned to when the Order is submitted.
- Description – Displays/Enter the description for the payment fee.
- Percentage – Displays/Set the percentage to be applied to the total value of the Order that will be charged as the payment fee. This can be used in conjunction with the Fixed Value.
- Fixed Value – Displays/Set the value to be a charged as the payment fee. This can be used in conjunction with the Percentage.
- Online Payment Fee
- Card Payment continued …
- Online Payment Discount
- Card – Select from the drop down list one of the following:
- None – If selected this will effectively ensure no Discount is applied.
- American Express – If selected the Discount will be applied to all American Express cards. That is, a card having a valid 15 digit card number, and beginning with either 34 or 37.
- Mastercard – Bankwest – If selected the Discount will be applied to all Bankwest Mastercards. That is, a card having a valid 16 digit card number, and beginning with either 528013, 540482, 543568, 512127 or 560267.
- Discount ID – Displays/Enter the ID of the predefined Discount (in Back Office) that this discount will be assigned to. This will be used for reporting purposes.
- Card – Select from the drop down list one of the following:
- Online Payment Discount
Notes …
If the Discount ID is left blank, it will default to a value of 0 (Non-Predefined ITEM Discount). If an invalid ID is entered, it will report under that invalid ID in Back Office and show as an OTHER discount.
- Card Payment continued …
- Online Payment Discount continued …
- Discount ID continued … Ensure the Back Office Discount has the:
- Web Enabled option selected.
- Auto Apply Discount option selected.
- Dates and Times selected for a Date/Time range..
- Discount ID continued … Ensure the Back Office Discount has the:
- Online Payment Discount continued …
Notes …
The Offer Discount ($ Value) and the Offer Discount (Percentage) values of the Back Office Discount are ignored by TouchMini as these are configured below.
- Card Payment continued …
- Online Payment Discount continued …
- Description – Displays/Enter the description for the Discount that the patron will see within OrderAway and on their receipt.
- Percentage – Displays/Set the percentage of Discount to be applied to the total value of the Order. For example, 10%. This can be used in conjunction with the Fixed Value.
- Online Payment Discount continued …
Notes …
If a value of 100% is entered, the Order will NOT be able to be processed due to it being a zero value.
- Card Payment continued …
- Online Payment Discount continued …
- Fixed Value – Displays/Set the value of the Discount. For example, $5.00. This can be used in conjunction with the Percentage.
- Online Payment Discount continued …
Notes …
If a value entered is greater than the total value of the Order, the Order will NOT be able to be processed due to it being a zero value.
If both a Percentage and Fixed Value Discount is configured, the Percentage will be applied to the items and the Fixed Value will be applied on-top to the total value of the Order.
- Card Payment continued …
- Online Payment Discount continued …
- Refer to How To Configure Online Payment Discounts for more information.
- Online Payment Discount continued …
- Submit Without Payment – Select to ensure patrons can select a PAY ON PICKUP option when they proceed to checkout in OrderAway. Refer to How To Configure Submit Without Payment for more information. Once selected the following settings will be available:

- Submit Without Payment continued …
- Change ‘Pay Later’ button text – Displays/Enter the text a patron will see that is associated with the Submit Without Payment option.
- If NO TEXT IS ENTERED, then the default text a patron will see, will depend on the current saved configuration. That is:
- PAY ON PICKUP – When the Pickup option is selected in the Service tab.
- PAY LATER – When the Delivery option, along with the Free Text option is selected in the Location Type drop down list in the Service tab.
- PAY ON DELIVERY – When the Delivery option, along with the Address option is selected in the Location Type drop down list in the Service tab.
- PAY LATER When In Venue / QR ordering is being used. That is a Location Suffix is included in the the OrderAway URL.
- If TEXT IS ENTERED, then a patron will only see it when either:
- The Delivery option along with the Free Text option is selected in the Location Type drop down list in the Service tab.
- In Venue / QR Code ordering is being used. That is a Location Suffix is included in the the OrderAway URL.
- If NO TEXT IS ENTERED, then the default text a patron will see, will depend on the current saved configuration. That is:
- Change ‘Pay Later’ button text – Displays/Enter the text a patron will see that is associated with the Submit Without Payment option.
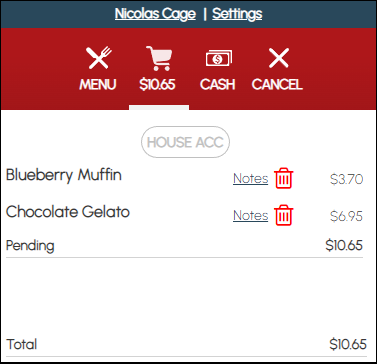
- Member account charge – Select to allow Members to be able to pay by charging to an Account. Once selected the following settings will be available:

- Member account charge continued …
- Enable SwiftPOS account charge processing – Select to ensure that Orders paid for by charging to an Account are processed by SwiftPOS and posted to the Member’s Account. If left unselected, then configure the remaining settings to enable non-SwiftPOS accounts to be charged.
Notes …
The Member account charge option will only be visible if the Allow member sign in option is selected in the Member tab. Also, charging to an Account must cover the total of the whole Order. Partially paying by charging to an Account and then paying the remaining amount using another payment Media is currently NOT supported.
- Member account charge continued …
- Media No – Displays/Enter the Media No the payment will be assigned to when the Order is submitted.
- Membership system invoice description – To be continued …
- Membership system invoice location ID – To be continued …
- Non-SwiftPOS Membership/Account Types – To be continued …
- Points charges/redemptions – Select to allow Members to charge/redeem Points. Once selected the following settings will be available:

Notes …
The Points charges/redemptions option will only be visible if the Allow member sign in option is selected in the Member tab. Also, charging to Points must cover the total of the whole Order. Partially paying by charging to Points and then paying the remaining amount using another payment Media is currently NOT supported.
- Points charges/redemptions continued …
- Media No – Displays/Enter the Media No the charge/redemption will be assigned to when the Order/Sale is submitted.
- Account number – Displays/Enter the Account number to be used for the Loyalty system.
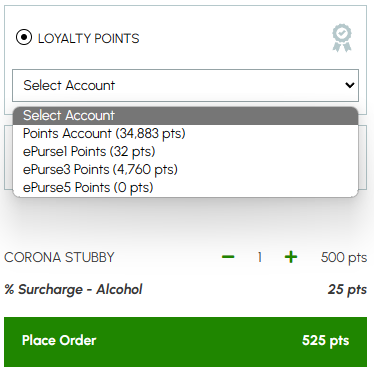
- Enable Multi-points buckets – Toggle select to enable/disable the charging/redemption use of ensure the points can be charged/redeemed using multiple points accounts.
- When NOT SELECTED:
- The first ePurse Points Account returned by NetPOS will be displayed to the patron, along with the balance.
- The Media No configured above will be used when the Order/Sale is submitted. That is, it should be:
- 529 for SwiftPOS Points.
- 156 for Gaming Points.
- 157 for ePurse Points (if an ePurse Points Account is the first one being returned).
- When SELECTED:
- Displays all the patron’s Points Accounts returned by NetPOS that cane be charged to/redeemed from. Some Points Accounts might only be for display/accruing purposes. The patron’s Points Accounts returned by NetPOS will be listed as a drop down list in the checkout:
- When NOT SELECTED:
- When SELECTED continued …
- The Media No configured above will be ignored, as it will automatically be determined.
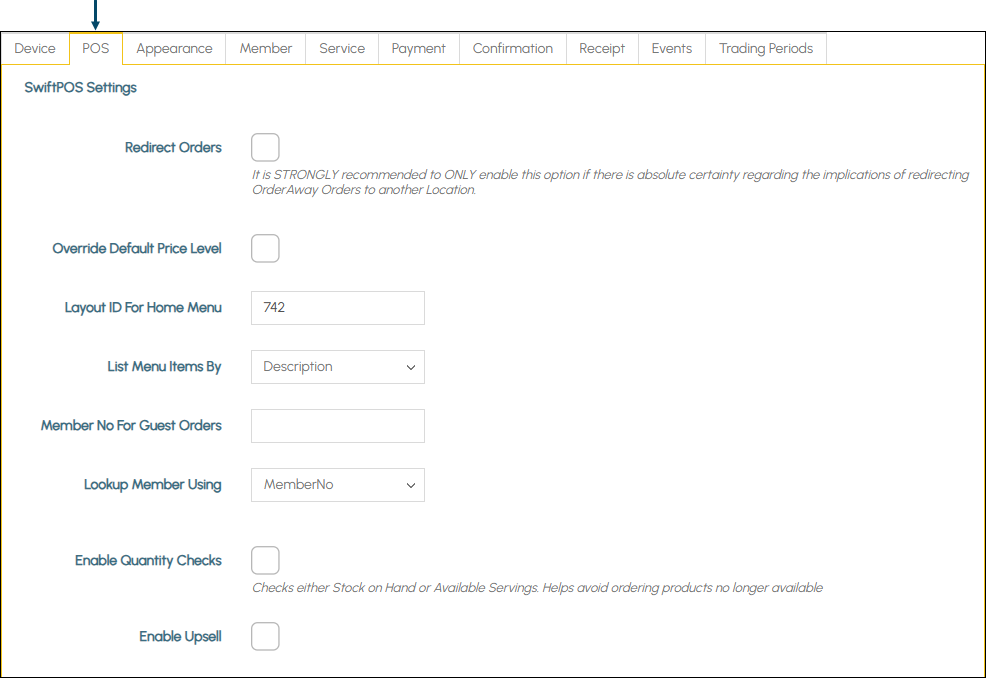
POS Tab
- Override Default Location ID – Select to enable the option of overriding the default Location, an OrderAway instance is assigned to. The default Location’s ID is displayed in brackets (3). This may prove to be useful when there is a need to redirect OrderAway Orders/Sales to another Location as a result of diminished Orders/Sales traffic at the default Location. Once selected the following settings will be available:

- Override Default Location ID continued …
- Select from the drop down list of Locations, the Location to which all OrderAway Orders/Sales, for the default Location, will be redirected to. Once activated an Orders redirected will appear in Touch with a prefix LXXXX, where XXXX is the ID of the Location from which the Order originated (that is, NOT the redirected To Location, but the From Location). For example:

Example of an OA Order in Touch in the redirected Location, showing the prefix with the Location ID (L3) of the From Location the Order was placed.
Notes …
Orders can also be redirected in Notify. Refer HERE for more information.
- Override Default Price Level ID – Select to specify the ID of a Price Level that will be applied to all Orders placed by Guests. Once specified the Price Level set will override the Location’s Default Price Level. Once selected the following settings will be available:

- Override Default Price Level ID continued …
- Guest price Level – Displays/Enter the ID of the Price Level that will be used for all Guest/Non-Member Orders.
- Layout to show – Displays/Enter the ID of the Layout that is to be considered as the Home Layout for the OrderAway Menu. Refer to Menus for more information.
Notes …
If anyone of the fields sourced are empty or blank the the Product Description will be used by default.
- Member for guest orders – Displays/Enter the ID of the Guest Member that was created to be used as the default Guest Member when no Member is included in An Order (that is, a patron is a Guest and not a Member when they have not signed in). For example 999999999.
- Lookup member by – Select from the drop down list the field used to lookup Members when retrieving/submitting data. For example, MemberNo.
- Turn on quantity checks – Select to ensure either the SOH or Available Servings quantities are checked to ensure the appropriate warnings are displayed when the levels set are reached. Turning on will prevent Items/Products being ordered when no longer available. Once selected the following settings will be available:

Notes …
Whether the SOH or Available Servings quantity is checked, that choice is set here. Also, when this option is enabled, ensure that Available Servings has also been enabled in the Table Tracking Settings at the SwiftPOS Touch terminal.
- Turn on quantity checks continued …
- No stock qty – Displays/Set the quantity at which a No stock warning (configured below) will be displayed against an Item/Product, and therefore is no longer available to be ordered. The quantity set here will be used when checking either the SOH or the Available Servings levels currently available. Set to 0 to ensure no warning is displayed.
- No stock warning – Displays/Set the warning notification to be displayed against an Item/Product when the No stock qty (configured above) has been reached.
- Limited stock qty – Displays/Set the quantity at which a Limited stock warning (configured below) will be displayed against an Item/Product. Set to 0 to ensure no warning is displayed.
- Limited stock warning – Displays/Set the warning notification to be displayed against an Item/Product when the Limited stock qty (configured above) has been reached.
Notes …
Stock Warnings will only be visible against Products that are of the type: Purchased Items, Reciped Items or Production Items.
- Enable Upsell – This option allows Venue administrators to set Layouts and/or Images to be displayed when navigating to either the Home Menu or Checkout, or both. Once selected the following settings will be available:

Notes …
If NO Upsell options are selected, then no advertising and/or upselling will be enabled in OrderAway.

- Show on Home Menu continued …
- Using Layout – Displays/Enter the ID of the SwiftPOS Keyboard Layout that has the Upsell Items/Products configured, and are displayed to patrons before the Home Menu is displayed.
- Advertising Image – Displays/Select the Upsell Image to be displayed to patrons before the Home Menu is displayed.
- Message – Displays/Enter an Upsell Message to be displayed to patrons before the Home Menu is displayed.
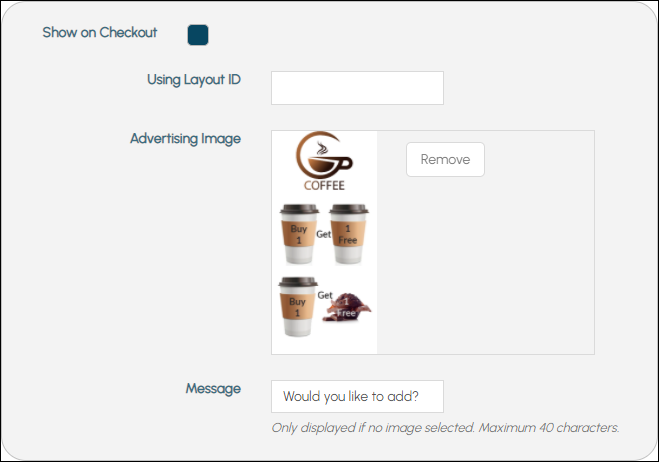
- Show on checkout – Select to ensure the Upsell option selected below (that is, the Using Layout and/or Advertising image options) is displayed BEFORE the Checkout is displayed. Once selected the following settings will be available:
- Show on Home Menu continued …
- Using Layout – Displays/Enter the ID of the SwiftPOS Keyboard Layout that has the Upsell Items/Products configured, and are displayed to patrons before the Checkout is displayed.
- Advertising Image – Displays/Select the Upsell Image to be displayed to patrons before the Checkout is displayed.
- Message – Displays/Enter an Upsell Message to be displayed to patrons before the Checkout is displayed.
- Using Layout – Displays/Enter the ID of the Keyboard Layout specifically created to include the list of Items/Products that will be presented to Patrons when Upselling is enabled. This option is generally recommended when using the Add-Ons Upselling option.
- Advertising image – Displays/Select the image that will be presented to Patrons when Upselling is enabled. This option is generally recommended when using the Advertising Upselling option. Select Remove to delete the image.
Notes …
If both the Using Layout and Advertising Image options above are configured, then the Advertising image will be displayed before any Items/Products (included in the Keyboard Layout specified). Patrons may have to scroll down to see the Items/Products.
- With Message (if no Advertising Image) – Displays/Enter the message that will be displayed when no Advertising image is selected.
Receipt Tab

- Do not display receipt – Select to ensure a Receipt is NOT displayed on the device’s screen at the end of an Order/Sale.
- Customise Receipt Header/Footer – Select to allow for the customising of the Receipt Header/Footer information. Once selected the following settings will be available:
Notes …
This option is only required to be selected and configured if the Submit orders directly to POS Terminal option is NOT SELECTED. When the Submit orders directly to POS Terminal option IS SELECTED, then it is NOT RECOMMENDED that this option be selected, as Tax amounts included in the Custom Receipt may not reflect the actual Tax amounts included in the sale. It is strongly advised to leave this option NOT SELECTED, in which case the Receipt generated will be as per the Receipt returned by the Touch Terminal, and should include the correct Tax amounts.

Configure the above to suit the Venue’s requirements.
Noteworthy
- Tax Label – Displays/Enter the description of the Tax Type. that will be included on the Custom Receipt.
- Tax Rate % – Enter the Tax rate to ensure the Tax included on the Custom Receipt can be calculated based on the rate entered. This currently doesn’t support Back office TAX setups.
Notes …
The Tax Rate entered here is separate from Back Office Tax Setups. For Back Office Tax Setups to be used instead, then the Submit orders directly to POS Terminal option must be selected and the Customise Receipt Header/Footer option must NOT BE SELECTED.
To be continued …
This completes the SETTINGS menu option for OrderAway.
Service Tab

- Pickup – Select to ensure the Pickup option is available to patrons. When patrons select this, they will be expected provide a Name and Mobile details when proceeding with the payment of an Order. They will also be expected to present at the Venue to pick up their Order.
Notes …
When Location Suffixes are used, the Pickup options are ignored.
- Delivery – Select to ensure the Delivery option is available to patrons. Once selected the following settings will be available:

Notes …
When Location Suffixes are used, the Delivery options are ignored
- Delivery continued …
- Location Type – Select from the drop down options one of the following:
- Free Text – Select to be able to enter a delivery location in the form of free text.
- Location Label – This will only be visible if the Free Text option is selected. Displays/Enter the text that will replace the Delivering To text displayed in the checkout screen. Once selected the following settings will be available:
- Free Text – Select to be able to enter a delivery location in the form of free text.
- Location Type – Select from the drop down options one of the following:

Notes …
When Location Suffixes are NOT used and the Free Text option is selected, patrons will be prompted to enter a Name and Phone.
- Delivery continued …
- Location Type continued …
- Address – Select to be able to restrict deliveries to addresses that are restricted to one of the following options:
- Delivery Restriction – This will only be visible if the Address option is selected. Used to limit the addresses that can be delivered to. This can either be one of the following:
- None – Select to ensure no delivery address limitation is applied.
- Postcodes – When selected addresses will be limited to those that fall within a list of permitted Deliverable Postcodes. Once selected the following settings will be available:
- Delivery Restriction – This will only be visible if the Address option is selected. Used to limit the addresses that can be delivered to. This can either be one of the following:
- Address – Select to be able to restrict deliveries to addresses that are restricted to one of the following options:
- Location Type continued …

Select the Postcodes to be included included in the Delivery area.
- Delivery continued …
- Location Type continued …
- Address continued …
- Delivery Restriction continued …
- Radius – When selected addresses will be limited to those that fall within a metre radius of the address entered (which is usually the address of the Venue). The address entered will be validated to ensure it is a valid Australian address. The address Finder (API) is used for the validation. The Delivery Radius in metres can be set to determine delivery restrictions. Once selected the following settings will be available:
- Delivery Restriction continued …
- Address continued …
- Location Type continued …

Enter the address from where Orders/Sales will be distributed for delivery, and then specify a Radius in metres from that address, to be included in the Delivery area.
- In Venue / QR – Used to configure the options available when it comes to the In Venue / QR Code service option.

- In Venue / QR continued …
- Capture Name – Select to require patrons to enter their name when ordering from a Table. This is only applicable when the OrderAway URL from which the Order is placed has a Location Suffix. If no Location Suffix is used and the Pickup option is selected then the entry of a name is mandatory.
- Capture Phone – Select to require patrons to enter their contact number when ordering from a Table. This is only applicable when the OrderAway URL from which the Order is placed has a Location Suffix. If no Location Suffix is used and the Pickup option is selected then the entry of a name is mandatory.
- Default Location Message – Display/Enter the message a patron will see when placing orders when a Location Suffix is in use. The {location} variable will display as per the Location Suffix used.

Example of the Default Location Message displayed to a patron
- In Venue / QR continued …
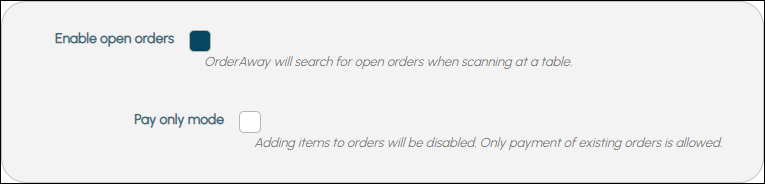
- Enable Open Orders – Select to ensure open Orders are searched when scanning at a Table. Once selected the following setting will be available:
- In Venue / QR continued …
- Enable Open Orders continued …
- Pay Only Mode – Select to ensure the payment of existing open Orders is required before items can be added to an Order. Once selected the following setting will be available:
- Enable Open Orders continued …

- In Venue / QR continued ……
- Enable Open Orders continued …
- Pay Only Mode continued …
- Ordering instructions – Displays/Enter the message a patron will see when in Pay only mode.
- Paid open order message – Displays/Enter the message a patron will see when an Order has been paid.
- Location message – Displays/Enter the message to override the default Location message when in Pay only mode.
- Pay Only Mode continued …
- Enable Open Orders continued …
- Enable Auto Finalise – Select to ensure paid Orders are automatically finalised at Touch. When selected, this option will override any Finalise Remote/Web Orders settings configured at Touch.
Notes …
Enable Auto Finalise is only available to enable when the Submit orders directly to POS Terminal option is selected during Location Activation. This feature is NOT available for 3rd party ordering integrations.
- Enable Auto Group – Select to ensure Orders placed within the Auto group delay time set, are grouped together and sent as a group to KVS’s and/or Kitchen printers. Similar to Bistro ordering at Touch, this is the OrderAway equivalent. The grouping is identified by the Location Suffix embedded in the QR Code scanned at the Table, and associated with each Order placed at the same Table. Refer to Grouping Orders for more information. Once selected the following setting will be available:

- Enable Auto Group continued ……
- Auto group delay (minutes) – Displays/Enter the delay in minutes an Order will be delayed prior to submission. All Orders placed within the time in minutes set will be grouped together.
Notes …
A value of 0 will mean Orders will NOT be Grouped. Enable Auto Group is only available, to enable, when the Submit orders directly to POS Terminal option is selected during Location Activation. This feature is NOT available for 3rd party ordering integrations.
- Schedule Order – Select to provide patrons with the option of specifying an expected Order delivery/pick up time. Leaving it unselected, patrons will not be able to specify an expected Order delivery/pick up time.
- Order Ready Offset (minutes) – Displays/Set the time (in minutes) an Order will be ready by, after the Order is submitted. Once set the time will be visible to the patron on the Order submission notification they receive after placing the Order. For example:

Notes …
This is generally referred to as a delayed Order. Once set the Order will print via the Order Master Terminal once the number of minutes set here have lapsed, after the time the Order was finalised. Additional flexibility is available to Venues by setting the Print Delayed orders XX mins before delivery setting at the Order Master Terminal.
- Last Order Cut-off (minutes) – Displays/Set the time (in minutes) before the Location’s closing time to determine the cut-off time for Orders. After this time Orders will not be accepted. The Location’s closing time is configured in the Trading Hours as part of the initial setup.
- Enable Order Again – Select to allow patrons to make use of the Order Again feature. Refer to How To Order Again for more information.
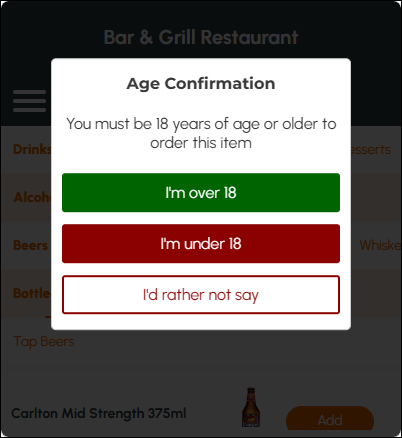
- Age Confirmation – Select to prompt for age confirmation when a patron attempts to order a Product assigned to the Restricted Product Family identified by the ID configured below. Depending on the Age Confirmation Mode selected, the patron will only be prompted to confirm their age once in a 24hr period, when ordering from the same device, and after confirming their age. Once selected the following settings will be available:

- Age Confirmation continued …
- Age Confirmation Mode – Select from the drop down list one of the following options:
- Yes/No Confirmation – When selected the patron will be prompted to respond to a prompt similar to the following:
- Age Confirmation Mode – Select from the drop down list one of the following options:
- Age Confirmation continued …
- Age Confirmation Mode continued …
- Date of Birth – When selected the patron will be prompted to enter their date of birth. For example:
- Age Confirmation Mode continued …

- Age Confirmation continued …
- Header Text – Displays/Enter the text that will appear in the header section of the age confirmation prompt. For example:

- Age Confirmation continued …
- Body Text – Displays/Enter the text that will appear in the body section of the age confirmation prompt. For example:

- Age Confirmation continued …
- Required Age – Displays/Enter the age in years a patron must at least be in order to order a restricted Product. For example, 18.
- Age Confirmation continued …
- Restricted Product Family – Displays/Enter the ID of the Family of Products that require age confirmation prior to being ordered.
Related Topics