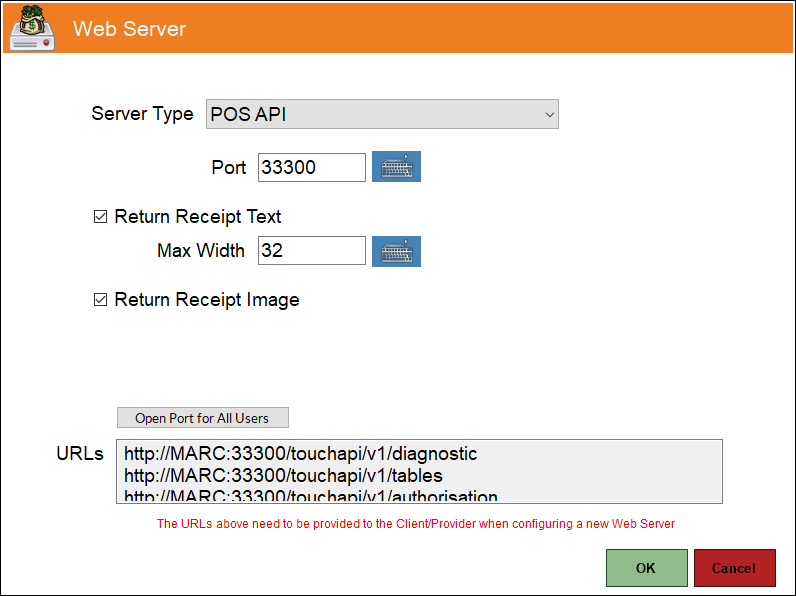
Accessed by selecting the POS API option in the Server Type drop down list.

Used to configure the settings required for the POS API Interface. The POS API (POS.Gateway.Client.exe) interface is used to process TouchMini Orders/Sales.
NOTE : This Interface along with the entry for the Gateway Client Service (Touch.Gateway.Client.exe) interface will automatically be added to the list of Interfaces displayed in the grid of the Interfaces List screen, when the Location (this Touch Terminal is in) is activated.
Noteworthy
- Port – Defaults to 33300.
NOTE : If the default value is changed then consideration will need to be given to the fact that the new value entered here will also have to be reflected in the setting RestfullSwiftPOSAdaptor-TwaBaseUrl configured in Venue Manager’s > Connect > Adaptor Settings.
- Return Receipt Text – It is recommended that this is always selected. Select to ensure that the SwiftPOS Touch Receipt information (at the time a TouchMini order/sale is submitted in TouchMini ) is returned in a text form.
- Max Width – Default is 32 characters. Displays/Enter the maximum width in characters of the generated Receipt.
NOTE : This setting was added and is recommended to be set to 32 in order to gain the best results when using Pax devices.
- Return Receipt Image – It is recommended that this is always selected. Select to ensure that the SwiftPOS Touch Receipt information (at the time a TouchMini order/sale is submitted in TouchMini ) is returned in the form of an image file. Once selected, and the Receipt Peripheral:
- Is configured as Non-Graphical, then the POS API will return a Receipt Image with a default header and footer using the following variables:
Header
- {DOCKET TYPE}
- {TRADING NAME}
- {ABNDescription}: {ABN}
- ————————————–
Footer
- Receipt #: {RECEIPT #}
- Date: {LASTACTIVITYDATE} Time: {LASTACTIVITYTIME}
- Clerk: {CLERK #} {CLERK NAME}
- Terminal: {TERMINAL ID} {TERMINAL NAME}
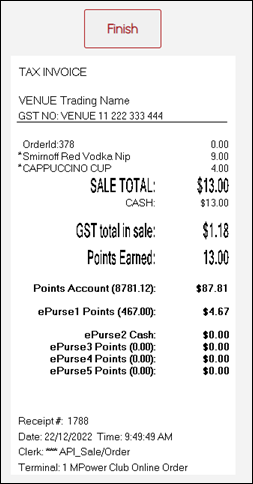
An example of the default Receipt returned.
- Return Receipt Image continued …
- Was configured as Graphical and then changed to Non-Graphical, the POS API will still return a Receipt Image based on the previous Graphical configuration. To ensure it returns Receipt Image with a default header and footer (as per above), then temporarily select the Use Graphical Printing option and clear all content in the Header and Footer and save the changes. Then unselect the Use Graphical Printing option and save again. The POS API will now return a Receipt Image with a default header and footer.
NOTE : It is recommended that both the above Return Receipt options are always selected. This will ensure accurate amounts/balances are always displayed/printed in TouchMini.
- Open Port for All Users – Select to ensure that all users regardless of their authorisation level (Admin rights) can run the selected Server Type. In this case POS API. By adding this option it ensures Apps are running with the highest authorisation level if required. For example, POS API requires Admin level authorisation, then make sure the required windows users are placed in the Administrative group. Application titles will append (Administrator) to the end to indicate the mode.
- URLs – Displays the URLs that need to be provided to the Client/Provider when configuring a new Web Server.
NOTE : These will automatically be populated when the interface is added. Also, to confirm that a connection has been established with POS API, copy the first URL listed (for example, http://???:33300/touchapi/v1/diagnostic) into a browser and it should return diagnostic information such as: {“LocalDateTime”:”2022-09-14T11:21:45.366073+10:00″,”Version”:”10.21.58.43″,”Messages”:[“Primary Receipt Printer: Online”,”Kitchen Printer: Online”,”Order Printer: NotFound”,”KVS 1: Enabled”,”KVS 2: Disabled”,”KVS 9: Disabled”,”KVS 11: Disabled”,”KVS 12: Disabled”,”KVS 13: Disabled”,”NetPOS: Online”]}. If a This site can’t be reached or Unable to connect or any other similar response is returned then there is an issue with the settings configured.
NOTE : Leaving the SwiftPOS Touch Terminal Settings screen open and NOT exiting it will generate an error in TouchMini. Refer to Touch Web Adaptor Error for more information.
Footer
- OK – Select to save any changes and exit the screen.
- Cancel – Select to NOT save any changes and exit the screen.
This completes the POS API screen for Touch.