This outlines the information and the steps that are needed to familiarise oneself with the SwiftPOS NetPOS 3rd Party Zen Global Interface, prior to and during it’s implementation in Back Office and Touch.
The content is targeted at Resellers and SwiftPOS Venue Administrators who have a sound knowledge of and experience with SwiftPOS. For further information or assistance, please contact your SwiftPOS Reseller or SwiftPOS Support.
Steps To Follow

What Is Required?

- SwiftPOS V10.64+
- A NetPOS registration for Zen Global.
- Ensure the credentials required for a connection to Zen Global’s API to be successful, has been obtained from Zen Global.
Configure Back Office For The Zen Global Interface?
Once the above requirements have been met, then Back Office will need to be configured in order to support the Zen Global Interface. To do this, do as follows:
- Zen Sales File – A ZEN file designation needs to be configured to ensure all Gift Card/Voucher Issues, Top Ups, Redemptions, etc are processed by Zen Global and attributed to the Gift Card/Voucher they are being applied to. To do this, do as follows:
- Locate and select the Touch terminal, from which Zen Global Gift Card/Voucher functions are going to be performed, in the Touch POS Terminal screen.
- Once selected, select the Tools button and then select the Options entry from the Tools menu to open the Settings screen.
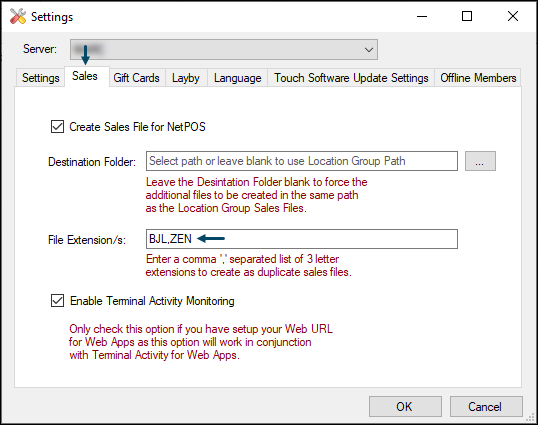
- In the Settings screen, select the Sales tab.
- Add a ZEN entry to the File Extension/s field. An example of which can be seen below.
- Zen Sales File continued …
- Select OK to save the change and exit the screen.
- Media – Ensure the required Media that need to be attributed to the various Gift Card/Voucher Masks are created and appropriately configured. SwiftPOS Media are generally used for reporting purposes and also to be able to apply GST Exemptions. The Media configured would depend entirely on the Venue’s reporting and GST exemption requirements. An example of Medias configured for Zen Global can be seen in the screenshot below.

- Ensure the Charge Media configured for the GiveAway Gift Card/Voucher type is also configured as Tax Exempt. Refer to How To Exempt A Media From GST in Back Office for more information.
Configure NetPOS For The Zen Global Interface?
Once the above requirements have been met, then the Zen Global settings will need to be configured. To do this access the Zen Global settings screen in NetPOS via the NetPOS Menu.
Once the Zen Global settings screen is displayed, configure as appropriate.
To access this screen refer to How To Access The NetPOS Menu. This screen is used to configure the settings required to implement the Zen Global Interface.
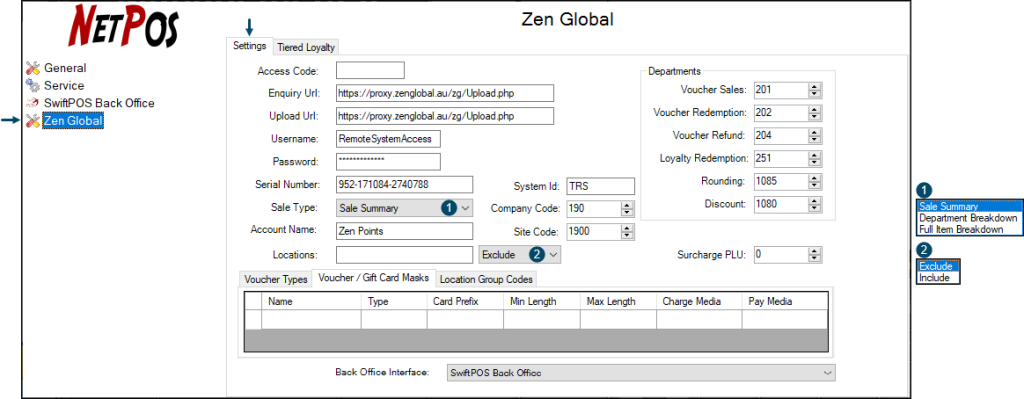
Settings Tab
- Access Code – Default is blank. Displays/Enter the Access Code that must match the same Access Code configured at the SwiftPOS Touch terminal. This is not mandatory, but does provide an additional level of security.
- Enquiry URL – Displays/Enter the URL provided by Zen Global.
- Upload URL – Displays/Enter the URL provided by Zen Global.
- Username/Password – Displays/Enter the credentials provided by Zen Global.
- Serial Number – Displays/Enter the Serial Number provided by Zen Global.
- Sale Type – Displays/Select from the drop down list one of the Sales Types. These are:
- Sales – Summary
- Department Breakdown
- Full Item Breakdown
- Account Name – Displays/Enter the Account Name provided by Zen Global.
- Account Name – Displays/Enter the Account Name provided by Zen Global.
- Locations – Displays/Enter the numbers of the Locations (separated by a comma) that are to be either Included or Excluded from being able to communicate with Zen Global. For example, enter Location number as 121,122,123.
- Exclude/Include – Displays/Select from the drop down list whether the Locations entered are to be either Excluded or Included. The default option is Exclude.
Notes …
By Default Location entered here will be considered as EXCLUDED Locations.
- System ID – Displays/Enter the System ID provided by Zen Global.
- Company Code – Displays/Enter the Company Code provided by Zen Global.
- Site Code – Displays/Enter the Site Code provided by Zen Global.
- Departments – Displays/Enter the Codes provided by Zen Global for the following:
- Voucher Sales
- Voucher Redemption
- Voucher Refund
- Loyalty Redemption
- Rounding
- Discount
- Surcharge PLU – Displays/Select the Surcharge PLU/Product that is to be assigned to the surcharge applicable, if any, is applied to the Gift Card/Voucher. Refer to How To Add A Surcharge PLU for more information.
- Back Office Interface – Select from the drop down list the Back Office instance to connect with.
Notes …
In general this will only have one instance listed. However, multiple Back Office instances can be listed, in which case one needs to be selected.
Grid Tabs
Voucher Types
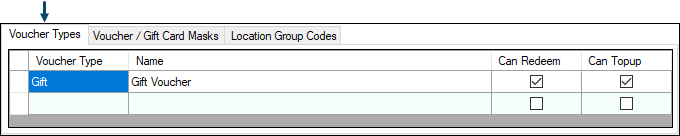
Used to create and configure the Gift Vouchers. This Tab is used by the legacy Zen Global interface and is valid for SwiftPOS release prior to v10.64.
The grid displays a list of the Gift Card/Voucher Card Masks along with:
- Voucher Type – To be continued …
- Name – To be continued …
- Can Redeem – To be continued …
- Can Topup– To be continued …
Voucher / Gift Card Masks
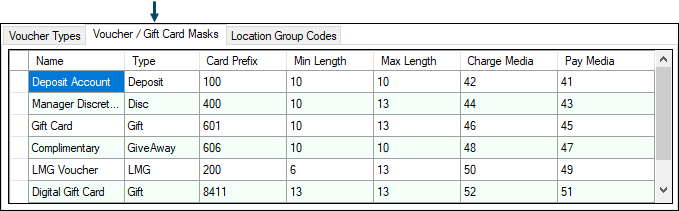
Used to create and configure the Gift Card/Voucher Card Masks for the current Zen Global interface and is valid for SwiftPOS release from v10.64 onwards. Card Masks are required to ensure Touch recognises Zen Global scanned Gift Cards/Vouchers, thus ensuring they are then processed as is appropriate.
The grid displays a list of the Gift Card/Voucher Card Masks along with:
- Name – Displays/Enter the name given to the Mask entry.
- Type – Displays/Enter the type of Gift Card/Voucher Card Mask. The type entered here
Notes …
It is IMPORTANT that the Type entered here is exactly as is provided by Zen Global. If entered incorrectly, Zen Global will not recognise it and hence will NOT process any requests associated with the incorrect Type. The screenshot above depicts that Types currently supported by Zen Global.
- Card Prefix – Displays/Enter the prefix that identifies the Type of Gift Card/Voucher Card. For example, 601 is the prefix for all Gift Cards, and will be treated as such when entered/scanned at Touch.
- Min/Max Length – Displays/Enter the minimum and maximum length in characters of the Gift Card/Voucher number.
- Charge/Pay Media – Displays/Enter the ID of the SwiftPOS Media that is to be assigned to any transaction generated by Touch when the Gift Card/Voucher Card is either being used for charging (redemptions) and/or payments (top ups).
Notes …
It is IMPORTANT that the Type entered here is exactly as is provided by Zen Global. If entered incorrectly, Zen Global will not recognise it and hence will NOT process any requests associated with the incorrect Type. The screenshot above depicts that Types currently supported by Zen Global.
Location Group Codes

Used to assign specific Serial Numbers, Company and Site Codes to individual SwiftPOS Location Groups (Venues). If no Location Group (Venue) specific entry is added to the grid, then the Serial Numbers, Company and Site Codes assigned will default to the ones configured above.
- Location Group – Displays/Enter the number of the SwiftPOS Location Group (Venue) for which specific codes are required.
- Serial Number – Displays/Enter the Serial Number to be assigned to the SwiftPOS Location Group (Venue).
- Company Code – Displays/Enter the Company Code to be assigned to the SwiftPOS Location Group (Venue).
- Site Code – Displays/Enter the Site Code to be assigned to the SwiftPOS Location Group (Venue).
Configure Touch For The Zen Global Interface?
To be continued …
Once the Zen Global Products have been added, then Touch will need to be configured to ensure Zen Global Gift Cards can be issued, redeemed, etc, and Zen Global Products can be Topped Up. To do this:
- Ensure the following POS Keys are added to the appropriate Keyboard Layout via the Designer. Refer to Add A POS Key To A Keyboard Layout for more information.
- Ensure the POS Keys, added above, are configured appropriately to meet the Venue’s requirements.
- Ensure a Full Update is sent to all Touch Terminals that make use of the same Keyboard Layout to which the above POS Keys were added.
This completes GETTING STARTED for the Zen Global Interface for NetPOS and Touch.
Related Topics