
Subjects ▲ ▼
About ▲ ▼
- Troubleshooting
- What Else?
- What Is It?
- What Is Required?
- What Is Supported?
- What To Consider?
- When Is It Used?
Troubleshooting? ▲ ▼
- Connection to XERO Failed – Incompatible Certificate and Password selected.
- Error -10: oauth_problem=consumer_key_unknown&oauth_problem_advice= …
- Rounding Discrepancies
- System.NullReferenceException: Object reference not set to an instance of an object at DataPortal.Panels.PanelXeroSettings.VB$StateMachine_923_btnImport_Click.MoveNext()
- The Line Amount cannot be zero or empty
- The remote server returned an error: (400) Bad Request. {“error”:”invalid_client”}
- The TaxType code ‘EXEMPTOUTPUT’ cannot be used with account code ‘???’.
- The total debits (???) must equal total credits (-???)
- Unable to establish a connection to XERO’s API
What Else? ▲ ▼
- Swiftpos V10.78+
The System Tax Types section in the Venues Settings tab is used to map Swiftpos System tax types to XERO tax types, thus providing Venues with the option of overriding the default mapping that occurs between Swiftpos and XERO with regards to tax types. The default tax types for Swiftpos are:
| GL Posting Type |
Swiftpos Tax Type |
|---|---|
|
General Journal |
|
|
Revenue WITH TAX |
Sales - Taxable |
|
Revenue WITHOUT TAX |
Sales - Tax Free |
|
Media |
Exempt |
|
Cost of Sales expenses |
Exempt |
|
Inventory |
Exempt |
|
Expense component Member Classification Media mapped discounts |
Exempt |
|
Revenue component Member Classification Media mapped discounts |
Exempt |
|
Supplier Invoices |
|
|
Purchases WITH TAX |
Purchases - Taxable |
|
Purchases WITHOUT TAX |
Purchases- Tax Free |
|
Discounts |
Exempt |
|
Freight |
Purchases - Taxable |
|
Rounding |
Exempt |
|
Surcharges |
Exempt |
|
Terminal Cash Offs |
|
|
Unders and Overs media |
Exempt |
|
Payment Media |
Exempt |
Also, if a System Tax Type is mapped to Not Selected, which implies the default tax type, Swiftpos in some cases, will override the tax type from the default. For example, for:
- General Journals: Revenue lines without tax always use the GST Free Income tax type.
- Supplier Invoices: Purchase lines without tax, Discounts, Surcharge and Rounding always use GST Free Expenses tax type.
Notes ...
The tax types displayed in the Tax Type column will be based on the value last imported when the Chat of Accounts was imported.
- A connection must be established with Xero in order for the XERO tax types to be downloaded from XERO.
Notes ...
If a connection cannot be established with XERO, then the following message will be displayed when attempting to open the Settings screen.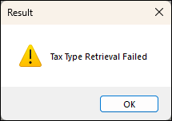
Check and re-configure the connections settings for the Venues and test them to confirm they are successful. The above message should no longer be displayed.
What Is It? ▲ ▼
The Swiftpos XERO Advanced GL Interface, like the XERO Basic GL interface, it is essentially used to export Swiftpos Sale, Stock Movement, Supplier Invoice and Terminal Cash Off Variance related data to XERO via the XERO API, however does it offer Venues additional features, over and above the XERO Basic GL interface. Refer HERE for more information.
What Is Required? ▲ ▼
- Swiftpos v10.80+ - This is the recommended version for all Venues using Xero integration, as this release includes the latest XERO fixes, enhancements, and XERO Advanced features.
- Swiftpos v10.78.15+ - This is the minimum version required by Venues to ensure they are able to connect to XERO using the new scopes for Xero’s Accounting API before September 2027. Refer HERE for more information. Venues that currently make use of XERO Advanced and:
-
- Upgrade Swiftpos before May 2026 - They will need to do the following:
- Disconnect the current App.
- Create a new App.
- Connect their existing XERO Organisation's credentials to the new App.
- Can delete their old App, if it is not in use.
- Upgrade Swiftpos from May 2026 and before Sep 2027 - They will need to do the following:
- NO action to be taken. Their existing App will be compatible with the new Accounting API scopes.
- Do NOT upgrade SwiftPOS before Sep 2027 - They will need to do the following after Sep 2027:
- Upgrade Swiftpos to latest version.
- Disconnect the current App.
- Create a new App.
- Connect their existing XERO Organisation's credentials to the new App.
- Can delete their old App, if it is not in use.
- Upgrade Swiftpos before May 2026 - They will need to do the following:
- Swiftpos v10.62+
IMPORTANT
For sites upgrading to Swiftpos V10.62+, It may be necessary to enlist the assistance/expertise of an accountant to ensure that in XERO, all Chart of Accounts (COA) and Tracking Categories are correct and appropriately configured for the Venue. Also, that all Account and Tracking Category assignments/mappings in the Account Assignment/Mapping tabs are done and correct.
- It is highly recommended that the setup and configuration of Swiftpos XERO export interface is done in Test environments initially. That is, test environments for both Swiftpos and XERO. Refer HERE for more information.
- Ensure the steps outlined HERE are completed.
- In XERO
- For Venues that are contemplating using XERO for the first time and are wanting to make use of XERO Integration in Swiftpos:
- XERO Registration - Venues will need to be registered to use the XERO Accounting platform. That is they will need to have a XERO Account. There is the option available to Login/Sign up for a 30 day free trial. This option is very useful when it comes to testing the Swiftpos XERO Advanced interface using a copy of the Venue's Swiftpos database in a test environment. Refer HERE for more information.
- Chart of Accounts (COA) - Venues will need to enlist the services of an Accountant to ensure that their COA in XERO, is setup up and configured appropriately. Refer HERE for more information.
- For Venues that are contemplating using XERO for the first time and are wanting to make use of XERO Integration in Swiftpos:
- In Swiftpos
- For Venues using XERO for the first time and for Venues already using XERO, and wanting to now make use of the Swiftpos XERO Advanced interface, the following applies:
- Swiftpos Registration - Venues will need to be registered for the Swiftpos XERO Advanced GL interface for access to this feature. Email registrations@swiftpos.com.au to obtain the appropriate registration.
- For Venues using XERO for the first time and for Venues already using XERO, and wanting to now make use of the Swiftpos XERO Advanced interface, ensure the following is configured:
- Ensure that the Post Financial Data option is selected for those Locations for which General Journal, Supplier Invoice and/or Terminal Cash Off related data is to be exported.
- For Venues using XERO for the first time and for Venues already using XERO, and wanting to now make use of the Swiftpos XERO Advanced interface, the following applies:
Notes ...
This does NOT apply to Inventory/Stock transfers between Locations. These will always be exported regardless of the whether this option is selected or not.
- It is highly recommended continued ...
- In Swiftpos continued ...
- For Venues using XERO for the first time and for Venues already using XERO, and wanting to now make use of the Swiftpos XERO Advanced interface, the following applies:
- For Venues wanting to make use of XERO's Tracking Categories, then ensure Tracking Categories have been configured in XERO*. Refer HERE for more information.
- For Venues using XERO for the first time and for Venues already using XERO, and wanting to now make use of the Swiftpos XERO Advanced interface, the following applies:
- In Swiftpos continued ...
* It may be necessary to enlist the assistance/expertise of an accountant to ensure that in XERO, all Tracking Categories are correct and appropriately configured for the Venue. Also, that all Tracking Category assignments/mappings are done in the Account assignment/mapping tabs are correct.
What Is Supported? ▲ ▼
The Swiftpos XERO Advanced export feature supports the following:
- The importing of a maximum of two Tracking Categories from Xero.
What To Consider? ▲ ▼
- A Venue having multiple XERO Organisations (equivalent to a Swiftpos Venues) with each having their own Chart of Accounts is now supported. In short that means, Swiftpos Venues can now export to separate XERO Organisations and have their own unique Chart of Accounts. Refer HERE for more information.
Notes ...
A XERO App (XERO API credentials, namely Client ID, Customer Secret and Redirect URL) configured in XERO, can be used by more than one Swiftpos Venue when establishing a connection to XERO.
- Refer HERE for more information.
When Is It Used? ▲ ▼
Any Swiftpos Venue that wants to ability to export financial transactional data to Xero and include Tracking Categories in the export.
The Swiftpos XERO Advanced GL Interface is an advanced version of the XERO Basic GL interface, and amongst other features, provides the ability to include XERO Tracking Categories as part of the exported data. This may be useful to larger Venues, like Clubs and Pubs and provides Venues with the ability to track transactional data and hence provide a Venue with the ability to view their financial performance based on Xero's Tracking Categories. For example, these may include Departments, Cost Centres or Regions.
Fundamentally, it functions in the same way as XERO Export interface, however, XERO Advanced supports the following:
- Single And Multiple XERO Organisations And Chart Of Accounts (COA) - It supports both single and multiple XERO Organisations, as well as multiple COAs. That is, each XERO Organisation in XERO has it’s own unique COA.
- Tracking Categories - These are configured in XERO and then:
- Imported into Swiftpos. Refer HERE for more information.
- Once imported, they can then be assigned/mapped to Swiftpos Location/Media, Location/Master Group combinations and Locations via the assigning/mapping Account tabs. This will ensure they are included with the financial data when exported to XERO.
- Additional Account Assignment/Mapping tabs - These have been included to support the following XERO Accounts:
Given the Swiftpos PRO XERO Export is primarily the same as the XERO Export interface, with the exception of the above, this document is aimed only to highlight the areas of difference. Hence it is RECOMMENDED that one familiarises oneself with the XERO Export interface first before continuing to read this document any further.
Examples ▲ ▼
Examples of exported XERO Advanced data for:
Supplier Invoices With Tracking Categories ▲ ▼

How To? ▲ ▼
- Access The Chart Of Accounts In XERO?
- Access The Tracking Categories In XERO?
- Add And Configure A Venues To Connect To XERO?
- Assign/Map XERO Accounts?
- Assign/Map XERO Tracking Categories?
- Create A XERO App For An API Connection?
- Export From Swiftpos Into XERO?
- Export The Chart Of Accounts in XERO?
- GET STARTED?
- Import The Chart Of Accounts Into Swiftpos?
- Import The Chart Of Accounts into XERO?
- Import Tracking Categories Into Swiftpos?
- Signup For A 30 Day Free Trial In XERO?
How To GET STARTED? ▲ ▼
- Review About and ensure the steps outlined HERE are addressed.
- When Going Live
- When Testing
-
- In the XERO Test environment create Tracking Categories to mirror what the Venue already has configured in XERO or is intending to configure. Refer HERE for more information.
- Import the Tracking Categories into Swiftpos for each of the Venues listed in the Venues Settings tab. Refer HERE for more information.
- Ensure all the Tracking Categories* have been assigned/mapped in the Account Assignment/Mapping tabs where appropriate to Swiftpos Location/Media, Location/Master Group combinations and Locations. Refer HERE for more information.
TIP
* It may be necessary to enlist the assistance/expertise of an accountant to ensure that in XERO, all Tracking Categories are correct and appropriately configured for the Venue. Also, that all Tracking Category assignments/mappings done in the Account Assignment/Mapping tabs are correct.
- Do as follows continued ...
- Export Sale, Stock Movement, Supplier Invoice and Terminal Cash Off Variance related data to XERO. Ensure both the manual and automatic (via the End of Day process) export of data is tested. Ensure the Tracking Categories, that have been assigned/mapped, are being imported into XERO with the data correctly. Refer HERE for more information.
- Refer HERE for an example of a Supplier Invoice imported into XERO with Tracking Category information included.
Notes ...
The first time the XERO Export runs successfully as part of the End of Day process, all Transactions that are NOT flagged as Exported, will be exported and uploaded into XERO. This will mean that immediately after the EOD has processed, there should not be any Trading Dates available for export, when viewed in the Export screen, for each of the Venues that have the XERO Export option selected in the End of Day Options screen.
* It may be necessary to enlist the assistance/expertise of an accountant to ensure that in XERO, all Tracking Categories are correct and appropriately configured for the Venue. Also, that all Tracking Category assignments/mappings are done in the Account Assignment/Mapping tabs are correct.
- Ensure the steps outlined in HERE have been completed.
- When Testing the Interface in a Test environment, in addition to the HERE, do as follows:
- In the XERO Test environment create Tracking Categories to mirror what the Venue already has configured in XERO or is intending to configure. Refer HERE for more information.
- Import the Tracking Categories into Swiftpos for each of the Venues listed in the Venues Settings tab. Refer HERE for more information.
- Assign/Map* the imported XERO Tracking Categories to Swiftpos Location/Media, Location/Master Group combinations and Locations. Refer HERE for more information.
TIP
* It may be necessary to enlist the assistance/expertise of an accountant to ensure that in XERO, all Tracking Categories are correct and appropriately configured for the Venue. Also, that all Tracking Category assignments/mappings done in the Account Assignment/Mapping tabs are correct.
- Do as follows continued ...
- Export Sale, Stock Movement, Supplier Invoice and Terminal Cash Off Variance related data to XERO. Ensure both the manual and automatic (via the End of Day process) export of data is tested. Ensure the Tracking Categories that have been assigned/mapped are being imported into XERO with the data correctly. Refer HERE for more information.
- Refer HERE for an example of a Supplier Invoice imported into XERO with Tracking Category information included.
Screens ▲ ▼
Export Screen ▲ ▼

To access select the Export option in the XERO Advanced menu in Data Portal. Provides a Venue with the ability to export General Journal, Supplier Invoice and Terminal Cash Off related data from Swiftpos and import them directly into XERO using XERO's API. General Journal data includes both Sales and Stock Movement transaction data. Supplier Invoice data refers to completed Supplier Invoices. Terminal Cash Offs refers to committed Terminal Cash Offs that have recorded a variance.
Tabs ▲ ▼
General Journals Tab ▲ ▼

Used to export Sales and Stock Movement transaction data to XERO
- Venue - Select from the drop-down list the Venue for which data will be exported.
- Location - Select from the drop-down list the Location for which data will be exported.
- Trading Date - Select from the drop-down list of dates the date for which data will be exported and uploaded into XERO using XERO's API.
Notes ...
Once exported, the data will be flagged as exported and the date will be removed from the Trading Date drop-down list. This will ensure that the same data is NOT exported multiple times. It is important to note that even though the export for a specific Trading Date may NOT be completely successful, the Trading Date will still be removed from the drop-down list. It is therefore VERY IMPORTANT to always review the Event Logs to ensure that any ERRORS are investigated and resolved in an appropriate manner.
- Export - Select to invoke the export. Once completed a prompt will be displayed confirming completion. All exported Journals can be viewed in the Event Logs.
Notes ...
If no prompt is displayed and the Export appears to have completed without the selected Trading Date being removed from the list of available dates, this may point to a failure of being able to connect to XERO. Check the Event Logs > Swiftpos Applications > Swiftpos SQL Application for any logging that may have occurred. Refer to Troubleshooting for more information.
- Reset - Select a Trading Date to ensure that General Journal related transactions for that date are flagged as NOT Exported, so that they can be exported again. Select to display the following prompt:

- Reset continued ...
- Venue - Select from the drop-down list the Venue for which data will be reset.
- Location - Select from the drop-down list the Location for which data will be reset.
- Trading Date - Select from the drop-down list the Trading Date for which General Journal related transactions will be reset.
- OK - Select to Reset.
- Cancel - Select to exit without Resetting.
Notes ...
When resetting and exporting again, be sure that they DO NOT result in duplicates when imported into XERO.
- Mark ALL as Exported - Select to display the following prompt and thereby ensure ALL General Journal related data in the selected Location is flagged as exported.

- Mark ALL as Exported continued ...
- Venue - Select from the drop-down list the Venue for which data will be flagged as exported.
- Location - Select from the drop-down list the Location for which data will be flagged as exported.
- OK - Select to flagged as exported.
- Cancel - Select to exit without marking as exported.
Notes ...
This is usually recommended when initially configuring Swiftpos to Export to XERO for the first time and also, when there is a requirement that all existing General Journal related transactions for a selected Location need to be flagged as exported.
Supplier Invoices Tab ▲ ▼

Used to export completed Supplier Invoice data to XERO
Notes ...
Invoices completed and having the same Posting Date as that of the selected Trading Date, will be selected for Export. Also, DO NOT enter Credit Notes into Swiftpos as negative Supplier Invoices. These DO NOT export to XERO successfully. Instead raise a Credit Note using the Credit Note Type option available when entering Supplier Invoices.
- Venue - Select from the drop-down list the Venue for which data will be exported.
- Location - Select from the drop-down list the Location for which data will be exported.
- Trading Date - Select from the drop-down list of dates the date for which data will be exported and uploaded into XERO using XERO's API.
Notes...
Once exported, the data will be flagged as exported and the date will be removed from the Trading Date drop-down list. This will ensure that the same data is NOT exported multiple times. It is important to note that even though the export for a specific Trading Date may NOT be completely successful, the Trading Date will still be removed from the drop-down list. It is therefore VERY IMPORTANT to always review the Event Logs to ensure that any ERRORS are investigated and resolved in an appropriate manner.
- Export - Select to invoke the export. Once completed a prompt will be displayed confirming completion. All exported Invoices can be viewed in the Event Logs.
Notes ...
If no prompt is displayed and the Export appears to have completed without the selected Trading Date being removed from the list of available dates, this may point to a failure of being able to connect to XERO. Check the Event Logs > Swiftpos Applications > Swiftpos SQL Application for any logging that may have occurred. Refer to Troubleshooting for more information.
- Reset - Select a Trading Date to ensure that Supplier Invoice related transactions for that date are flagged as NOT Exported, so that they can be exported again. Select to display the following prompt:

- Reset continued ...
- Venue - Select from the drop-down list the Venue for which data will be reset.
- Location - Select from the drop-down list the Location for which data will be reset.
- OK - Select to Reset.
- Cancel - Select to exit without Resetting.
Notes ...
When resetting and exporting again, be sure that they DO NOT result in duplicates when imported into XERO.
- Mark ALL as Exported - Select to display the following prompt and thereby ensure ALL Supplier Invoice related data in the selected Location is flagged as exported.

- Mark ALL as Exported continued ...
- Venue - Select from the drop-down list the Venue for which data will be flagged as exported.
- Location - Select from the drop-down list the Location for which data will be flagged as exported.
- OK - Select to flagged as exported.
- Cancel - Select to exit without marking as exported.
Notes ...
This is usually recommended when initially configuring Swiftpos to Export to XERO for the first time and also, when there is a requirement that all existing Supplier Invoice related transactions for a selected Location need to be flagged as exported.
Terminal Cash Offs Tab ▲ ▼

Used to export committed Terminal Cash Off data to XERO
Notes...
Terminal Cash Offs that have not recorded a variance will NOT be available for export.
- Venue - Select from the drop-down list the Venue for which data will be exported.
- Location - Select from the drop-down list the Location for which data will be exported.
- Trading Date - Select from the drop-down list of dates the date for which data will be exported and uploaded into XERO using XERO's API.
Notes...
Once exported, the data will be flagged as exported and the date will be removed from the Trading Date drop-down list. This will ensure that the same data is NOT exported multiple times. It is important to note that even though the export for a specific Trading Date may NOT be completely successful, the Trading Date will still be removed from the drop-down list. It is therefore VERY IMPORTANT to always review the Event Logs to ensure that any ERRORS are investigated and resolved in an appropriate manner.
- Export - Select to invoke the export. Once completed a prompt will be displayed confirming completion. All exported Invoices can be viewed in the Event Logs.
Notes...
If no prompt is displayed and the Export appears to have completed without the selected Trading Date being removed from the list of available dates, this may point to a failure of being able to connect to XERO. Check the Event Logs > Swiftpos Applications > Swiftpos SQL Application for any logging that may have occurred. Refer to Troubleshooting for more information.
- Reset - Select a Trading Date to ensure that Terminal Cash Off related transactions for that date are flagged as NOT Exported, so that they can be exported again. Select to display the following prompt:

- Reset continued ...
- Venue - Select from the drop-down list the Venue for which data will be reset.
- Location - Select from the drop-down list the Location for which data will be reset.
- OK - Select to Reset.
- Cancel - Select to exit without Resetting.
Notes...
When resetting and exporting again, be sure that they DO NOT result in duplicates when imported into XERO.
- Mark ALL as Exported - Select to display the following prompt and thereby ensure ALL Terminal Cash Off related data in the selected Location is flagged as exported.

- Mark ALL as Exported continued ...
- Venue - Select from the drop-down list the Venue for which data will be flagged as exported.
- Location - Select from the drop-down list the Location for which data will be flagged as exported.
- OK - Select to flagged as exported.
- Cancel - Select to exit without marking as exported.
Notes...
This is usually recommended when initially configuring Swiftpos to Export to XERO for the first time and also, when there is a requirement that all existing Terminal Cash Off related transactions for a selected Location need to be flagged as exported.
Settings Screen ▲ ▼

To access, select the Settings option in the XERO Advanced menu in Data Portal. Provides a Venue with the ability to configure the settings required to establish a connection to XERO, as well as import the Chart of Accounts and Tracking Categories from XERO, and assign/map these to Swiftpos Location/Media combinations, Location/Master Group combinations and Locations.
Tabs ▲ ▼
Venues Settings Tab ▲ ▼

Refer HERE for more information.
Grid Section
Displays a list of Venues that are currently available to be selected when exporting to XERO. These are listed along with their:
- Organisation - Displays the XERO Organisation the Venues is associated with.
- Venue ID - Displays Venues's ID.
- Client ID - Displays the Client ID that is being used to establish a connection to the XERO Organisation.
- Client Secret - Displays the Client Secret that is being used to establish a connection to the XERO Organisation.
- Redirect URL - Displays the Redirect URL that is being used to establish a connection to the XERO Organisation.
- Test - Select to initiate a test of the connection credentials entered above.
- Cash Basis Report - Select to ensure the export of data supports Cash Basis Reporting.
Notes ...
When the Cash Basis Report option is selected, XERO Advanced logs will include the text "with the Cash Basis Reporting option selected"
System Tax Type Section
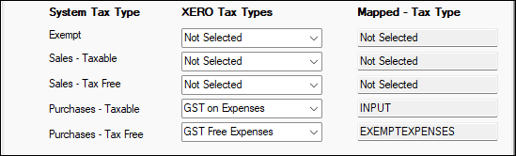
- System Tax Type - Lists the tax types referred to in Swiftpos. Refer HERE for more information.
- XERO Tax Types - XERO tax types listed in the drop-down lists and used to map to the Swiftpos Tax Types. XERO tax types are downloaded from XERO when the Settings screen is loaded.
- Mapped - Tax Types - Lists the mapped tax types.
Refer HERE for more information.
Footer Section
- Add Row - Select to add row in the grid.
- Delete Row - Select to delete the currently selected row in the grid.
- Import Chart of Accounts - Refer HERE for more information.
- Import Tracking Categories - Refer HERE for more information.
Accounts Tab ▲ ▼

Example of the Accounts tab after importing the Chart of Accounts from XERO.
Notes ...
For Venues with multiple Locations, they may consider creating Location specific Accounts in XERO.
Header Section
- By Venues - Select from the drop-down list of available Venues.
Grid Section
Displays a list of XERO Accounts and their attributes as imported from XERO, and which can then be selected when assigning/mapping Accounts in the Account Assignment/Mapping tabs to the right. The grid displays the following columns:
- Xero Account
- Description
- Type
- Tax Type
- Status
Notes ...
The values of the Account attributes listed above are as they were when last imported from XERO. To view the most up to date values, re-import the Chart of Accounts.
Footer Section
- Delete Row - Select to delete the currently selected row in the grid.
Example Of Accounts In XERO
The following can be used as a guide when configuring Accounts in XERO:
| Category | Type | Account | Purpose | Tax Code |
| Asset | Current Asset | Undeposited Funds | An account to which Cash payments/refunds from sales made can be posted. | BAS Excluded |
| Clearing Account | An account to be used as a default account for the assigning/mapping of Swiftpos Location/Media combinations. | BAS Excluded | ||
| Trade Debtors | An Account to which Customer/Member Account Charges/Payments can be posted. | BAS Excluded | ||
| Inventory | Inventory – Accounts to which Stock Adjustments/Stocktake/Purchases/Sales related transaction data can be posted. | BAS Excluded | ||
| Liability | Current Liability | GST Collect/Paid | An Account to which GST Collected and Paid can be posted. | BAS Excluded |
| Revenue | Revenue | Sales | Accounts to which income/revenue from sales made can be credited. | GST on Income |
| Expense | Direct Costs | COGS | Accounts to which the Cost of Goods from sales can be posted. | BAS Excluded |
| Stock Adjustments | Accounts to which Stocktake and Stock Adjustments (Receipts, Adjustments, Damaged Goods, Returns, Promotions and Wastage) generated transaction data can be posted. | BAS Excluded | ||
| Expense | Freight | An Account to which Supplier Invoice related Freight Charges can be posted. | GST Free Expense | |
| Discounts | An Account to which Supplier Invoice related Discounts can be posted. | GST Free Expense | ||
| Rounding | An Account to which Supplier Invoice related Rounding/Misc Charges can be posted. | GST Free Expense | ||
| Surcharges | An Account to which Supplier Invoice related Surcharges can be posted. | GST Free Expense | ||
| Unders & Overs | An Account to which variances in POS Terminal Cash Offs can be posted. | GST Free Expense |
Notes ...
For Venues with multiple Locations, they may choose to create Location specific Accounts. Obviously this list will vary from Venue to Venue and will also be dependent on the Venue's specific Chart of Accounts (Account List). It may be necessary to enlist the assistance/expertise of an accountant to ensure that in XERO, all Accounts are correct and appropriately configured for the Venue.
Account Assignment / Mapping Tabs ▲ ▼
- Media Accounts
- Cost of Sales Accounts
- Sales Accounts
- Purchase Accounts
- Inventory Accounts
- Freight Accounts
- Surcharge Accounts
- Discount Accounts
- Rounding Accounts
- Tax Collected Accounts
- Tax Paid Accounts
Notes...
It is recommended that all rows, in each of the tabs, be assigned/mapped to an Account.
Also, the values of the Tracking Categories listed, in each of the tabs above, are as they were when last imported from XERO. To view the most up to date values, re-import the Tracking Categories. If no Tracking Categories have been configured in XERO then the columns headings, in each of the tabs above, will default to Tracking Category 1 & 2.
Media Clearing Accounts Tab ▲ ▼

Example of Account & Tracking Category (Region & Country columns) assignments/mappings for one Location
Used to assign/map XERO Accounts and/or Tracking Categories to Swiftpos Location/Media combinations.
Header Section
- By Venues - Select from the drop-down list of available Venues.
- Clearing Account - Select from the drop-down list the XERO Account that will be used to assign/map to the Swiftpos Location/Media combination.
Apply To
Use to assign/map the selected XERO Account to the rows in the grid by using one of the following options:
- Selected Rows - Select to assign/map to all rows that are currently selected in the grid.
- Unassigned Rows - Select to assign/map to all rows that are currently DO NOT have an Account assigned/mapped in the grid.
- Selected Location - Select to assign/map to all rows in the grid that are associated with a selected Location.
- Copy Location - Select to copy the assignments/mappings of a selected Location to another.
Grid Section
Displays a list of Location/Media combinations that are required to be assigned/mapped to a XERO Account and/or Tracking Categories.
- Location - Displays the Swiftpos Location.
- Media - Displays the Swiftpos Media.
- Clearing Account - Displays/Select the XERO Account from the drop-down list that is to be assigned/mapped to the Swiftpos Location/Media combination.
- Region (Tracking Category 1) - Displays/Select the XERO Tracking Category from the drop-down list that is to be assigned/mapped to the Swiftpos Location/Media combination.
- Country (Tracking Category 2) - Displays/Select the XERO Tracking Category from the drop-down list that is to be assigned/mapped to the Swiftpos Location/Media combination.
Cost Of Sales Accounts Tab ▲ ▼

Example of Account assignments/mappings for one Location
Used to assign/map XERO Cost of Sales Accounts and/or Tracking Categories to Swiftpos Location/Master Group combinations.
Header Section
Refer HERE for more information.
Apply To
Refer HERE for more information.
Grid Section
Displays a list of Location/Master Group combinations that are required to be assigned/mapped to a XERO Cost of Sales Account and/or Tracking Categories.
- Location - Displays the Swiftpos Location.
- Master Group - Displays the Swiftpos Master Group.
- Cost of Sales Account - Displays/Select the XERO Cost of Sales Account from the drop-down list that is to be assigned/mapped to the Swiftpos Location/Master Group combination.
- Region (Tracking Category 1) - Displays/Select the XERO Tracking Category from the drop-down list that is to be assigned/mapped to the Swiftpos Location/Media combination.
- Country (Tracking Category 2) - Displays/Select the XERO Tracking Category from the drop-down list that is to be assigned/mapped to the Swiftpos Location/Media combination.
Sales Accounts Tab ▲ ▼

Example of Account assignments/mappings for one Location
Used to assign/map XERO Sales Accounts and/or Tracking Categories to Swiftpos Location/Master Group combinations.
Header Section
Refer HERE for more information.
Apply To
Refer HERE for more information.
Grid Section
Displays a list of Location/Master Group combinations that are required to be assigned/mapped to a XERO Sales Account and/or Tracking Categories.
- Location - Displays the Swiftpos Location.
- Master Group - Displays the Swiftpos Master Group.
- Sales Account - Displays/Select the XERO Sales Account from the drop-down list that is to be assigned/mapped to the Swiftpos Location/Master Group combination.
- Region (Tracking Category 1) - Displays/Select the XERO Tracking Category from the drop-down list that is to be assigned/mapped to the Swiftpos Location/Media combination.
- Country (Tracking Category 2) - Displays/Select the XERO Tracking Category from the drop-down list that is to be assigned/mapped to the Swiftpos Location/Media combination.
Purchase Accounts Tab ▲ ▼

Example of Account assignments/mappings for one Location
Used to assign/map XERO Purchase Accounts and/or Tracking Categories to Swiftpos Location/Master Group combinations.
Header Section
Refer HERE for more information.
Apply To
Refer HERE for more information.
Grid Section
Displays a list of Location/Master Group combinations that are required to be assigned/mapped to a XERO Purchase Account and/or Tracking Categories.
- Location - Displays the Swiftpos Location.
- Master Group - Displays the Swiftpos Master Group.
- Purchase Account - Displays/Select the XERO Purchase Account from the drop-down list that is to be assigned/mapped to the Swiftpos Location/Master Group combination.
- Region (Tracking Category 1) - Displays/Select the XERO Tracking Category from the drop-down list that is to be assigned/mapped to the Swiftpos Location/Media combination.
- Country (Tracking Category 2) - Displays/Select the XERO Tracking Category from the drop-down list that is to be assigned/mapped to the Swiftpos Location/Media combination.
Inventory Accounts Tab ▲ ▼

Example of Account assignments/mappings for one Location
Used to assign/map XERO Inventory Accounts and/or Tracking Categories to Swiftpos Location/Master Group combinations.
Header Section
Refer HERE for more information.
Apply To
Refer HERE for more information.
Grid Section
Displays a list of Location/Master Group combinations that are required to be assigned/mapped to a XERO Inventory Account and/or Tracking Categories.
- Location - Displays the Swiftpos Location.
- Master Group - Displays the Swiftpos Master Group.
- Inventory Account - Displays/Select the XERO Inventory Account from the drop-down list that is to be assigned/mapped to the Swiftpos Location/Master Group combination.
- Region (Tracking Category 1) - Displays/Select the XERO Tracking Category from the drop-down list that is to be assigned/mapped to the Swiftpos Location/Media combination.
- Country (Tracking Category 2) - Displays/Select the XERO Tracking Category from the drop-down list that is to be assigned/mapped to the Swiftpos Location/Media combination.
Freight Accounts Tab ▲ ▼

Example of Account assignments/mappings for one Location
Used to assign/map XERO Freight Accounts and/or Tracking Categories to Swiftpos Locations.
Header Section
Refer HERE for more information.
Apply To
Refer HERE for more information.
Grid Section
Displays a list of Locations that are required to be assigned/mapped to a XERO Freight Account and/or Tracking Categories.
- Location - Displays the Swiftpos Location.
- Freight Account - Displays/Select the XERO Freight Account from the drop-down list that is to be assigned/mapped to the Swiftpos Location.
- Region (Tracking Category 1) - Displays/Select the XERO Tracking Category from the drop-down list that is to be assigned/mapped to the Swiftpos Location/Media combination.
- Country (Tracking Category 2) - Displays/Select the XERO Tracking Category from the drop-down list that is to be assigned/mapped to the Swiftpos Location/Media combination.
Surcharge Accounts Tab ▲ ▼

Example of Account assignments/mappings for one Location
Used to assign/map XERO Surcharge Accounts and/or Tracking Categories to Swiftpos Locations.
Header Section
Refer HERE for more information.
Apply To
Refer HERE for more information.
Grid Section
Displays a list of Locations that are required to be assigned/mapped to a XERO Surcharge Account and/or Tracking Categories.
- Location - Displays the Swiftpos Location.
- Surcharge Account - Displays/Select the XERO Surcharge Account from the drop-down list that is to be assigned/mapped to the Swiftpos Location.
- Region (Tracking Category 1) - Displays/Select the XERO Tracking Category from the drop-down list that is to be assigned/mapped to the Swiftpos Location/Media combination.
- Country (Tracking Category 2) - Displays/Select the XERO Tracking Category from the drop-down list that is to be assigned/mapped to the Swiftpos Location/Media combination.
Discount Accounts Tab ▲ ▼

Example of Account assignments/mappings for one Location
Used to assign/map XERO Discount Accounts and/or Tracking Categories to Swiftpos Locations.
Header Section
Refer HERE for more information.
Apply To
Refer HERE for more information.
Grid Section
Displays a list of Locations that are required to be assigned/mapped to a XERO Discount Account and/or Tracking Categories.
- Location - Displays the Swiftpos Location.
- Discount Account - Displays/Select the XERO Discount Account from the drop-down list that is to be assigned/mapped to the Swiftpos Location.
- Region (Tracking Category 1) - Displays/Select the XERO Tracking Category from the drop-down list that is to be assigned/mapped to the Swiftpos Location/Media combination.
- Country (Tracking Category 2) - Displays/Select the XERO Tracking Category from the drop-down list that is to be assigned/mapped to the Swiftpos Location/Media combination.
Rounding Accounts Tab ▲ ▼

Example of Account assignments/mappings for one Location
Used to assign/map XERO Rounding Accounts and/or Tracking Categories to Swiftpos Locations.
Header Section
Refer HERE for more information.
Apply To
Refer HERE for more information.
Grid Section
Displays a list of Locations that are required to be assigned/mapped to a XERO Rounding Account and/or Tracking Categories.
- Location - Displays the Swiftpos Location.
- Rounding Account - Displays/Select the XERO Rounding Account from the drop-down list that is to be assigned/mapped to the Swiftpos Location.
- Region (Tracking Category 1) - Displays/Select the XERO Tracking Category from the drop-down list that is to be assigned/mapped to the Swiftpos Location/Media combination.
- Country (Tracking Category 2) - Displays/Select the XERO Tracking Category from the drop-down list that is to be assigned/mapped to the Swiftpos Location/Media combination.
Tax Collected Accounts Tab ▲ ▼

Example of Account assignments/mappings for one Location
Used to assign/map XERO Tax Collected Accounts and/or Tracking Categories to Swiftpos Locations.
Header Section
Refer HERE for more information.
Apply To
Refer HERE for more information.
Grid Section
Displays a list of Locations that are required to be assigned/mapped to a XERO Tax Collected Account and/or Tracking Categories.
- Location - Displays the Swiftpos Location.
- Tax Collected Account - Displays/Select the XERO Tax Collected Account from the drop-down list that is to be assigned/mapped to the Swiftpos Location.
- Region (Tracking Category 1) - Displays/Select the XERO Tracking Category from the drop-down list that is to be assigned/mapped to the Swiftpos Location/Media combination.
- Country (Tracking Category 2) - Displays/Select the XERO Tracking Category from the drop-down list that is to be assigned/mapped to the Swiftpos Location/Media combination.
Tax Paid Accounts Tab ▲ ▼

Example of Account assignments/mappings for one Location
Used to assign/map XERO Tax Paid Accounts and/or Tracking Categories to Swiftpos Locations.
Header Section
Refer HERE for more information.
Apply To
Refer HERE for more information.
Grid Section
Displays a list of Locations that are required to be assigned/mapped to a XERO Tax Paid Account and/or Tracking Categories.
- Location - Displays the Swiftpos Location.
- Tax Paid Account - Displays/Select the XERO Tax Paid Account from the drop-down list that is to be assigned/mapped to the Swiftpos Location.
- Region (Tracking Category 1) - Displays/Select the XERO Tracking Category from the drop-down list that is to be assigned/mapped to the Swiftpos Location/Media combination.
- Country (Tracking Category 2) - Displays/Select the XERO Tracking Category from the drop-down list that is to be assigned/mapped to the Swiftpos Location/Media combination.
End of article ▲