
This outlines How To Export From Swiftpos Into XERO using either the Swiftpos XERO Basic or XERO Advanced interface GL Interfaces.
Subjects ▲ ▼
When Is It Required? ▲ ▼
This is generally required when:
- Venues want to export Swiftpos Sale, Stock Movement, Supplier Invoice and Terminal Cash Off Variance related data to XERO via the XERO API.
To Be Considered ▲ ▼
- Prior to exporting for the first time, it may be necessary to ensure that all transactions to date are flagged as exported. Previous years transactions may not need to be exported and therefore will need to be flagged as exported. This can be done by using the Mark ALL as Exported buttons in the Export screen in XERO Basic or in XERO Advanced.
- Once all transactions have been flagged as exported, then reset transactions for the specific dates that need to be exported to XERO. This can be done using the Reset buttons in the Export screen in XERO Basic or in XERO Advanced.
How To Export From Swiftpos Into XERO? ▲ ▼
The exporting of General Journals, Supplier Invoices and/or Terminal Cash Offs can be done in either of the following ways:
- Manually
- Automatically (via the End of Day process)
Refer to examples in XERO Basic or in XERO Advanced to see examples of exported data in XERO.
Manually ▲ ▼
To export data from Swiftpos XERO Basic to XERO manually, do as follows:
- Ensure the steps outlined in GET STARTED in XERO Basic or in XERO Advanced have been addressed.
- In the Export screen in XERO Basic or in XERO Advanced:
- In either the General Journals, Supplier Invoices and/or Terminal Cash Offs sections, select:
- Venue from the drop-down list for which data is to be exported.
- Location from the drop-down list for which data is to be exported.
- Trading Date from the drop-down list for which data is to be exported.
- Export button to commence the exporting of data to XERO.
- After each Export check the Event Logs (Swiftpos Applications > Swiftpos SQL Application) for any errors.
- Refer to Troubleshooting in XERO Basic or in XERO Advanced.
- In either the General Journals, Supplier Invoices and/or Terminal Cash Offs sections, select:
Automatically ▲ ▼
To export data from Swiftpos to XERO automatically, do as follows:
- Ensure the steps outlined in GET STARTED in XERO Basic or in XERO Advanced have been addressed.
- In the End of Day Options screen ensure the XERO Export option is selected for the Venues for which transactions will be exported.
- Confirm the End of Day Run Time is correctly configured.
- Ensure the End of Day service is running.
- The first time the End of Day runs, check the Event Logs > Swiftpos Services > End of Day Services. An example of the entries expected to be seen in the Event Log is shown below:
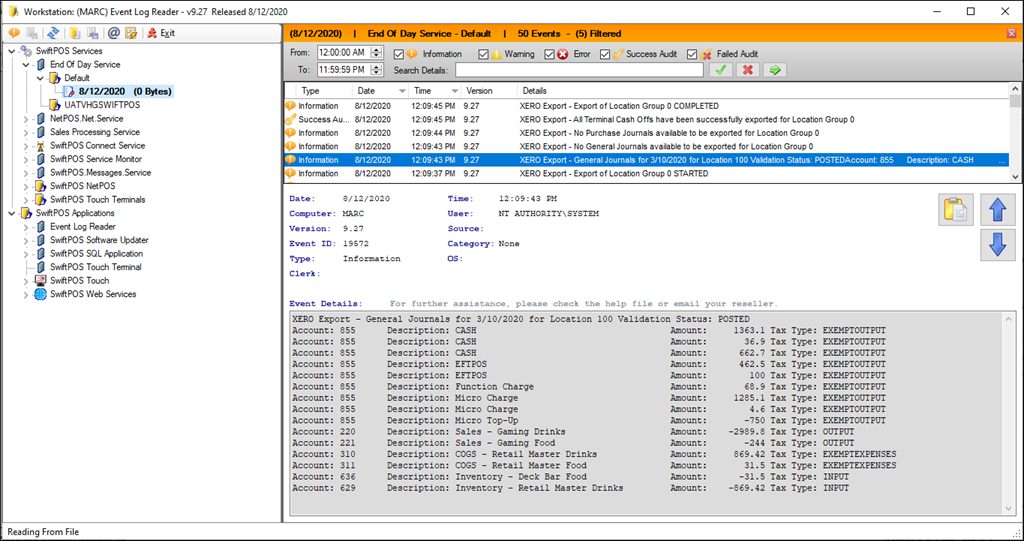
- If after the End Of Day process has run and Trading Dates, that were expected to be exported, are still listed as available dates in the Trading Date drop-down lists in any of the 3 Export sections, this may point to a failure to establish a connection to XERO. Check the Event logs and refer to Troubleshooting in XERO Basic or in XERO Advanced for more information. For example:

Notes...
The first time the XERO Export runs successfully as part of the End of Day process, all Transactions that are NOT flagged as Exported, will be exported and uploaded into XERO. This will mean that immediately after the EOD has processed, there should not be any Trading Dates available for export, when viewed in the Export screen in XERO Basic or in XERO Advanced, for each of the Venues that have the XERO Export option selected in the End of Day Options screen.
End of article ▲