
Accessed from various configuration screens in Touch. Used to configure the header/footer settings for Floor, Kitchen, Order, Raffle Ticket Barrel and Receipt printers. The settings outlined in this article are only available when the graphical printing option has been selected against the printer in Touch. Refer HERE for non-graphical mode information.
Subjects ▲ ▼
About ▲ ▼
What Is Required? ▲ ▼
- Swiftpos v10+
- Requires USB or Ethernet printers - We do not recommend RS232 because they are too slow.
What To Consider? ▲ ▼
-
There are two methods of printing namely, graphical and non-graphical. Refer HERE for more information.
- It is recommended that Venues with more than one Touch terminal, configure their printers in the Back Office HERE.
When Is It Used? ▲ ▼
Used to configure the header, footer and language options when printing dockets, receipts and tickets in graphical mode in Touch.
Sections ▲ ▼
Tabs Section ▲ ▼
![]()

Used to configure the header section of printed dockets, receipts and tickets.
- Add Item - Select to add an item/Print Field onto the docket. The item/Print Field is added with default settings and size.
- Add Picture - Select to add an image. The maximum width in pixels is 420.
- Copy Item - Select to copy the currently selected item.
- Delete Item - Select to delete the currently selected item. Both images and text can be deleted.
- Item Details - Below is a list of item details that are available for edit:
- Text - Select to adjust the text that will appear in the item. Can be used to add dynamic text like Table Number or Customer Name. Text entered cannot exceed 4000 characters.
- Bold - Select to ensure the test is displayed as bold.
- Text Size Buttons - Select to adjust the text size of the item.
- Text Colour - Select from the following to set the colour of the text:
- Text Align - Select to adjust the alignment of the item.
- Conditional - Select from the drop-down list to add one of the following conditions to the currently selected print item:
- CUSTOMER - Select to ensure that the selected print item will only be printed if the order/sale has a Customer/Member associated with it.
- TABLE - Select to ensure that the selected print item will only be printed if the order/sale is related to a Table.
- ORDER - Select to ensure that the selected print item will only be printed if the order/sale is related to a phone/web order.
- HOLD - Select to ensure that the selected print item will only be printed if this is a held order/sale.
- EVENT - Select to ensure that the selected print item will only be printed if the order/sale is related to an event.
- ITEM HAS VALUE - Select to ensure that the selected print item will only be printed if ANYONE of the Print Fields entered into the Text field above, has a value. If all of then DO NOT have a value, then the selected print item will NOT be printed.
Notes ...
This only applies to any text type Print Field. For example, {Booking Name} {Clerkname}. It does NOT apply to Print Fields that are numbers.
Notes ...
It is recommended that items that have conditions should appear on a line on their own OR if necessary, share a line with another item that has the same condition. This of course does not apply to the NOT Empty condition.
- Item Details continued ...
- Move and Size Arrows - Select to adjust the size and position of the item on the docket.
- Set as Normal Barcode - Select to ensure the selected item is printed as a normal barcode on the receipt.
- Set as 2D Barcode - Select to ensure the selected item is printed as a 2D barcode on the receipt.
- 2D Barcode Size - Displays/Set the size the 2D barcodes will be printed at.

Used to configure the footer section of printed dockets, receipts and tickets. For information regarding the configuration options available refer HERE.

Notes ...
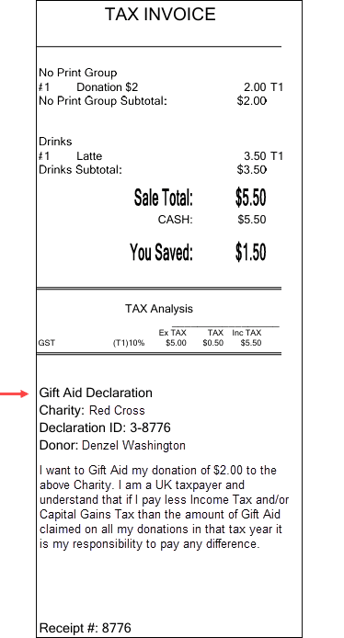
This tab will only be visible if the Enable Gift Aid for Terminal option is selected in Touch.
Used to configure the Gift Aid declaration to be printed as part of the Receipt. For information regarding Gift Aid UK refer HERE. For information regarding the configuration options available refer HERE.
Example

This tab will only be visible when a Kitchen Printer peripheral is selected. Used to configure the the detail section of kitchen dockets.
With the exception of the following configuration option, refer HERE for information regarding the other options:
- Qty Field Length - Select from the drop-down list on of the sizes to increase/decrease the length of the Qty field (printed on the docket) as required. Qty's that require decimals may need the Qty's field length increased to cater for the decimals to be printed on the docket. For example, 62.75.

Used to select what languages are to be used when dockets, receipts and tickets. If none is selected then English will be used by default. Refer HERE for more information. Also. the ability to print dual languages on receipts has been added. For example:

Refer HERE. to configure the translations for various print items printed on receipts.
Footer Section ▲ ▼
![]()
- Layby Terms - Select to add terms and conditions relating to laybys that need to appear on printed dockets.
- Add Length - Select to increase the length of the docket.
- Reduce Length - Select to reduce the length of the docket.
- Fill with Defaults - Select to clear all items in the Header/Footer sections and then insert the default items. The defaults are determined based on the Venue's current Registration.
End of article ▲