Subjects ▲ ▼
About ▲ ▼
What Is Required? ▲ ▼
- Touch will need to be installed and operational.
- Ensure a Receipt Printer has been added as a peripheral to Touch. Refer HERE for more information.
What To Consider? ▲ ▼
- It is recommended that Venues with more than one Touch device, configure their print devices in the Back Office HERE.
When Is It Used? ▲ ▼
Used to configure the settings for printing receipts/tax invoices. More than 1 is allowed.
Examples ▲ ▼

This is a sample of a receipt showing the use of the following settings:
How To? ▲ ▼
Screens ▲ ▼
Customer Receipt Settings Screen ▲ ▼

To access, select the Customer Details option in the footer section of the Receipt Printer screen. Used to configure whether Customer/Member's, Account and Loyalty details are printed or not, and what details must be printed.
- Print Customer Details on Receipt - Select to ensure the Customer/Member's details are printed on the Order Print.
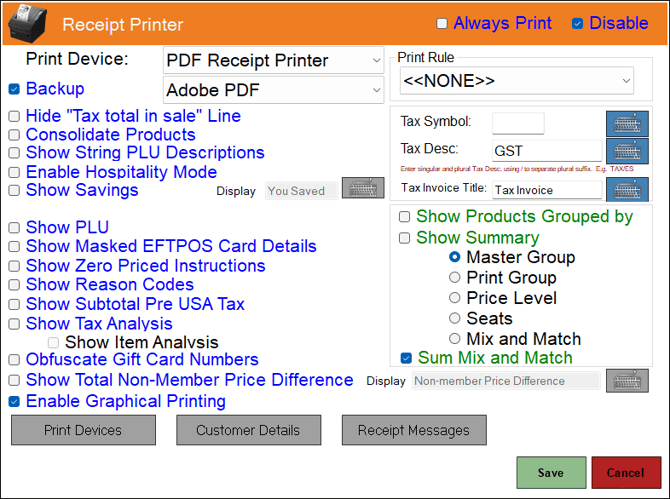
Receipt Printer Screen ▲ ▼
To access, select the Receipt Printer option from the Peripheral Type drop-down list in the Add New Peripheral screen, and then enter an appropriate Description for the peripheral being added (For example, Receipt Printer) and select OK. The above screen will then be displayed. Used to configure/manage/view Receipt print devices for Touch.
![]()
- Always Print - Select to ensure receipts are always printed even when the Receipt option is off. Mostly used for security screen overlays.
- Disabled - Toggle select to enable/disable the print device.
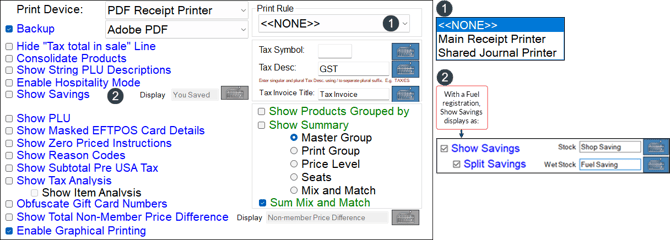
- Print Device - Select from the drop-down list the print device for printing receipts/tax invoices.
- Backup - Select from the drop-down list the print device to be designated as the backup print device. Refer HERE for more information.
- Hide "Total tax in sale" Line - Select to ensure the "Totals Include" line will not be printed on the receipt.
- Consolidate Products - Select to combine the same items/products together and show a combined total. For example:
|
NOT SELECTED |
SELECTED |
|
*Lindaur NZ Brut Glass 150ml 5.50 T1 *Lindaur NZ Brut Glass 150ml 5.50 T1 |
*Lindaur NZ Brut Glass 150ml 2 @ $5.50 $11.00 T1 |
- Show String PLU Description - Select to ensure the description of the string PLU product is printed on the receipt.
|
NOT SELECTED |
SELECTED |
|
Pumpkin Soup |
Soup of the Day Pumpkin Soup |
- Enable Hospitality Mode - Select enable Hospitality mode, which will result in the length of the receipt being reduced by printing as follows:
|
NOT SELECTED |
SELECTED |
|
|
|


Notes ...
Hospitality Mode should NOT be used for NMI or QuickFuel Modes.
- Show Savings - Select to print the total savings a Customer/Member has received if Products are sold at a different Price Level to the normal Price level in the current sale. A Savings line will be printed at the end of the receipt. You can also enter the label to display against the savings.
- Split Savings - Select to show Savings split between non-WetWet Stock items and Wet Stock items. Useful for fuel outlets that want to distinguish Fuel savings from Shop (retail outlet) savings on their receipts. Once selected enter the label that will appear on the receipts for each of the savings types (Stock and Wet Stock).
- Show PLU - Select to ensure the PLU Number is printed.
- Show Masked EFTPOS Card Details - Select to print the Credit Card details in a masked format (that is, not all the digits of CC number will be printed).
- Show Zero Priced Instructions - Select to ensure Instructions with a value of zero are printed. This is to ensure instructions like Medium Rare or Chilli Sauce are printed on the receipt.
|
NOT SELECTED |
SELECTED |
|
Rump Steak 24.20 |
Rump Steak 24.20 Medium Rare 0.00 Chilli Sauce 0.00 |
- Show Reason Codes - Select to print Reason Codes.
- Show Subtotal Pre USA Tax - Select to ensure a subtotal is printed that does not include USA taxes.
- Show Tax Analysis - Select to print a summary of the Tax applied to the sale. Refer HERE for an example.
- Show Item Analysis - Select to ensure the Tax Analysis section at the bottom of the receipt prints the tax items (T1, T2, etc) separately.
- Obfuscate Gift Card Numbers - Select to ensure Gift Card Numbers are partially visible, with part of it hidden. For example:

- Show Total Non-Member Price Difference - Select to display the price difference between the Location's Default Price Level & Base Member Price configured HERE. For example:

Notes ...
This option is only applied when graphical printing is enabled. Also, it currently does not support with Promotions and Discounts.
- Enable Graphical Printing - Select to ensure the print device is in graphical mode. This is mandatory if printing in languages other than English is required. Refer HERE for graphical and HERE for non-graphical printing.
- Synchronise with Back Office - Select from the drop-down list the Back Office option from which this print device will inherit it's settings. Any changes made to their settings in Back Office will automatically be applied when the Touch device receives an update. This option is only available to Windows Printers with the Graphical Printing option selected.
- Tax Symbol - Displays/Enter the character symbol that will prefix each sale item on the receipt that has had Tax applied. Select the keyboard icon to enter a character. Refer HERE for an example.
- Tax Desc - Displays/Enter the description to be used when printing tax amounts on the receipt.
- Tax Invoice Title - Displays/Enter the text that will be used to print as the title (using the {Docket Type} printer field) on the receipt. For example:

- Show Products Grouped By - Select to group the Products on the receipt by one of the following:
- Master Group
- Print Group
- Price Level
- Seats
- Mix and Match
- Refer HERE for examples of receipts.
- Show Summary - Select to print totals on the bottom of the receipt for the Groups selected above. Refer HERE for an example.
- Sum Mix and Match - Select to ensure that MnM Discounts are totalled and reported as a single line entry on receipts. For example:


- Printers - Select to open the Printing Devices screen to configure print devices.
- Customer Details - Select to open the Customer Receipt Settings screen and configure the Customer/Member's details to be printed.
- Receipt Messages - Select to open the Header/Footer screen to configure receipts. Refer HERE for graphical and HERE for non-graphical printing information. Header/Footers can also be configured for peripherals set up in the Back Office.
End of article ▲