This provides an overview of the Multi Link (#999) POS Key. Refer HERE for more information.
Subjects ▲ ▼
About ▲ ▼
What Is Not Supported? ▲ ▼
- This POS Key is NOT supported in Orderaway.
What Is Required? ▲ ▼
- Swiftpos v10+
- Ensure this POS Key is added to the appropriate Keyboard Layout using the Designer. Refer HERE for more information.
What Is Supported? ▲ ▼
- This POS Key is supported in Touchmini, and is mainly used for the selling of a package of Products to support the stocking of a fridge in a Suite (Area) associated with an Event Session. It is however, limited to only supporting the linking of Product POS Keys. Refer HERE for more information.
What To Consider? ▲ ▼
- If required, access to this POS Key can be restricted by the Clerk Security feature.
When Is It Used? ▲ ▼
Used to link multiple POS Keys so they function as a single POS Key in Touch. It can be used to combine any combination of Finalise, Function, Layout, Product and Special Function POS Keys.
How To? ▲ ▼
GET STARTED? ▲ ▼
Given the flexibility of this POS Key and the numerous ways it can be configured, an example is given here to configure this POS Key for Touch to support the application of applying a 10 % discount to all items in a sale that have not already been discounted.
- Review About and ensure the steps outlined HERE are addressed.
- In Keyboard Designer, select the Multi Link (#999) POS Key that has been added to a Layout.
- Ensure it is given an appropriate Caption. For example, 10% Sale Discount.
- Select the More Settings option to display the Settings screen and configure as required.
- Select the Multi Link Events option to open the Multi Link Events screen.
- Select the Add Link option to open the MultiLink Button Settings screen.
- Select the Function option from the Link Type drop-down list.
- Using the Search option opposite the Link Item, locate and select the Subtotal function key.
- Select the Additional Settings option to configure any settings required for the Subtotal function.
- Select OK to add the Subtotal function as a Link Event to the grid.
- Select the Add Link option again.
- Select the Function option from the Link Type drop-down list.
- Using the Search option opposite the Link Item, locate and select the Discount function key.
- Select the Additional Settings option to configure any settings required for the Discount function.
- Select OK to add the Discount function as a Link to the grid.
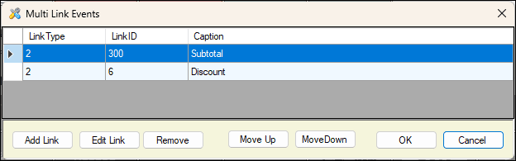
Example of the Multi Link Events screen configured for a 10% Sales Discount
- Save the changes.
- Once configured, ensure a Full Update is sent to all the Touch devices that will be using the POS Key. Refer HERE for more information.
Notes ...
In this example, the 10% Sale Discount will only be applied to those items that have NOT been discounted in the sale.
Screens ▲ ▼
Multilink Button Settings Screen ▲ ▼
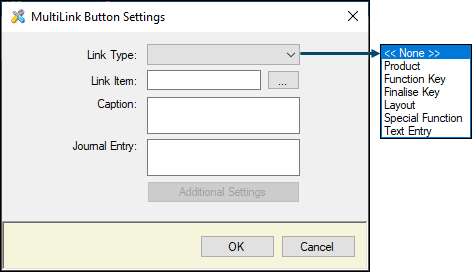
Accessed by selecting the Add Link option or the Edit Link option.
- Link Type - Select from the drop-down list one of the types of POS Keys to add as a link.
- Link Item - Select the search option to the right of the Link Item field, to open the search screen to select either a Finalise/Function/Product/Special Function or Layout item or drag and drop them from the Quick Buttons menu onto the Keyboard.
- Caption - Displays/Enter a caption as is appropriate.
- Journal Entry - Sets the text displayed in the Sales Grid when this key is used.
- Additional Settings - Select to configure any additional settings required for the selected Linked Event. This will vary depending on the Linked POS Key selected via the Link Type and Item. Refer to POS Keys for more information.
- OK - Select to save any changes and exit.
- Cancel - Select to exit without saving.
Multi Link Events Screen ▲ ▼

Accessed by selecting the Multi Link Events option in Keyboard Designer when this POS Key is selected.
- Add Link - Select to open the Multilink Button Settings screen and add a Linked Event. Once added it will appear in the grid.
- Edit Link - Select to open the Multilink Button Settings screen and edit the selected Linked Event in the grid.
- Remove - Select to delete the selected Linked Event.
- Move Up/Down - Select to move the selected Linked Event in the grid up/down.
- OK - Select to save any changes and exit.
- Cancel - Select to exit without saving.
Notes ...
Linked Events will be processed in top/down order as they appear in the grid.
Settings Screen ▲ ▼

- Apply Qty to all products - Select to ensure the quantity specified at the time of ordering/selling is applied to all Products that are included in as Multi Link Events.
End of article ▲