To access, select the Customers menu option in Terminal Settings. Used to configure Customer/Member related settings. Such settings include how Customer/Members are validated and what Customer/Member details are displayed in the sales grid in Touch.
Tabs ▲ ▼
- Add/Edit Members
- Customer Facing Display
- Misc
- Offline Members
- Sales Grid
- Search
- Status Info
- Validation
Add/Edit Members Tab ▲ ▼
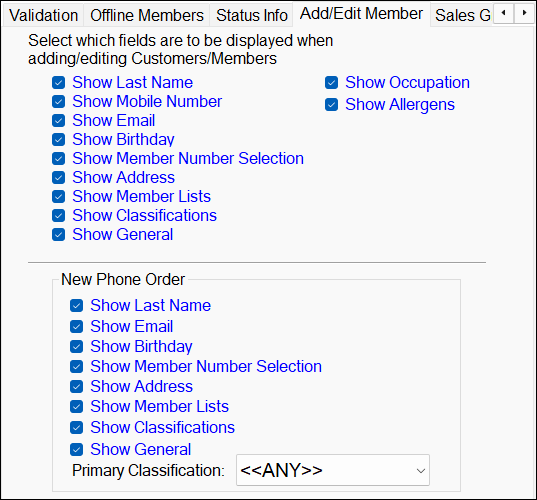
Used to determine what fields will appear on the Customer Details/New Customer screen when adding/editing a Customer/Member in Touch.
Adding/Editing Customers/Members Section
Used to determine what fields will appear on the Customer Details and New Customer screens when adding/editing a Customer/Member in Touch.
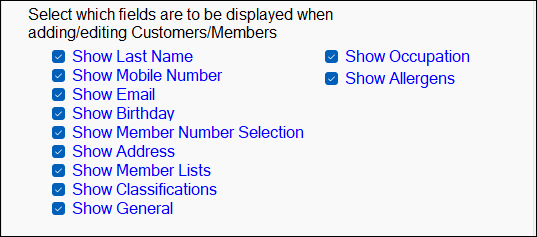
Notes ...
If no options are selected, then by default the First Name will be displayed. For example:
New Phone Order Section
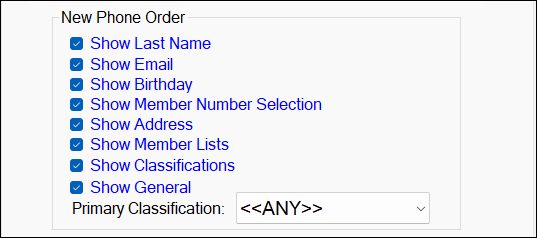
Used to determine what fields will appear on the Order Customer screen when taking a new Phone Order from a Customer that is a Non-Member.
Noteworthy
- Primary Classification - Select from the drop-down list of available Classifications the default Classification to be assigned to non-Member Customers created when taking a Phone Order.
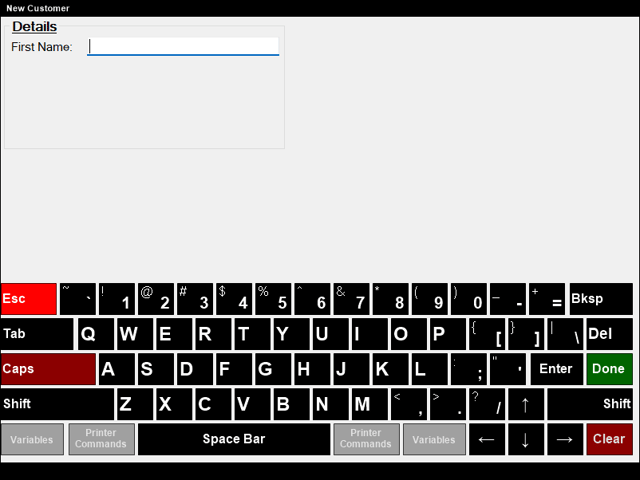
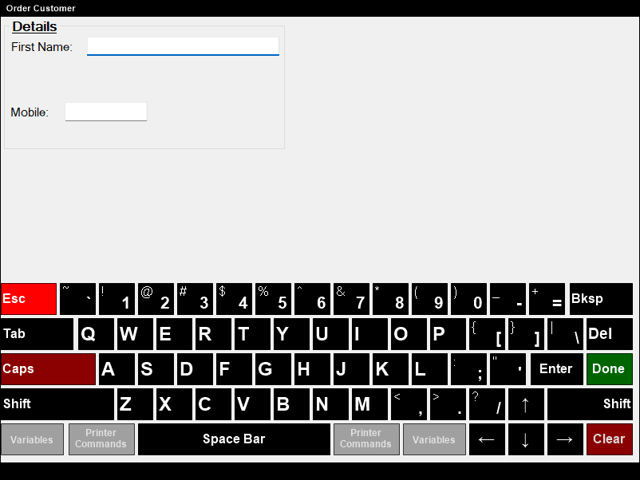
Notes ...
If no options are selected, then by default the First Name and Mobile No field will be displayed. For example:
Customer Facing Display Tab ▲ ▼
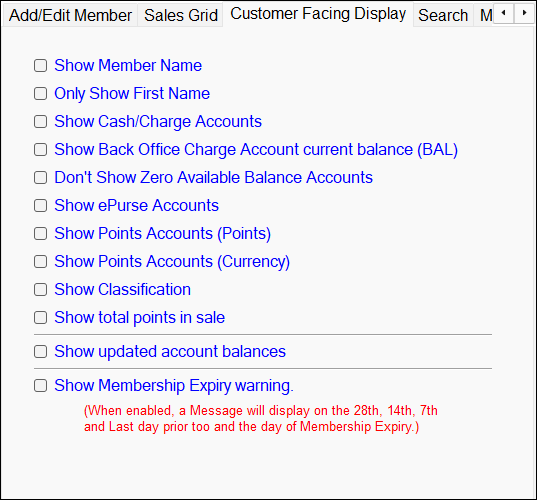
Used to determine what is displayed on the Customer facing display when a Customer/Member is added to an order/sale in Touch. The format of how the Customer/Member's name is displayed is set HERE for each Location Group (Venue) or select the Only Show First Name option above.
Misc Tab ▲ ▼
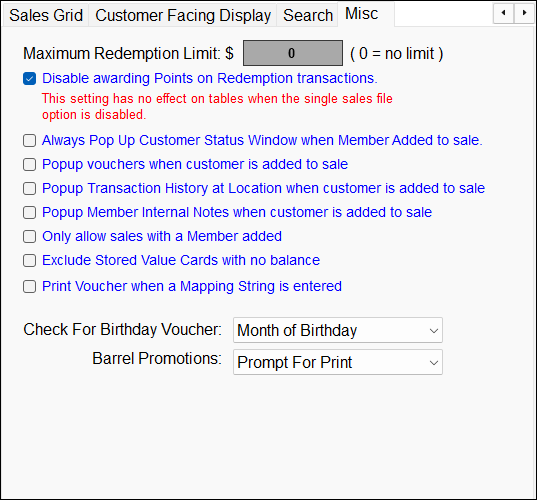
- Maximum Redemption Limits $ - Enter the maximum amount Customers/Members can redeem in a single order/sale.
- Disable awarding Points on Redemption transactions - Toggle select to enable/disable the awarding of Points to Customers/Members when an order/sale is being finalised and Points Redemption (Media type 529 - Points Redemption) is being used to either fully or partially finalise the order/sale.
Notes ...
When selected this option will override any setting configured for the Media type 529 - Redemption in the Media Award Points screen.
- Always pop up Customer Status Window when Member added to the sale - Select this to ensure the Customer/Member's Account Status information is displayed whenever a Customer/Member swipes their card.
- Print Transactions - Select to open Calendar popups to select a From/To Date and Time range of the Transactions required to be printed. A sample of the printed Transactions can be seen here.
- Popup vouchers when customer is added to sale - Select to ensure the Member Vouchers screen (as seen below) pops up displaying all the outstanding Vouchers for the Customer/Member when they are added to the sale.
- Popup Transaction History at Location when customer is added to sale - Select to ensure that the Last Member Sales in Location screen is displayed to provide the option of adding items/products from previous sales to the order/sale.
- Popup Member Internal Notes when customer is added to sale - Select to ensure any Internal Notes recorded against the selected Customer/Member are displayed. For example:
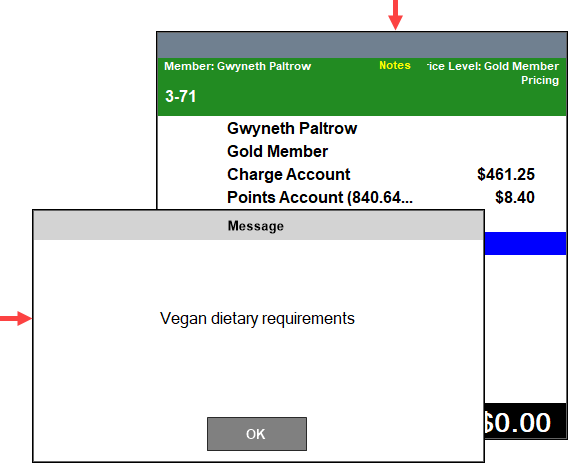
Notes ...
Also, the text Notes in the Header section of the sales grid can also be selected to display the Internal Notes.
- Only allow sales with a Member added - Select to ensure that a Customer/Member must always be added to sale prior to any item being sold.
- Exclude Stored Value Cards with no balance - Select to ensure Stored Value Vouchers with a balance of zero are not displayed.
- Print Voucher when a Mapping String is entered - Select to ensure that the Voucher is printed even though a Mapping String has been entered.
Notes ...
In general, it is NOT recommended to have this option selected.
- Check For Birthday Validity - Select to choose from the drop-down list one of the following checks regarding a Customer/Member's birthday:
- Day of Birthday
- Week of Birthday
- Month of Birthday
- Barrel Promotions - Select from the drop-down list one of the following:
- Just Earn - Select to ensure Barrel Draw tickets will only be displayed as earned and not printed.
- Print - Select to ensure Barrel Draw tickets will always be printed for a Barrel Draw. The Barrel Draw Printer will need to be configured HERE.
- Prompt for Print - Select to ensure a prompt is displayed confirming the printing of Barrel Draw tickets for a Barrel Draw.
Offline Members Tab ▲ ▼

Used when the Touch terminal is offline (due to technical issues) and when there is a requirement to provide to Customers/Members limited functions, such as earn points.
-
Offline Members - Selected will ensure that Customer/Members earn points according to the Classification selected. However, account charge and point redemption and other Member functions will not be available while the Touch terminal is offline (regardless of whether this option is selected or not). If the host is offline, the only options are to hold the order/sale or to finalise it to a TAB. Once Touch is online again the order/sale or TAB can be finalised. When selected the following options are enabled:
- Display Name - Select the keyboard icon to enter the name that will be displayed in the sales grid when a Customer/Member's card is swiped and when the Touch terminal is offline.
- Classification - Select from the drop-down list the Classification that is to be defaulted to when the Touch terminal is offline. The Classification selected will determine the Price Level used to charge the offline Customer/Member only.
- Keep local copy of Members - Select to ensure a local (Touch terminal) copy of the Member details are kept, in order to support the processing of Member's when the NetPOS service is not running.
Notes ...
The data stored locally is depersonalised. That is, it has had address, phone, email and other person identifying information removed.
- Offline Members continued ...
- Keep local copy of Members continued ...
- Enforce Local Member Balance - Select to ensure that when processing an account charge and the NetPOS service is not running, the Member's Account Balance will be retrieved from the locally kept Member's details and used to determine if there are sufficient funds available. Upon completion, the locally kept Member's Account Balance will be updated.
- Keep local copy of Members continued ...
Notes ...
This only applies to the Account Charge (#90) POS Key. The Offline Account Charge (#195) POS Key (#195) will process all charges regardless of the Member's account balance. The Charge / Redemption (#151) POS Key will validate and prevent the charge from proceeding when insufficient funds are available.
Room Charges Section
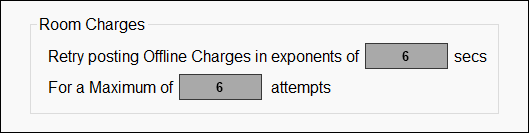
- Retry posting Offline Charges in exponents of X secs - Displays/Set the time (X) in seconds. The time set here will be, in the first instance, the time that will need to lapse before retrying to post an offline Room Charge again, after the previous attempt failed. After that, it will then be in exponents of the X value set until the maximum number of retries has been reached. For example, the first attempt will be made after 6 seconds, the 2nd after 36 (6x6) seconds, the 3rd after 216 (6x6x6) seconds and so on until the maximum number of retries has been reached.
- For a Maximum of X attempts - Displays/Set the maximum number (X) of attempts.
Sales Grid Tab ▲ ▼
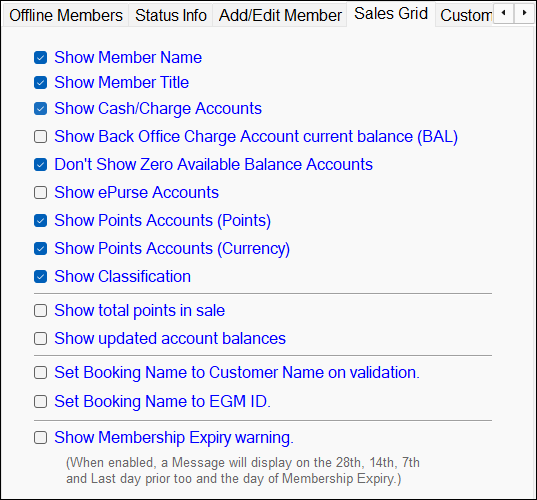
Used to determine what is displayed in the sales grid in Touch when a Customer/Member is added to an order/sale.
Noteworthy
- Set Booking Name to Customer Name on validation - Select to ensure that when a Member is added to a sale in Touch, their name will be used as the booking name and also appear on the KVS along with their order.
Search Tab ▲ ▼

Used to determine what is displayed on the Customer Search screen when Customer POS Key is selected. The format of how the Customer/Member's name is displayed is set HERE for each Location Group (Venue).
Noteworthy
- Show First Address Line on Customer Search Screen - Select to ensure the Customer's/Member's first address line is displayed when pressing the Customer (#102) POS Key.
- Show Primary Classification on Customer Search Screen - Select to ensure the Customer/Member's Classification is displayed when pressing the Customer (#102) POS Key.
- Show Date of Birth on Customer Search Screen - Select to ensure the Customer's/Member's date of birth is displayed when pressing the Customer (#102) POS Key.
- Show Email Address on Customer Search Screen - Select to ensure the Customer's/Member's email address is displayed when selecting the Customer (#102) POS Key.
- Disable New Customer Button from Customer Search Screen - Toggle select to turn on/off the ability to add new customers from the Customer Search screen.
Status Info Tab ▲ ▼

Used to determine what Customer/Member information Touch operators will see when they select the Account Status (#104) POS Key to view the details of the Customer's/Member's account in the Account Status screen. Select/Deselect the options available as required.
-
Show/Hide - Toggle select the options available as required. to configure which Customer/Member details are displayed on the Account Status screen when the Account Status (#104) POS Key is selected. Refer HERE to configure which details are to be displayed in the sales grid, or HERE for which details are to be printed on Receipts.
Notes ...
How the Customer/Member's name is displayed on the screen can be configured here for each Location Group (Venue).
- Show Vouchers - Select to ensure:
- The View Voucher option will be visible in the Account Status screen.
- The Customer's/Member's available vouchers will also be visible on the Customer facing display.
- A V is displayed in the header section of the sales grid when a Customer/Member is added to an order/sale and that Customer/Member has available vouchers.
- A V (1) is displayed in the header section of the sales grid when a voucher is added to an order/sale. The number in brackets depicts the number of vouchers currently in the order/sale.
- Description - Displays/Enter the description (label) to be attributed to the Venue's Company #. For example, ABN. This will be displayed as the Company #'s label in the Account Status screen.
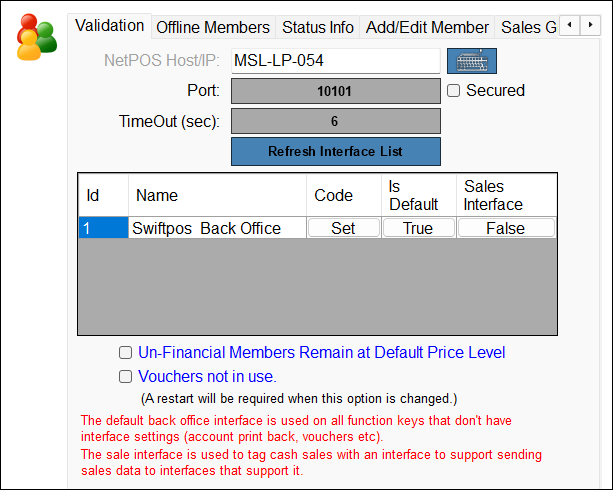
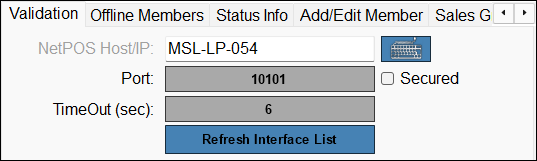
Validation Tab ▲ ▼
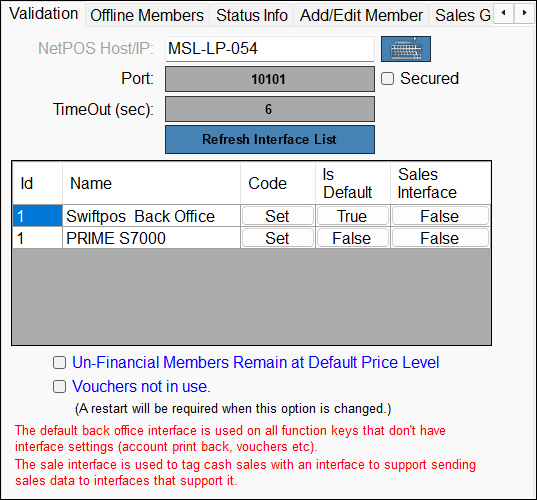
Used to activate the validation of Customer/Members using the NetPOS service.
IMPORTANT
DO NOT leave the default setting of 'localhost' or 127.0.0.1, unless the NetPOS service is running on the same server (PC) as the Touch terminal. If so, a search for the NetPOS service will be carried out each time a sale is finalised.
-
NetPOS.Net Host/IP - The following options are recommended:
- Leave blank if NO validation of Customer/Members is required.
- Enter the host name or IP address (eg. 192.168.0.1) of the server (PC) on which the NetPOS service is installed.
- Enter localhost or 127.0.0.1 if you are running the NetPOS service on the same server (PC) as the Touch terminal.
- Port Number - Select to set the Port Number. The default Port Number used by the NetPOS service to establish a connection is 10101. This can be changed to any other port number to meet the Venue's specific requirements. The port number specified here will need to be allowed by the site's firewalls.
- TimeOut (sec) - Select to set the timeout in seconds. Default is 6 seconds.
Notes ...
The Timeout setting can have adverse repercussions when NOT set appropriately. For example, a Transaction may fail to post. The Timeout set here MUST always be greater than the NetPOS Timeout setting. If Gaming is being used at a site, then it is strongly recommended that Timeout setting set here, is greater that that set for both NetPOS and Gaming. For example:
- If the Gaming Timeout setting is set to 4 seconds.
- Set the NetPOS Timeout setting to 5 seconds.
- Set this setting to 6 seconds.
When a large site is getting Timeout issues (see the NetPOS.Net logs), then the suggested Timeout settings might need to be changed. For example, to 30 secs for Gaming, 32 secs for NetPOS and 34 secs for the setting here. This means there maybe a considerable delay (+/- 30 secs) to get a response at the Touch.
- Refresh Interface List - Select to refresh the list of currently connected interfaces.
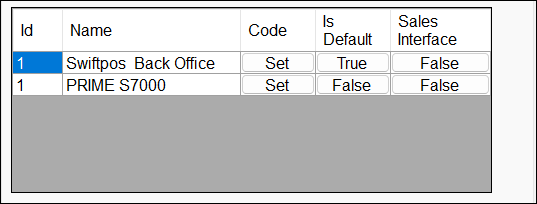
- ID - Displays the ID of the Interface.
- Name - Displays the name of the Interface.
- Access Code - Generally not required to be set. Only applicable for multi-Business/Venues requiring multiple Customer/Member databases.
- Is Default - Set to True to ensure validation of Customer/Members will be done using the selected interface.
- Sale Interface - Select to set to True to ensure cash sales are tagged with an Interface. This is to support sending sales data to Interfaces that require it.
- Un-Financial Members Remain at Default Price Level - Check this to ensure Customer/Members returned to the Swiftpos Touch terminal as Un-Financial Customer/Members receive the default Price Level.
- Vouchers not in use - Select to ensure that Voucher / Barrel Promotion related functions are disabled at the Swiftpos Touch terminal. This feature was originally designed to increase performance on old hardware.
When a Customer/Member, that is considered Financial, is added to an order/sale in Touch, the header section of the sales grid will be displayed in a green background to depict the Financial status of the Customer Member. For example:
When a Customer/Member, that is considered NON-Financial, is added to an order/sale in Touch, the header section of the sales grid will be displayed in a grey background to depict the Non-Financial status of the Customer Member. For example:
End of article ▲