
Screens ▲ ▼
Order Customer Screen ▲ ▼

To access, select the New option in the Customer Search screen. Used to add the details of a new Customer/Member placing an order in Touch.
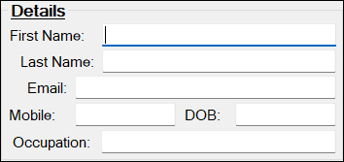
Displays/Enter the First and Last Name, Email, Mobile, DOB (Date of Birth) and/or Occupation of the Customer/Member.
- First Name - Displays/Enter the Customer/Member's first name.
- Last Name - Displays/Enter the Customer/Member's surname.
- Email - Displays/Enter the Customer/Member's email address.
- Mobile - Displays/Enter the Customer/Member's mobile phone number.
- DOB - Displays/Enter the Customer/Member's date of birth in the format compliant with the local regional format. For example, in:
- Australia - Enter a date in the dd/mm/yyyy or dd-mm-yyyy format.
- USA - Enter a date in the mm/dd/yyyy or mm-dd-yyyy format.
- Occupation - Displays/Enter the Customer/Member's occupation.

- Address - Enter the Customer/Member's address details.
![]()
- Classification - Select to open the Member Classifications search screen to select a Classification to assign to the Customer/Member. If a Classification is displayed here instead of the text Select Classification, then this means a default Primary Classification has been configured HERE.
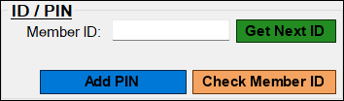
- Get Next ID - Select to obtain the next available ID from Back Office.
- Add/Change PIN - Select to open the numeric keypad to enter a PIN of up to 9 digits.
- Check Member ID - Select to check that the entered ID is available in Back Office.
- Alternate ID - Enter an alternate ID for the Customer/Member.

- ABN - Displays/Enter the Customer/Member's ABN number if required.
- Account Limit - Displays/Enter the Credit Limit specific to the Customer/Member.
- Gender - Select from the drop-down list the most appropriate option.
- Linked Classifications - Select to open the Linked Classifications screen and select Classifications to link to the selected Customer/Member.
- Select Interest Groups - Select to open the Interest Groups screen and assign Interest Groups to the selected Customer/Member.
- Notes - Select to open the Member Notes screen and assign Interest Groups to the selected Customer/Member.
- Allergens - Select to open the Allergens prompt to select the allergens applicable to the Customer/Member being added.

- Member Photo - Select to open the Member Photo screen to acquire/crop/remove an image of a Customer/Member.
Notes ...
In order to be able to capture images, the Image Acquisition Device will need to be setup as a Peripheral in Touch.
- Mail/eMail/SMS lists - Select/Unselect to include/exclude the Customer/Member in available contact lists.
End of article ▲