
This outlines How To Install The Table Tracking Database in Swiftpos for Touch.
Subjects ▲ ▼
About ▲ ▼
What Is Required? ▲ ▼
- Ensure Touch is installed.
What To Consider? ▲ ▼
- Global Tables - This is when different Locations in a Venue share a single Table Tracking database. This allows for access to Tables in Swiftpos across multiple Locations. This feature is useful when customers seated in the bar while waiting for a Table, wish to have their bar purchases moved onto their Table so it can all be paid for when they are ready to leave. If this is a requirement of a site, then it must be considered when deciding the location and number of databases to be installed.
Notes ..
Do NOT connect to a Table Tracking Database over the internet. Table Maps are refreshed every 10 seconds to change the status on a Table and this would create too much traffic over the internet. It should always be local to the site.
When Is It Used? ▲ ▼
Used to Install The Table Tracking Database to ensure Touch operates as expected.
How To? ▲ ▼
Use the following points as a checklist when installing the Swiftpos Table Tracking database.
- Review About and ensure the steps outlined HERE are addressed.
- Determine The Location And Number Of Databases?
- Create The Table Tracking Database?
- Configure The Connection Setup?
- Backup And Transfer To Host PC/Servers?
- Configure Windows Firewall?
- Configure Touch?
Determine The Location And Number Of Databases? ▲ ▼
The first decision that needs to be made when setting up Table Tracking is to decide how many Table Tracking/remote order databases will be required and where they will be located. The best configuration should be decided after considering the size of the Venue and the expected load on the Table Tracking database(s).
- Single Venue - Single Restaurant - In a single Venue with a single restaurant the Table Tracking database can either be installed on the same host PC/Server as the Swiftpos Back Office or on it's own dedicated Table Tracking PC/Server.
- Single Venue - Multiple Restaurants - In a single Venue that has multiple restaurants the restaurants can either share a single Table Tracking database on a Table Tracking PC/Server, OR each have their own Table Tracking database on a single PC/Server, OR they can each have their own Table Tracking database on separate PC/Servers.
Notes ..
It is important to remember that if the restaurants do not share the same Table Tracking database, they will not be able to interact with each other's Tables.
- Multi-Venue - In a multi-Venue setup, Swiftpos Back Office would be installed at the head office and a separate Table Tracking database would need to be installed at each Venue (Location Group). When considering the requirements for each individual Venue refer to the Single Venue information above.
Create the Table Tracking Database? ▲ ▼
- Using the New Table Tracking Database option in the Advanced Tasks menu of SQL Tools in Back Office, create the TABLE TRACKING database on the Swiftpos Back Office PC/Server.
Configure The Connection Setup? ▲ ▼
- Using the Change Database option in the Tools menu of the Main Menu in Back Office, select the Table Tracking Database option to open the Connect to Server - Table Tracking SQL Server screen and configure the SQL Server connection to establish a connection to the TABLE TRACKING database.
Backup And Transfer To Host PC/Servers? ▲ ▼
- Using the Backup Database option in the SQL Tools menu in Back Office with the Compress (ZIP format) option selected, backup the TABLE TRACKING database created above.
- Using the .ZIP file created by the backup, transfer it to the PCs/server(s) that are hosting Swiftpos Touch.
Notes ...
This would be required for multi-Venues or for Venues that are going to have multiple databases or for Venues that will have a single database but located on a dedicated PC/Server. Refer HERE for more information.
Also, Microsoft SQL Server Express Edition will need to be installed on the PC/Server(s) that are going to host the Table Tracking databases. Refer HERE for more information.
Configure Windows Firewall? ▲ ▼
The following instructions explain how to add an exception to the Windows Firewall so that SQL Server will be accessible from other networked PCs.
Notes ...
If a 3rd party firewall application is being used on the SQL Server host PC/Server, then consult that 3rd party's documentation to configure an exception.
- At the windows desktop press the Start button then select Control Panel.
- Double click the Windows Firewall icon.
- Click the Exceptions tab then press Add Program.
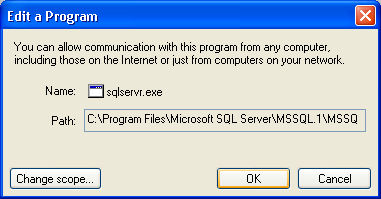
- Browse to the SQL Server executable which is located at C:\Program Files\Microsoft SQL Server\MSSQL.1\MSSQL\Binn\sqlservr.exe by default.
- Select Change Scope once the correct file path has been set.
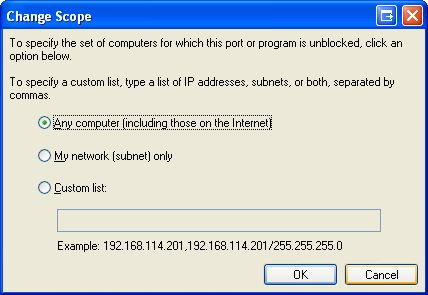
- To allow access from any computer including those over the internet click the first radio box, otherwise click the second radio box to only allow access from computers on the same subnet.
- Select OK to save the changes and close windows firewall.
Configure Touch? ▲ ▼
- Start Touch on the PC/server that will be designated as the Table Tracking Master terminal for a Location.
- Navigate to the Table Tracking settings screen and select Set option opposite the Connected To field, to open the Connect to Server - Table Tracking SQL Server screen and configure the SQL Server connection to establish a connection to the TABLE TRACKING database.
- Select the Table Number Ranges option and setup the table ranges for each Location.
- Select the Locations option and select the Locations for which the Master Touch terminal will have access to.
- Configure the remaining Table Tracking settings as is required for the Venue.
- Save the configuration changes.
End of article ▲