Used to configure the connection to a SQL Server database. Used throughout Back Office and Touch where the establishment of a connection is required. Mostly used when connecting to one of the following databases is required:
Back Office ▲ ▼
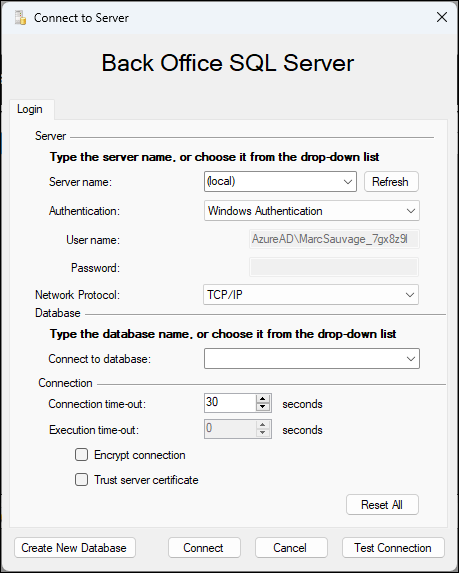
Server Section ▲ ▼
- Server name - Select from the drop down list of available servers or enter the name of the SQL Server that hosts the swiftpos database. Select (local) if the SQL Server is running on the local PC. If the drop down list is empty, then check that Microsoft SQL Server is installed and the firewall is configured to ensure that Microsoft SQL Server is visible to the local PC or network.
Notes...
It is recommended to use an IP address (for example: 192.168.0.2) for the swiftpos connection rather than a DNS Name, to avoid the DNS name having to be resolved each time the server is interrogated.
- Authentication - Select from the drop down list one of the following:
- Windows Authentication
- SQL Authentication
- User name - Displays/Enter the user name. The default user name is sa.
- Password - Displays/Enter the password. The default password is swiftpos.
Notes...
If a SQL user other than the default sa user has been configured and is intended to be used to connect to the swiftpos database, then it is important to keep in mind that all the required permissions are set during a DB Upgrade. That includes the permissions for the swiftpos User role and Server State permissions (Encryption and SSL Connection).
- Network Protocol - Select from the drop down list, the preferred Network Protocol used to establish connection:
- TCP/IP
- Shared Memory
- Named Pages
Notes...
Refer HERE for more information.
Database Section ▲ ▼
- Connect to database - Select from the drop-down list of available databases or enter the name of the database.
Connection Section ▲ ▼
- Connection time-out - Displays/Set the timeout in seconds to establish a connection. Default is 30.
- Execution time-out - Displays/Set the execution timeout in seconds.
- Encrypt connection - Select to enable.
- Trust server certificate - Select to enable.
- Reset All - Select to ensure any changes are reset to the original settings.
Notes...
Security Considerations
If you have a Self Signed Certificate then you need to ensure the Trust server certificate option is selected. This is basically saying to trust any certificate on the server.
If you have forced security on the SQL Server then you the Encrypt connection option does NOT need to be selected, as it is already forced.
If you have purchased an SSL and registered it correctly then both the Trust server certificate option and Encrypt connection option need to be left unselected.
Footer Section ▲ ▼
- Create New Database - Select to open the Create New Database screen to create a new swiftpos database.
- Connect - Select to establish a connection
- Cancel - Select to exit without saving settings.
- Test Connection - Select to test the database connection settings configured above.
Table Tracking ▲ ▼
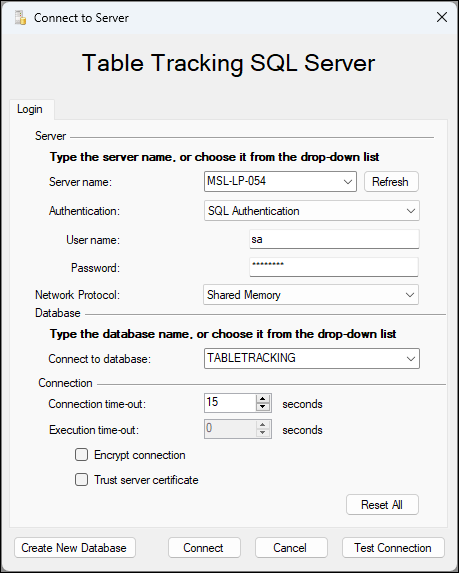
Server Section ▲ ▼
- Server name - Select from the drop down list of available servers or enter the name of the SQL Server that hosts the TableTracking database. Select (local) if the SQL Server is running on the local PC. If the drop down list is empty, then check that Microsoft SQL Server is installed and the firewall is configured to ensure that Microsoft SQL Server is visible to the local PC or network.
Notes...
It is recommended to use an IP address (for example: 192.168.0.2) for the Table Tracking connection rather than a DNS Name, to avoid the DNS name having to be resolved each time the server is interrogated.
- Authentication - Select from the drop down list one of the following:
- Windows Authentication
- SQL Authentication
- User name - Displays/Enter the user name. The default user name is sa.
- Password - Displays/Enter the password. The default password is swiftpos.
Notes...
If a SQL user other than the default sa user has been configured and is intended to be used to connect to the swiftpos database, then it is important to keep in mind that all the required permissions are set during a DB Upgrade. That includes the permissions for the swiftpos User role and Server State permissions (Encryption and SSL Connection).
- Network Protocol - Select from the drop down list, the preferred Network Protocol used to establish connection:
- TCP/IP
- Shared Memory
- Named Pages
Notes...
Refer HERE for more information.
Database Section ▲ ▼
- Connect to database - Select from the drop down list of available databases or enter the name of the database.
Connection Section ▲ ▼
- Connection time-out - Displays/Set the timeout in seconds to establish a connection. Default is 15.
- Execution time-out - Displays/Set the execution timeout in seconds.
- Encrypt connection - Select to enable.
- Trust server certificate - Select to enable.
- Reset All - Select to ensure any changes are reset to the original settings.
Footer Section ▲ ▼
- Create New Database - Select to open the Create New Database screen to create a new swiftpos database.
- Connect - Select to establish a connection
- Cancel - Select to exit without saving settings.
- Test Connection - Select to test the database connection settings configured above.
End of article ▲