
This outlines the information and the steps that are needed to familiarise oneself with the ?????? interface.
The content is targeted at Resellers and swiftpos Venue Administrators who have a sound knowledge of and experience with swiftpos. For further information or assistance, please contact your swiftpos Reseller or swiftpos Support.
Subjects ▲ ▼
About ▲ ▼
What Is It? ▲ ▼
Vii is one of Australia’s leading loyalty solutions, they offer a complete Gift Card solution, providing services in design, implementation, and management of gift cards. Refer HERE for more information.
Integration is available via swiftpos as per the price list.
What Is Not Supported? ▲ ▼
- Gift Cards are pre-numbered and come with pre-assigned PIN numbers.
- Gift Cards CANNOT be topped up. That is, once they are issued and loaded with and initial amount.
- When doing a Refund operation, the amount refunded cannot exceed the initial amount loaded onto the Gift Card.
- When Cancelling a Gift Card, the amount entered must be equal to the initial amount loaded onto the Gift Card.
- The connection between NetPOS and Vii, once configured and established, will be limited to a 2 minute timeout. That means, that in the event of an interruption or connection failure at any time during an operation and the 2 minute timeout elapses, the operation will be aborted and the status and balance of the Card will be reinstated, to as it was prior to the said operation having commenced.
What Is Required? ▲ ▼
- SwiftPOS V10.50+
- A NetPOS registration for Vii.
What To Consider? ▲ ▼
When Is It Used? ▲ ▼
Any swiftpos Venue that wants to integrate with Vii and offer their Gift Card services to their patrons.
How To? ▲ ▼
- Activate/Issue/Load A Vii Gift Card
- Cancel/Refund/Void A Vii Gift Card
- Check The Balance Of A Vii Gift Card
- GET STARTED?
- Redeem A VII Gift Card
- Refund To A Vii Gift Card
- View Vii Gift Card Transactions
How To GET STARTED? ▲ ▼
Do as follows:
- What is it?
- What is Required?
- How to Register A NetPOS Interface?
- How To Configure NetPOS for Vii Gift Cards?
How To Configure NetPOS For Vii Gift Cards? ▲ ▼
- Once the NetPOS registration process has been completed for the Vii Interface, then the Vii settings will need to be configured. To do this access the NetPOS Vii Interface Settings screen in NetPOS. Refer to How To Access The NetPOS Menu for more information.
- Once the NetPOS Vii Interface Settings screen is displayed, configure as is appropriate.
How To Configure Touch For Vii Gift Cards? ▲ ▼
Once the configuration of NetPOS has been completed, then Touch will need to be configured to ensure Vii Gift Cards they can be issued, redeemed, etc, at Touch. To do this:
- Ensure the following POS Keys are added to the appropriate Keyboard Layout via the Designer:
- Ensure the POS Keys, added above, are configured appropriately to meet the Venue's requirements.
- Ensure a Full Update is sent to all Touch Terminals that make use of the same Keyboard Layout to which the above POS Keys were added.
Notes...
Refer to Add A POS Key To A Keyboard Layout for more information.
Screens ▲ ▼
NetPOS Vii Interface Settings Screen ▲ ▼
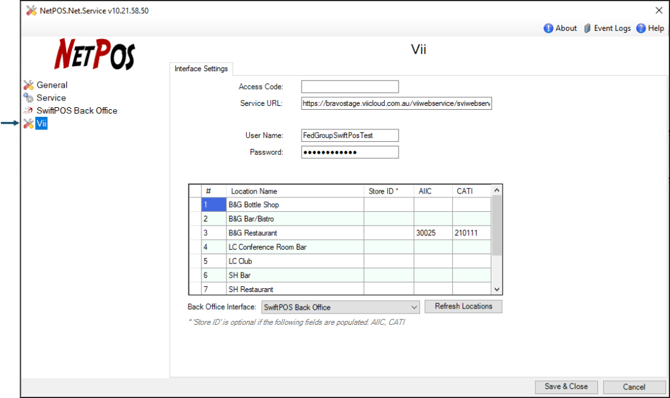
To access refer to How To Access The NetPOS Menu for more information. A NetPOS Registration for the Vii Interface will be required in order to access this screen. This screen is used to configure the settings required to implement Vii Gift Cards.
Header Section
- Access Code - Default is blank. Displays/Enter the Access Code that must match the same Access Code configured at the swiftpos Touch terminal. This is not mandatory, but does provide an additional level of security.
- Service URL - Displays/Enter the URL provided by Vii.
- User Name/Password - Displays/Enter the login credentials provided by Vii.
Grid Section
Displays a list of the Locations, their Store ID, AIIC and CATI details. These values are provided by Vii and will need to be populated opposite each of the Locations that will require access to Vii's Gift Card services.
- Store ID - This is optional and can be left blank.
- AIIC - Displays/Enter the value as provided by Vii.
- CATI - Displays/Enter the value as provided by Vii.
Footer Section
- Back Office Interface - Select from the drop down list the Back Office instance to connect with.
Notes ...
In general this will only have one instance listed. However, multiple Back Office instances can be listed, in which case one needs to be selected.
- Refresh Locations - Select to ensure the list of Locations displayed in the grid is refreshed with the latest currently available.
End of article ▲