
This provides an overview of the Redeem/Check Balance Gift Cards (#242) POS Key used in conjunction with 3rd Party gift card/voucher providers.
Subjects ▲ ▼
About ▲ ▼
What Is Required? ▲ ▼
- Swiftpos v10+
- Ensure this POS Key is added to the appropriate Keyboard Layout using the Designer. Refer HERE for more information.
- Venues will need a NetPOS registration and the NetPOS settings will need to be configured for the appropriate 3rd Party Interface in order to use this POS Key.
What Is Supported? ▲ ▼
This POS Key can be used in conjunction with the following 3rd Party Integrations:
What To Consider? ▲ ▼
- If required, access to this POS Key can be restricted by the Clerk Security feature.
- To ensure both Checking the Balance and Redeeming, 2 POS Keys will need to be configured with the Redeeming POS Key having an appropriate Media selected.
When Is It Used? ▲ ▼
Used for either Checking the Balance or Redeeming a 3rd party gift card/voucher.
Refer to Check The Balance Of A 3rd Party Gift Card and How To Redeem A 3rd Party Gift Card for more information.
How To? ▲ ▼
- GET STARTED
- Use This POS Key With?
How To GET STARTED? ▲ ▼
- Review About and ensure the steps outlined HERE are addressed.
- In Keyboard Designer, select the 3rd Party Gift Card (#241) POS Key that has been added to a Layout.
- Ensure it is given an appropriate Caption. For example, Redeem A Gift Card. or Check Balance Of A Gift Card.
- Select the More Settings option to display the Settings screen.
- Once configured, ensure a Full Update is sent to all the Touch terminals that will be using the POS Key. Refer HERE for more information.
Screens ▲ ▼
Settings Screen ▲ ▼
Specific to:
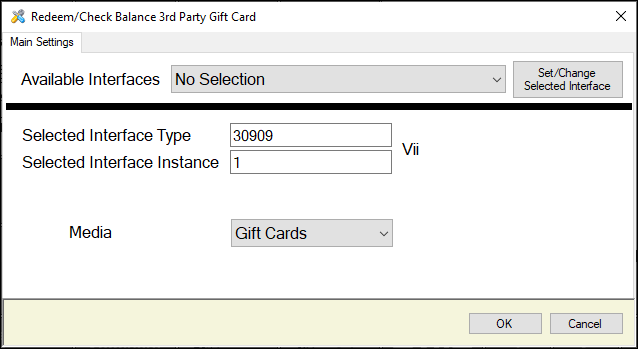
This screen is accessed by selecting the More Settings button in Keyboard Designer.
- Available Interfaces - Select from the drop down list the required Interface.
Notes...
If no interface is selected, the default used will be the interface which is set as default in NetPOS
- Set/Change Selected Interface - Select to select the interface selected above and set the Selected Interface Type and Instance values.
- Media - Select from the drop down list the one of the following when wanting to configure the POS Key for:
- Checking the Balance of a Gift Card (Check Balance) - Ensure the << Select >> option is selected. This will ensure the POS Key will be used for Checking Balances only.
- Redeeming a Gift Card (Paying With Gift Card) - Ensure one of the Media listed is selected. This will ensure that the POS Key will be used for Redeeming only. Once selected the balance of the Card will be used as payment in the sale and the amount redeemed will be applied to the Media selected.
Notes...
It is recommended to configure 2 POS Keys, one for Checking Balances and one for Paying with Gift Cards (Redeeming ).

Example of a Keyboard Layout configuration with 2 POS Keys, configured
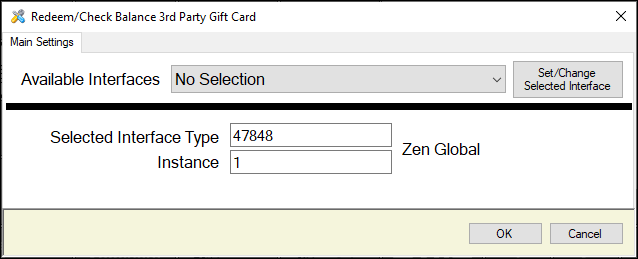
This screen is accessed by selecting the More Settings button in Keyboard Designer.
- Available Interfaces - Select from the drop down list the required Interface.
Notes...
If no interface is selected, the default used will be the interface which is set as default in NetPOS.
- Set/Change Selected Interface - Select to select the interface selected above and set the Selected Interface Type and Instance values.
End of article. ▲