Subjects ▲ ▼
About ▲ ▼
Used to manage/view Peripheral / Device configurations in Touch. Displays a list of currently configured Peripherals / Devices. Refer HERE for more information.
What Is Required? ▲ ▼
- Touch will need to be installed and operational.
What Is Supported? ▲ ▼
The following lists the Peripherals / Devices that are supported in Touch:
- Alternate EFT - Aston Club and Flexi-Net TITO options are now included in the EFTPOS Peripheral as well. Refer HERE for more information.
- Barcode Scanner - RS232/USB or OPOS.
- Setting up Card Masks
- USB Barcode Scanners
- Barrel Promotion Printer - Used to configure the printer settings for the printing of Barrel PromotionTickets for placing in a barrel for drawing a winner later. It is likely that it would be a shared network printer that is designed to automatically drop the tickets into the barrel for a major prize draw.
- Caller ID - Looks up a Customer based on the incoming phone number.
- Cash Drawer - How to setup a cash drawer - Up to 4 per Touch device.
- Clerk RF Reader - For RF (Radio Frequency) receivers to identify Clerk/Staff Member/etc wrist bands.
- Console Serial POS Interface - Reseller Help - For Fuel Kentronics information.
- Customer Facing Display - For displaying advertising and sales journal information to Customers/Members/Patrons/etc. Makes use of Advertising Image/Video (MP4) files.
- Advertising - Setup and Scheduling of Advertising Image/Video (MP4) for Customer Advertising.
- Drive Thru Customer Display - For 3rd Party Customer Ordering Drive Thru systems (Summit).
- EFTPOS - For EFTPOS devices.
- Ethernet I/O Door Controller - For devices that control Door Access.
- Finger Print Reader - For identifying Clerk/Staff Members/etc.
- Fiscal Device - Used to meet the tax reporting compliance obligations of the Fijian government.
- Floor Printer - Used to configure the printer settings for the printing of floor dockets for wait staff at the pass. Floor dockets print in Table seat order, therefore making table service simpler. It is however common practice to print multiple copies of the kitchen docket (since they are also able to print seat numbers) and use the second copy as the floor docket. Thus, avoiding the need for an extra floor printer. floor docket printing can also be done from the Kitchen Video.
- Fuel Pump Interface - For POSTEC Controller and QuickFuel Controller.
- Fuel Pump Interface - For the Enabler Fuel System.
- Fuel Pump Interface - Interface for Kentronics Fuel Pumps in Service Stations. Reseller Help - For Fuel Kentronics information.
- Fuel Drive Off - QuickFuel Drive Off Process and Reporting
- Image Acquisition Device - Enables the capturing of Customer/Member photo's in Touch.
- Keyboard Input Device - For USB devices that emulate keyboard input. Recommend using Barcode Scanner or RFID Reader instead and REMOVE the "Keyboard Input Device" because it can create confusion with masking for other devices. It should not be necessary to have this device in your settings.
- Kitchen Printer - Used to configure the printer settings for printing kitchen dockets for kitchen staff for the preparation of food and drinks orders. More than 1 is allowed.
- Kitchen Video System - Select to open the Kitchen Video System Monitor V2 screen to configure KVS screens for the display/managing/tracking of kitchen orders.
Notes ...
A KVS peripheral cannot be added when attempting to do this from a Touch Lite device type. An appropriate message will be displayed.
- A KVS peripheral cannot be added when attempting to do this from a Touch Lite type device. An appropriate message will be displayed.
- Kitchen Video System Legacy.
- Label Printer - Used to configure the printer settings for printing item/product price labels from Touch. Can be used to print labels for items/products such as deli, fish, fruit, meat, poultry, vegetables, etc. That is, items/products generally sold over the counter.
- Line Display - Customer 2 Line Display settings.
- Magnetic Card Swipe Reader - For Magnetic Card readers. USB card reader options - RS232 or OPOS - Keyboard Input Device - Card Masks.
- Member Card Printer - Used to configure the printer settings for printing Member membership cards.
- Member RF Reader - For RF (Radio Frequency) receivers to identify Customer/Member/Patron/etc RFID wrist bands.
- Menu Board (Not Supported) - Refer HERE for more information.
- NFC Card Reader - For Customer/Member lookups using a NFC (Near Field Communication) reader.
- Order Printer - Used to configure the printer settings for printing phone and web orders submitted via Touch.
- Pager System - For paging Customers/Staff/etc using Paging Systems.
- PINPAD - For Pinpad devices to facilitate the entry of a Pin when redeeming Vouchers.
- Raffle Ticket Barrel Printer - Used to configure the printer settings for printing Raffle Tickets for placing in a barrel for drawing a winner later.
- Receipt Printer - Used to configure the printer settings for printing Receipts/Tax Invoices. More than 1 is allowed.
- RF Reader - For RF (Radio Frequency) receivers to identify Members/Patrons/Staff/etc.
- Service Indicator.
- Third Party Vending Machine - Select to add peripherals such as Free Wifi, Range Express, Range Servant, Range Servant 2, VDMS Dispenser, VDMS Live, Brunswick and Intercard.
- Voucher Printer - Used to configure the printer settings for printing Vouchers. More than 1 is allowed.
- Voucher Printer Alternate - Used to configure the printer settings for printing Vouchers to an alternate printer. This is used in conjunction with the Use Alternate Printer option.
What To Consider? ▲ ▼
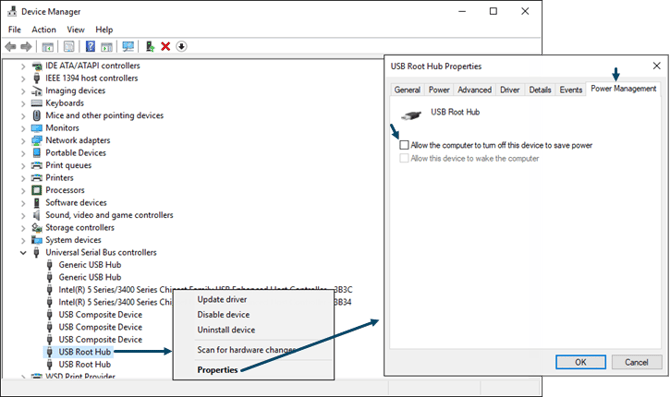
- If USB Peripherals are being used, it is recommended that Windows is configured to NOT allow them to go to sleep. Ensure the Allow the computer to turn off this device to save power Device Manager option (as shown below) is NOT selected.
How To? ▲ ▼
How To Add A Peripheral? ▲ ▼
- Navigate to the Peripheral List menu option in the Terminal Settings menu in Touch.
- Select the Add New option.
- In the Add New Peripheral screen:
- Select from the Peripheral Type drop-down list the type of Peripheral being added. Refer HERE for more information relating to the configuration specific to the Peripheral / Device being added.
- Enter a description in the Description setting that appropriately describes the Peripheral / Device being added.
- Select OK to add the Peripheral / Device and open the appropriate configuration screen.
- The configuration screen for the new Peripheral / Device will be displayed. Configure the Peripheral / Device. Refer HERE for more information.
- If a Test option is available, select it to test the configuration.
- Once satisfied, select Save to save the changes and exit.
Screens ▲ ▼
Add New Peripheral Screen ▲ ▼

To access, select the Add New option in the Peripherals And Devices screen. Used when a Venue wants to add a new Peripheral / Device in Touch.
- Peripheral Type - Select from the drop-down list of Peripheral types that are supported. Refer HERE for more information.
- Description - Displays/Enter the description of the Peripheral selected.
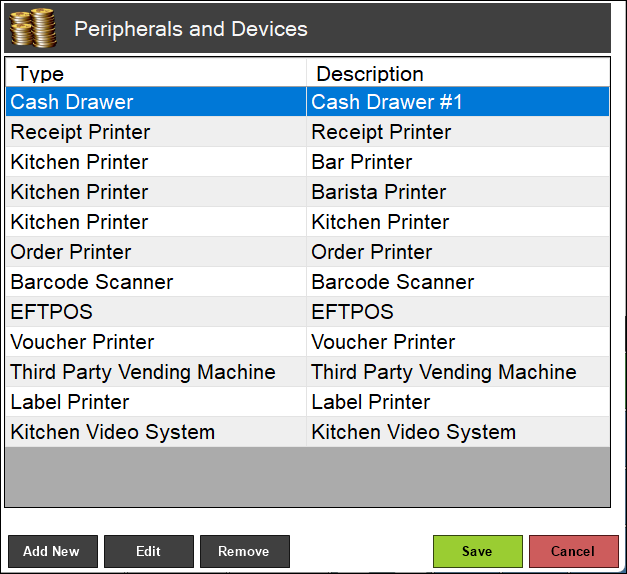
Peripherals And Devices Screen ▲ ▼
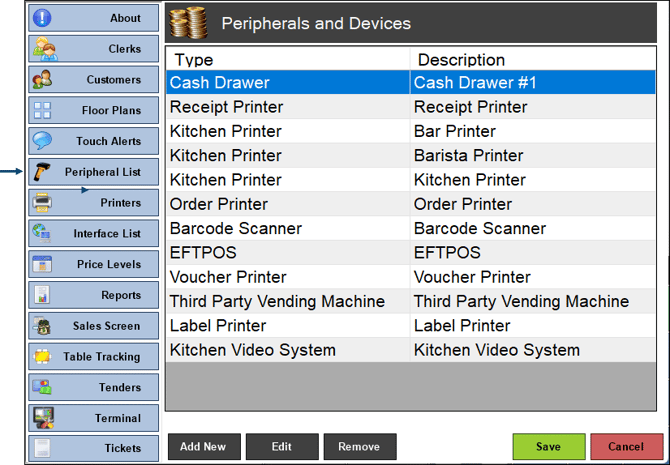
To access, select the Peripheral List menu option in the Terminal Settings menu. Used when a Venue wants to add a Peripheral / Device in Touch.
- Add New - Select to open the Add New Peripheral screen below, to add a new Peripheral to the Touch device. Refer HERE for more information.
- Edit - Select to open the configuration screen relevant to the selected Peripheral / Device, to edit.
- Refer HERE for more information relating to the configuration specific to the Peripheral / Device being edited.
- Remove - Select to remove the selected Peripheral / Device from Touch.
End of article ▲