This outlines How To Transfer Touchmini Devices Between Locations in Touchmini.
The transferring of Touchmini devices between Locations, can now be seamlessly undertaken from the device itself. Previously, this was only possible via Venue Manager.
Subjects ▲ ▼
About ▲ ▼
What Is Required? ▲ ▼
- Swiftpos V10.74+
- Touchmini v10.73.3+
- In Back Office
- Ensure a Clerk/Staff Member has been given the appropriate Security Permissions in Back Office to authorise the transfer of a devices between Locations

- Ensure a Clerk/Staff Member has been given the appropriate Security Permissions in Back Office to authorise the transfer of a devices between Locations
- A device must be registered and enabled within a Location.
- More than one Location must be activated within the Venue.
- A Touch device must be online and designated as the Orders Master in the new Location (the Location to which a device is being transferred).
- The Gateway Client Service must be running in the new Location (the Location to which a device is being transferred).
- Ensure that the device is NOT locked to one or more Event Areas (Suites). This is only applicable to Venues that are registered for Events. Refer to HERE for more information.
- Ensure that NO Orders are in progress. To confirm this, select the checkout (shopping trolley) icon in the top right hand corner of the screen and confirm it has no items.
- Ensure that NO Orders are pending or waiting to be submitted. To confirm this, navigate to the Transactions screen and confirm that all transactions have a tick icon preceding them. For example:
![]()
What To Consider? ▲ ▼
- This menu option DOES NOT support the transfer of Touchmini devices (between Locations) that are locked to one or more Event Areas (Suites).
How To Transfer Touchmini Devices Between Locations? ▲ ▼
Touchmini devices can be transferred between Locations in one of the following ways, using:
Touchmini ▲ ▼
Do as follows:
- Select the new Location to which the device is to be transferred from the drop-down list in the Tools menu. Refer to HERE for more information.
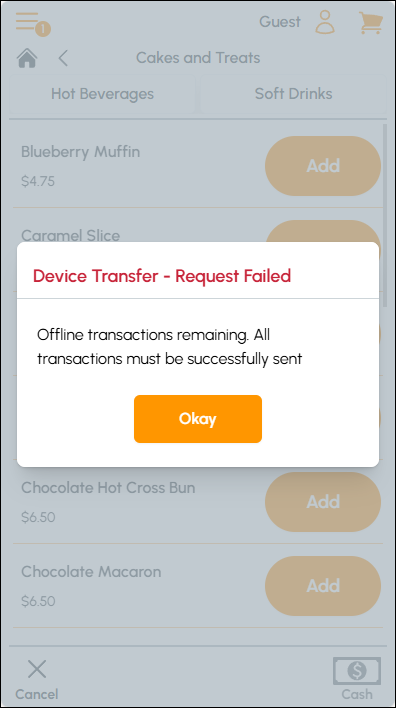
- If there is an Order/Sale in progress, then a Device Transfer - Request Failed notification will be displayed. Cancel or finalise the Order/Sale and try again.
- If there are transactions pending, that is, transactions that have as yet not been submitted, then a Device Transfer - Request Failed notification will be displayed. Ensure all pending transactions are processed or cleared and try again.
- If the Clerk/Staff Member currently signed in does not have appropriate authorisation to perform Transfers, then a Clerk Sign-In prompt is displayed to ensure the entry of the ID of a Clerk/Staff Member that does have the appropriate authority. Refer to HERE for more information.
Venue Manager ▲ ▼
Do as follows:
- Select the Transfer option from the Touchmini menu in Venue Manager. Refer to HERE for more information.
![]()
- Select the Location the device is currently assigned to, to expand it and list all the Touchmini devices.
- Locate the device to be transferred and select the Transfer To option.
- Once selected the Transfer Device prompt will be displayed
![]()
- Select the new Location to which the device is being transferred, from the To drop-down list.
- Once selected, select the Transfer option to initiate the Transfer.
- Wait until the Device Transfer Initiated message is displayed.
- Select the new Location to expand it and confirm the device is listed.
Notes ...
Once transferred the device's settings will be automatically cloned from the settings for the Default Configuration in the new Location.
Also, the entry in the Devices screen in Back Office, associated with the transferred device, will be updated automatically to display the device new Location.
- If necessary, consider configuring any settings specific to the device in the new Location. The device's settings would have been cloned from the settings for the Default Configuration in the new Location. Refer to HERE for more information.
- The device is now ready to use in the new Location.
![]()
Example of the transferring a Touchmini device between Locations.
End of article ▲