IMPORTANT
Touchmini v1 has reached it's end of life and will NO LONGER be enhanced/improved. It is now superseded by Touchmini v2.

The Device Configuration Tabs are used to configure TouchMini devices. They are accessed by selecting the Name of a Device listed in TouchMini Devices. Refer to How To Access The Configuration Tabs for more information.
Refer to How To Configure A Device for more information.
The content is targeted at Resellers and swiftpos Venue Administrators who have a sound knowledge of and experience with swiftpos. For further information or assistance, please contact your swiftpos Reseller or swiftpos Support.
Notes...
DO NOT FORGET to select the SAVE button to ensure all changes made are saved.
Tabs ▼
Appearance Tab ▲ ▼
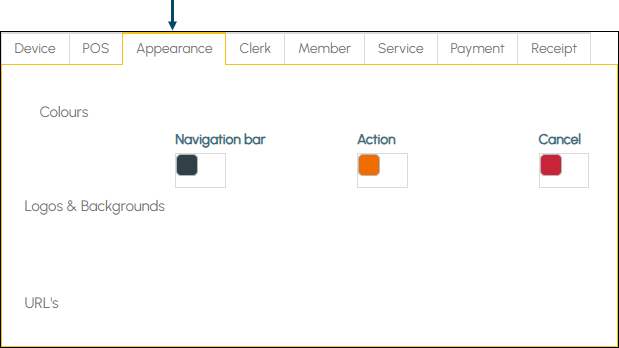
- Colours - Select from the colour options available to adjust colours as required:
- Navigation bar colour
- Action colour
- Cancel colour
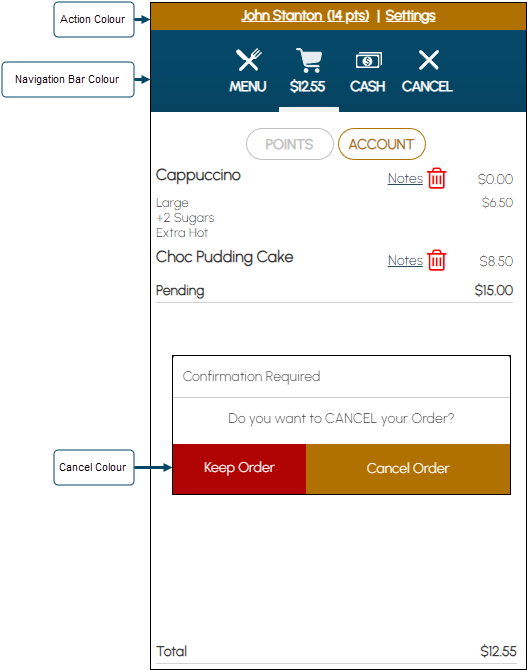
An example of the result of colour choices selected
- Logos & Backgrounds - Currently does NOT apply to TouchMini.
- URL's - Currently does NOT apply to TouchMini.
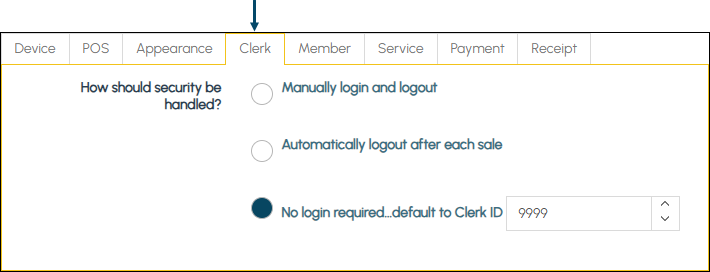
Clerk Tab ▲ ▼
Notes...
If this option is selected, then also ensure that the TouchMini Settings option has been selected against the appropriate Clerk Security Groups.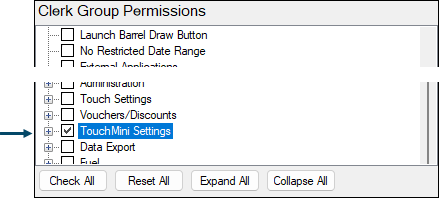
-->
How should security be handled? - Select from one of the following options available:
- Manually login and logout - Select to ensure Clerk/Staff can login/logoff manually as required. When selected a Clerk Login prompt will be displayed, in which the Clerk's/Staff Member's ID and PIN can be entered.
- Automatically logout after each Order - Select to ensure the Clerk/Staff Member is automatically logged off after an Order/Sale is finalised or cancelled.
- No login required... default to Clerk ID - Select to ensure Clerks/Staff Members are not required to login. For this to be the case the entry of a default Clerk ID is required. For example, 9999. Refer to How To Configure The Default POS Clerk for more information.
Device Tab ▲ ▼
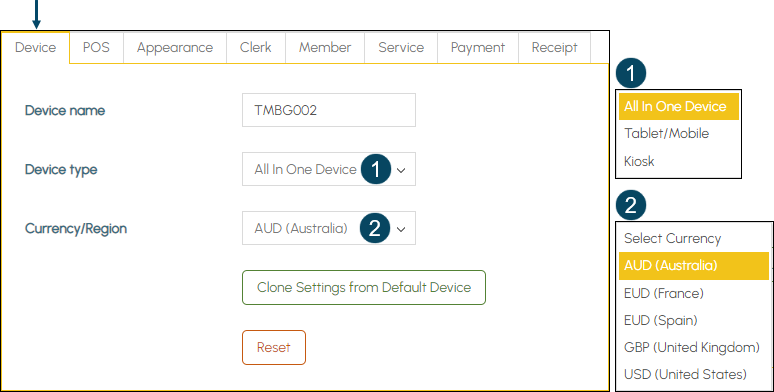
- Device Name - Displays/Enter the name of the device.
Notes...
When entered/changed, the name entered here will be updated against the device's Terminal ID in Back Office . However, when the name of a TouchMini device is changed in Back Office, it will NOT be updated here.
- Device Type - Select from the drop down list the Type of device being configured. That is one of the following:
- Tablet/Mobile
- All In One Device
- Kiosk
- Currency/Region - Select from the drop down list the Currency (Region) that is applicable to the Location in which the Device is going to be used.
- Clone Settings from Default Device - Select to overwrite all the current configuration for the selected Device and clone the configuration from the Default Device. Refer to How To Clone A Device for more information.
- Reset - Select to erase the current configuration for the selected Device.
Notes...
It is possible that the Default Configuration has been configured for a different device Type. However, it can still be cloned to TouchMini devices of a different type.
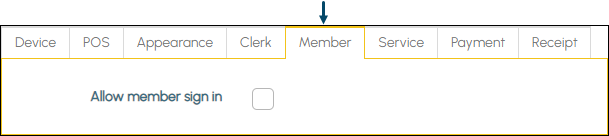
Member Tab ▲ ▼
Notes...
When the Event area service option is selected in the Service tab, by default the configuration of the Member tab is disabled. Instead it will appear as follows:
To ensure configuration of the Member’s tab is enabled, ensure the Event area service option is NOT selected in the Service tab.
Notes...
Member sign in is required if Member Pricing or Account Payments are to be made available.
- Allow member sign in - Select to allow for the signing in of Members when taking Orders. Once selected the following options will be available:


Notes...
Once a Member is signed in, pricing will be determined based on the Member's Classification, in the same way it is determined at swiftpos Touch.
- Allow member sign in continued ...
- Keep the member signed in -Select to ensure the Member currently signed in remains signed in until intentionally signed out. Signing out occurs when the Member's name is selected in the top of the screen. When not selected the Member currently signed in will be automatically signed out after an Order/Sale is finalised or cancelled.
IMPORTANT
It is recommended to NOT select the Keep the member signed in option when Member Campaigns are required to be applied to Orders placed by Members. Selecting the Keep the member signed in option DOES NOT always guarantee Member Campaigns will be applied.
- Allow member sign in continued ...
- Auto logon member if an event is on - Select to ensure the Member that is associated with an event is automatically signed in when the event is taking place.
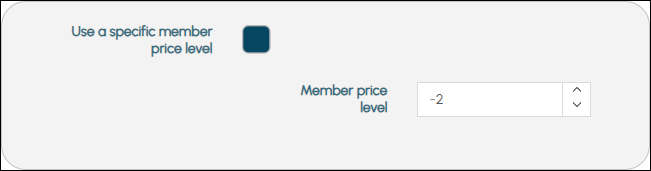
- Use a specific member Price level - Select to ensure the Member Price Level set will be used for all signed in Members. Once selected the following options will be available:
- Allow member sign in continued ...
- Use a specific member Price level continued ...
- Member price level - Select the Price Level to be applied to all Members. The default value of -2 ensures pricing is deferred to swiftpos to determine, which would normally be the normal price.
- Use a specific member Price level continued ...
- Allow member sign in continued ...
- EGM Lookup - This option does NOT apply to TouchMini v1. It only applies to TouchMini v2.
Payment Tab ▲ ▼
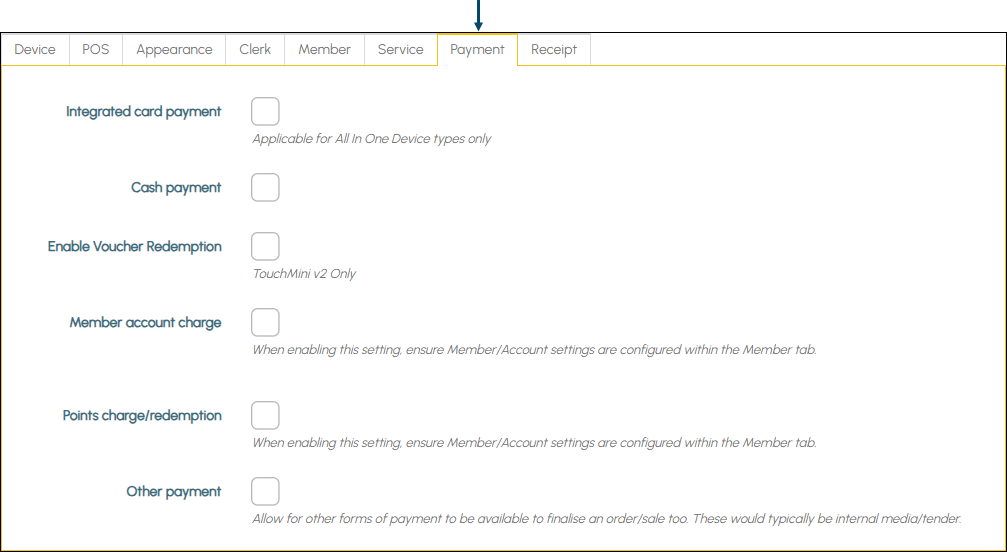
- Integrated Card Payment - Only applicable for All In One Device Device Types. Select to allow for card payments to be made using an All In One Device approved for use. Once selected the following Payment Types will be available:
- Payment Type - The following options will be available:
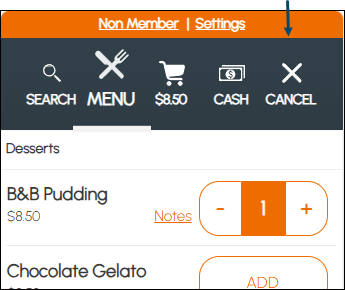
- Cash Payment - Select to ensure a Cash option will appear in the header to allow for the payment in cash of the Order/Sale at the swiftpos Touch Terminal.
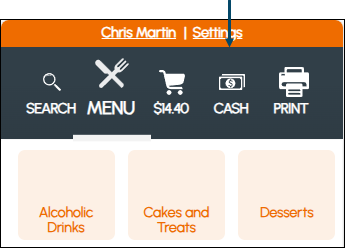
Example of a Cash payment button being displayed in TouchMini
Notes...
If the Cash Payment option is selected then it is recommended to ensure the Do not Display Receipt is also selected. Once the CASH menu item is selected, the Order will appear in Orders Pending at the swiftpos Touch Terminal assigned to the OrderAway Location.
- Enable Voucher Redemption - Select to enable the redemption of Vouchers on this device.
- Member account charge - Select to allow Members to be able to pay by charging to an Account. Once selected the following options will be available:
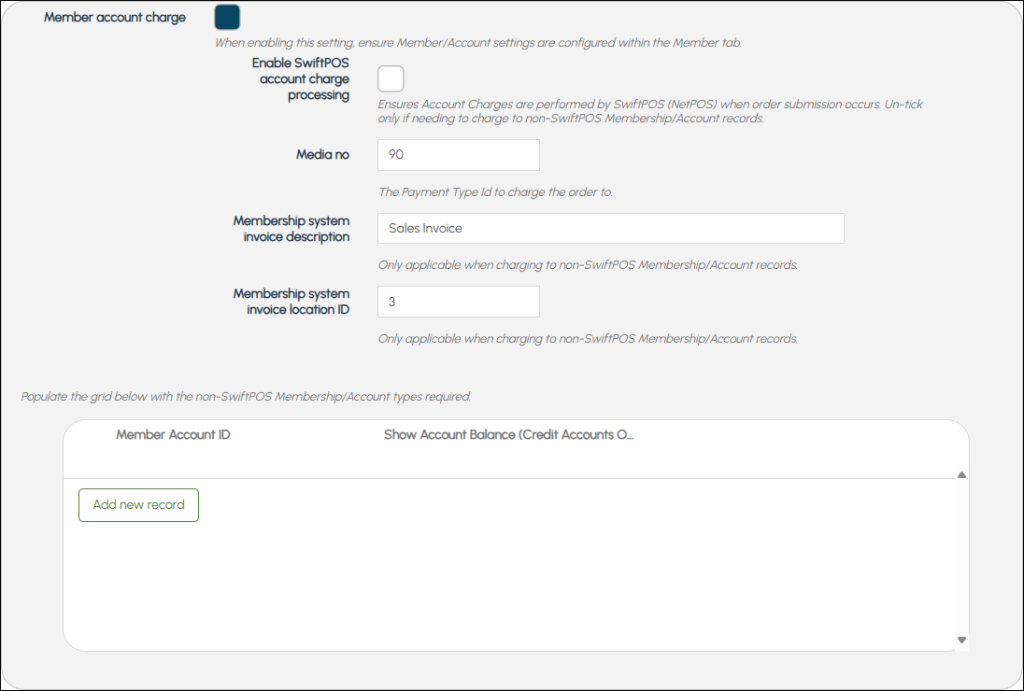
- Member Account charge continued ...
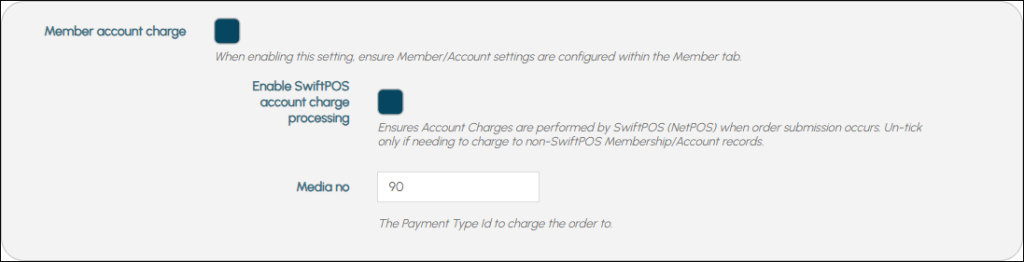
- Enable swiftpos account charge processing - Select to ensure that Orders paid for by charging to an Account are processed by swiftpos and posted to the Member's Account. Once selected the following options will be available:
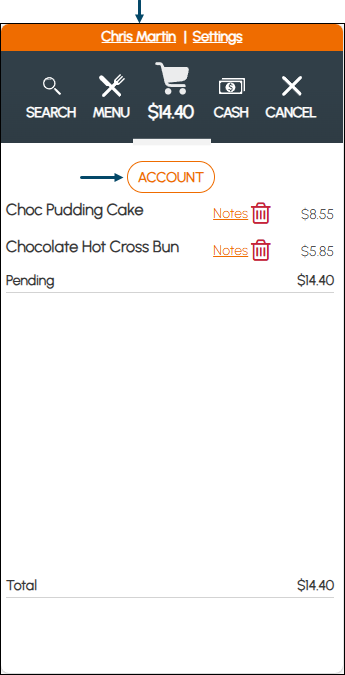
Example of an Account payment button being displayed in TouchMini.
It will only be displayed if a Member has been added to the Order
- Member Account charge continued ...
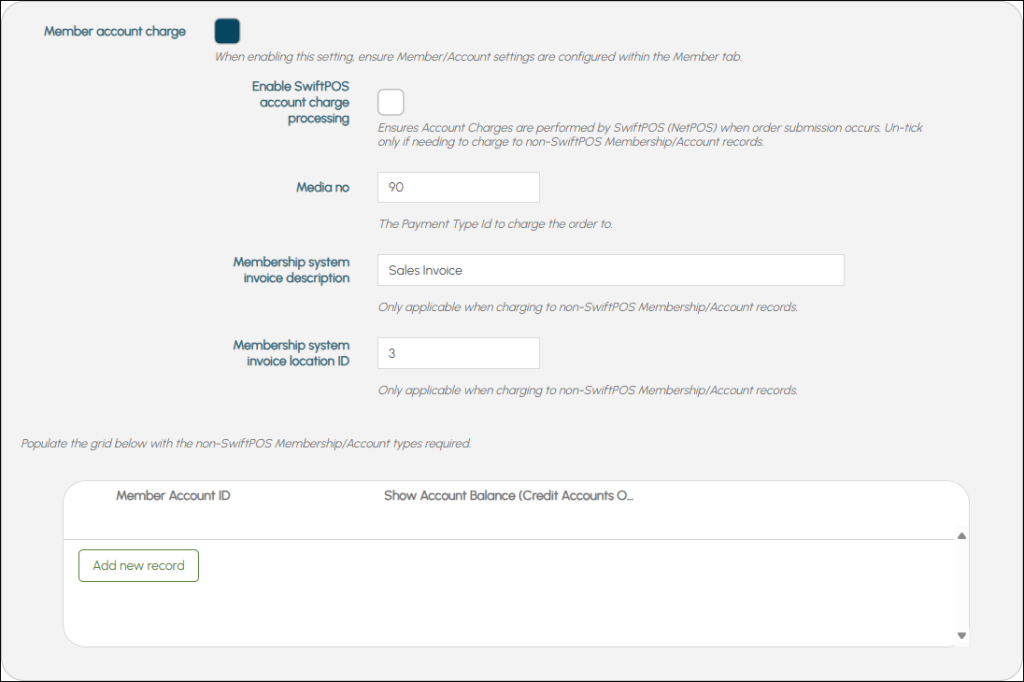
- Enable swiftpos account charge processing continued ... If left unselected, then configure the remaining settings to enable non-swiftpos accounts to be charged.
Notes...
The Member account charge option will only be visible if the Allow member sign in option is selected in the Member tab. Also, charging to an Account must cover the total of the whole Order. Partially paying by charging to an Account and then paying the remaining amount using another payment Media is currently NOT supported.
- Member Account charge continued ...
- Media no - Displays/Set the Media No to the swiftpos Media No to be used when charging a Member's Account. For example, 90.
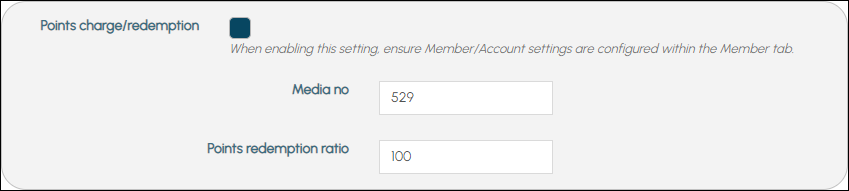
- Points Charge/Redemption - Select to allow the payment of an Order using a Member's accumulated Loyalty Points. Once selected the following options will be available:
- Points Charge/Redemption continued ...
- Media No - Displays/Set the Media No to the swiftpos Media No to be used when paying with points. For example, 529.
- Points Redemption Ratio - Displays/Set the ratio at which points will be redeemed. For example, 100.
Notes...
The Points charge/redemption option will only be visible if Allow member sign in option has been selected. Also, paying with points must cover the total of the whole Order. Partially paying in points and then paying the remaining amount using another payment Media is currently NOT supported.
With the Points redemption ratio setting, if it is set to anything other than 0, then this is what will be used in TouchMini. If it is set to 0, then the same Redemption Ratio used in Touch will be used in TouchMini.
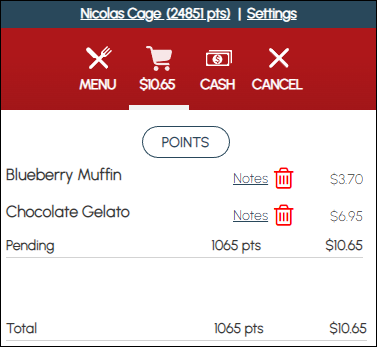
Example of the Points button being displayed when the Points charge/redemption option is selected
- Other Payment - Select to allow for other forms of payment when finalising An Order. This would generally be internal media/tender types. Once selected the following options will be available:
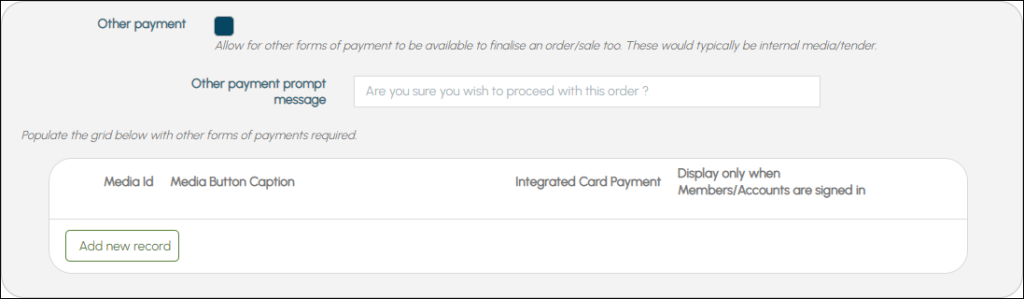
- Other Payment continued ...
- Other Payment Prompt Message - Displays/Enter the prompt to be displayed when Pay is selected on the TouchMini device.
- Other Payments Grid - Edit/Lists the Payments currently available.
- Media ID - Displays/Enter the swiftpos Media ID
- Media Button Caption - Displays/Enter the caption to be displayed when selecting the Payment option.
- Integrated Card Payment - Select to enable.
- Display only when Members/Accounts are signed in - Select to enable.
- Add New Payment - Select to add new Media type.
- Delete - Select to delete the Payment record.
- Add New Record - Select to add a new Payment record.
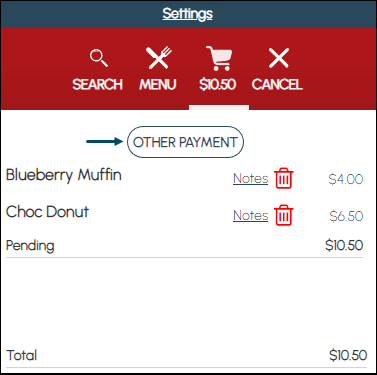
Example of the Other Payment button being displayed when the Other Payment option is selected
Datamesh (APAC) ▲ ▼
If selected, then the following options will be available:

- Surcharge ID - Displays/Enter (if applicable) the swiftpos Surcharge ID to be assigned to any surcharges associated with payments.
- Media No - Displays/Enter the swiftpos Media No to be associated with payments.
- Card Payment Discount - Select to ensure Order/Sale level discounts are enabled. Once selected the following options will be available:
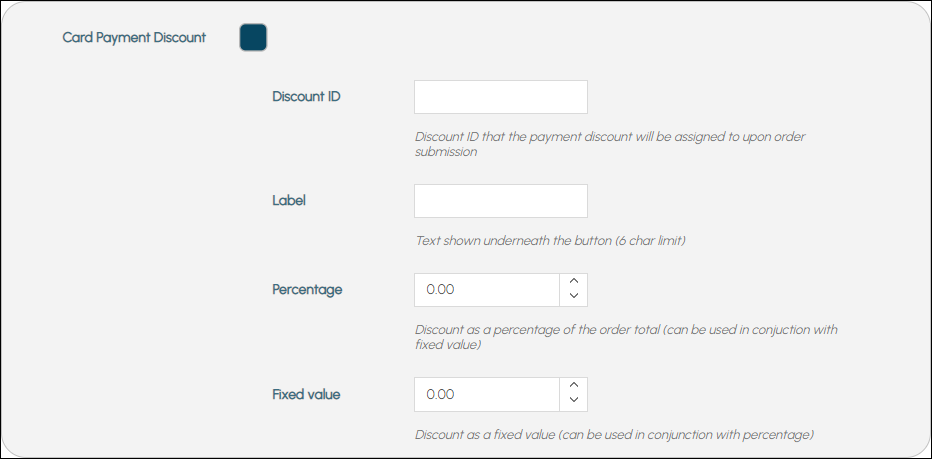
- Card Payment Discount continued ...
- Discount ID - Displays/Enter the ID of the Back Office pre-defined Discount this Discount will be assigned to. This will be used for reporting purposes.
Notes...
If the Discount ID is left blank, it will default to a value of 0 (Non pre-defined ITEM Discount). If an invalid ID is entered, it will report under that invalid ID in Back Office and show as an OTHER discount.
- Online Payment Discount continued ...
- Discount ID continued ...
- Ensure the Back Office pre-defined Discount has the:
- Web Enabled option selected.
- Auto Apply Discount option selected.
- Dates and Times selected for a Date/Time range..
- Ensure the Back Office pre-defined Discount has the:
- Discount ID continued ...
Notes...
The Offer Discount ($ Value) and Offer Discount (Percentage) values of the Back Office pre-defined Discount are ignored by TouchMini as these are configured below.
- Card Payment Discount continued ...
- Label - Displays/Enter the description for the Discount that will appear in TouchMini in the toolbar. A maximum of 6 characters is allowed.
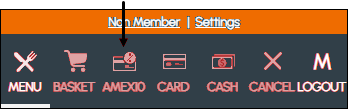
Example of how the Discount menu option and Label value AMEX10 will appear in TouchMini.
Notes...
The icon for the Discount menu option is NOT customisable.
- Card Payment Discount continued ...
- Percentage - Displays/Set the percentage of Discount to be applied to the total value of the Order. For example, 10%. This can be used in conjunction with the Fixed Value.
Notes...
If a value of 100% is entered, the Order/Sale will NOT be able to be processed due to it being a zero value.
- Card Payment Discount continued ...
- Fixed Value - Displays/Set the value of the Discount. For example, $5.00. This can be used in conjunction with the Percentage.
Notes...
Once configured, clear the TouchMini Device's cache. This will ensure the Discount menu option is displayed in the toolbar at the top of the screen.
Payworks (UK) ▲ ▼
If selected, then the following options will be available:
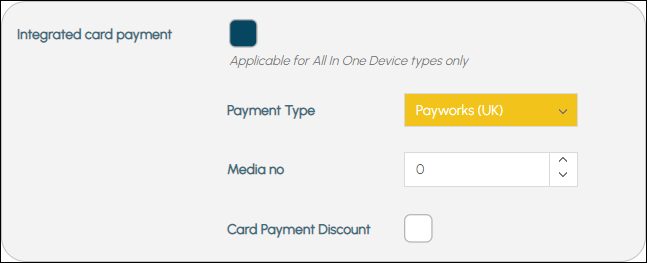
- Media No - Displays/Enter the swiftpos Media No to be associated with payments.
- Card Payment Discount - Select to ensure Order/Sale level discounts are enabled. Refer HERE for more information.
Positive (UK) ▲ ▼
If selected, then the following options will be available:

- Media No - Displays/Enter the swiftpos Media No to be associated with payments.
- Card Payment Discount - Select to ensure Order/Sale level discounts are enabled. Refer HERE for more information.
Oolio (Adyen) ▲ ▼
If selected, then the following options will be available:
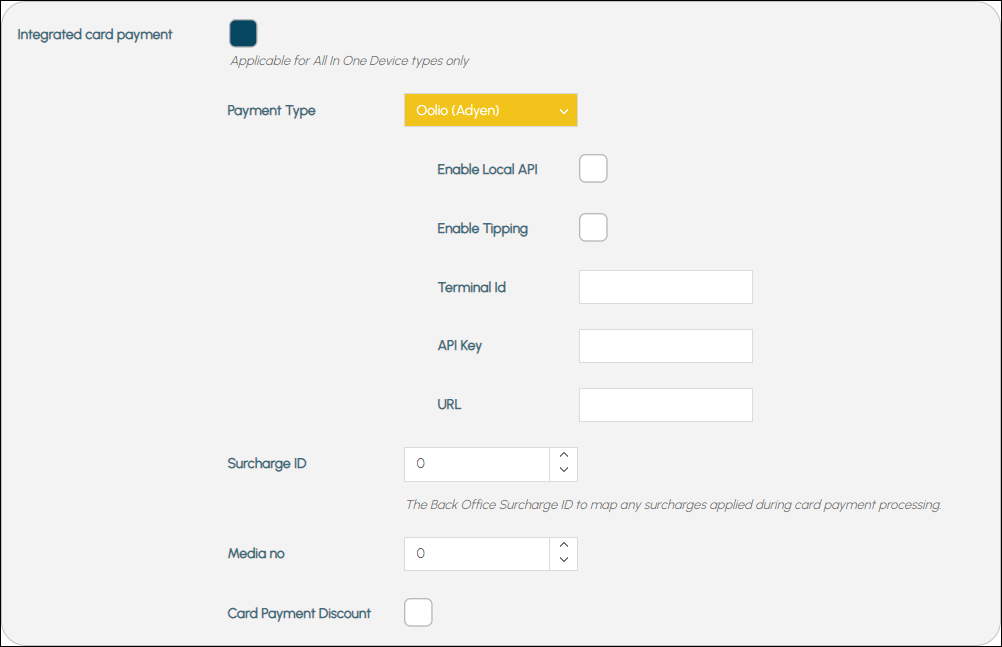
- The following options are only visible if the All In One option is selected against the Device Type setting in the Device tab:
- Enable Local API – Select to enable.
- Enable Tipping – Select to ensure that a prompt for Tipping is enabled when taking a card payment. Refer to How To Configure For Tipping for more information.
- Terminal Id – Displays/Set to the Terminal ID provided by Adyen. This is usually in the format XXXX-YYYYYYYYYYYYYYY where:
- XXXX represents the model no.
- YYYYYYYYYYYYYYY represents the serial no.
- For example, S1F2-000158224612989.
- These can be provided by the Oolio Pay KYC team, found typically in the Adyen Portal under Point of Sale > Terminals.
- API Key – Set this to the API key that provided by Adyen, that has been generated for the Merchant by the Oolio Pay KYC team. Refer to Get Your API Key for more information. The steps they would follow can be found here: https://docs.adyen.com/point-of-sale/design-your-integration/terminal-api#api-key. The Oolio Pay KYC team should have also enabled the Terminal API for the Merchant. Refer to the Enable Terminal API for more information.
- URL – Displays/Set the URL to connect to the Adyen Cloud API. Ensure this is set to:
- For Production (live) environments:
- Australia – https://terminal-api-live-au.adyen.com/sync
- Europe – https://terminal-api-live.adyen.com/sync
- United States – https://terminal-api-live-us.adyen.com/sync
- For Testing
- Globally – https://terminal-api-test.adyen.com/sync
- For Production (live) environments:
- Surcharge ID - Displays/Enter (if applicable) the swiftpos Surcharge ID to be assigned to any surcharges associated with payments.
- Media No - Displays/Enter the swiftpos Media No to be associated with payments.
- Card Payment Discount - Select to ensure Order/Sale level discounts are enabled. Refer HERE for more information.
Verizone (NZ) ▲ ▼
If selected, then the following options will be available:

- Media No - Displays/Enter the swiftpos Media No to be associated with payments.
- Card Payment Discount - Select to ensure Order/Sale level discounts are enabled. Refer HERE for more information.
POS Tab ▲ ▼

- Terminal ID (BETA) - Displays the ID of the Terminal the selected device is currently assigned to. To assign a Terminal ID to a TouchMini device, refer to How To Enable A Device for more information.
IMPORTANT
The Terminal ID feature is currently a BETA release version and is introduced to support the locking of TouchMini devices to an Event Area. Further development of this feature is scheduled and will be coming soon ...
- Default Layout ID to display - Displays/Enter the ID of the Layout that is to be considered as the Home Layout for the device. Refer to Menus topic more information.
- Clear Layout Cache - Select to clear the browser's cache and ensure the Menus are reloaded.
- Record Sale in Alternate Location - Select to enable. Once selected the following options will be available:
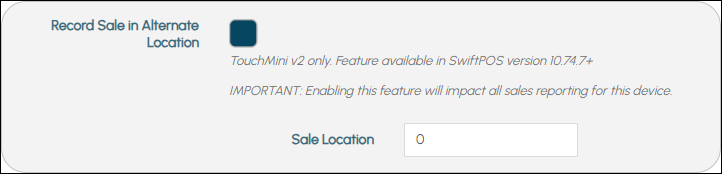
- Record Sale in Alternate Location continued ...
- Sale Location - Displays/Enter the ID of the Alternate Location against which sales are to be recorded.
IMPORTANT
Enabling this feature will impact all sales reporting for this device.
Notes...
This feature is only available in TouchMini v2 from v10.74.7+. Once enabled, the Location ID displayed here will be submitted with each sale. The device's Terminal ID will remain the same, as it will still make use of the Touch Order Master terminal in the Location the terminal is in.
- Product search - Select to ensure a Search option will appear in the header to allow searching of Products other than those found in the Menus.

- Override Default Price Level - Select to override the override the Location's Default Price Level that is normally used for Guest/Non-Member Orders. Once selected the following options will be available:

- Override Default Price Level ID continued ...
- Guest Price Level ID - Displays/Enter the ID of the Price Level that will be used for all Guest/Non-Member Orders.
- Free Text Instructions/comments PLU - Displays/Enter the PLU Number to use for free text instructions/comments in all Orders. When entered and saved, the value entered will also be displayed in the RestfullSwiftPOSAdaptor-CommentsItemId setting here.
Notes...
This setting is shared by all devices that are linked to the Location above.
- List Menu Items by - Select from the drop down list the swiftpos field used to source the name of Menu Items. The following Product Description will be used, depending on the option selected:
- Description - The Product Description will be used. This is also the default.
- Short Description - The Short (16 Char) description will be used.
- Long Description - The Alternate Description will be used.
- Layout Caption - The Caption associated with a Product POS Key.
Notes...
If anyone of the fields sourced are empty or blank the the Product Description will be used by default.
- Member No For Guest Orders - Displays/Enter the ID of the Guest Member that was created to be used as the default Guest Member when no Member is included in An Order (that is, a patron is a Guest and not a Member when they have not signed in). For example 999999999.
- Lookup Member Using - Select from the drop down list the field used to lookup Members when retrieving/submitting data. For example, MemberNo.
- Enable Quantity Checks - Select to ensure either the SOH or Available Servings quantities are checked to ensure the appropriate warnings are displayed when the levels set are reached. Turning on will prevent Items/Products being ordered when no longer available. Once selected the following options will be available:

Notes...
Whether the SOH or Available Servings quantity is checked, that choice is set here. Also, when this option is enabled, ensure that Available Servings has also been enabled in the Table Tracking Settings at the swiftpos Touch terminal.
- Turn on quantity checks continued ...
- No stock qty - Displays/Set the quantity at which a No stock warning (configured below) will be displayed against an Item/Product, and therefore is no longer available to be ordered. The quantity set here will be used when checking either the SOH or the Available Servings levels currently available. Set to 0 to ensure no warning is displayed.
- No stock warning - Displays/Set the warning notification to be displayed against an Item/Product when the No stock qty (configured above) has been reached.
- Limited stock qty - Displays/Set the quantity at which a Limited stock warning (configured below) will be displayed against an Item/Product. Set to 0 to ensure no warning is displayed.
- Limited stock warning - Displays/Set the warning notification to be displayed against an Item/Product when the Limited stock qty (configured above) has been reached.
Notes...
Stock Warnings will only be visible against Products that are of the type: Purchased Items, Reciped Items or Production Items.
Receipt Tab ▲ ▼
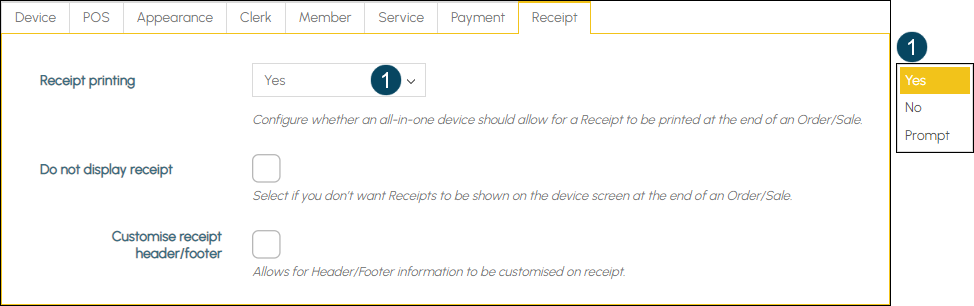
- The following options are only visible if the All In One option is selected against the Device Type setting in the Device tab:
- Receipt printing - Select from the drop down list one of the following:
- Yes - Select to ensure Receipts are always be printed.
- No - Select to ensure Receipts are NOT printed.
- Prompt - Select to ensure a prompt is displayed to confirm whether a Receipt should be printed or not.
- Receipt printing - Select from the drop down list one of the following:
- Do not display receipt - Select to ensure the receipt is NOT displayed on the device.
- Customise receipt header/footer - Select to allow for the customising of the Receipt header/footer information. Refer How To Configure For Receipt Printing for more information. Once selected the following settings will be available:

Notes...
This should only be selected if the Receipt generated by the Touch Master Orders Terminal is NOT required to be retrieved.
IMPORTANT
Also, the Address and ABN details are sourced as follows:Initially from the Custom Receipt Header/Footer details (in Venue Manager), if the option has been selected.Then from the Location Contact Info, if NOT blank.Lastly, from the Registration.
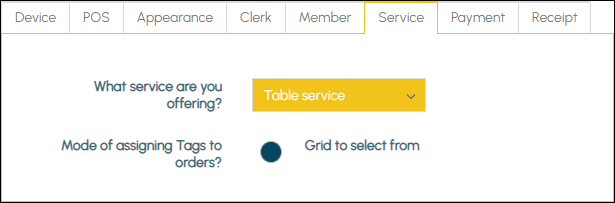
Service Tab ▲ ▼
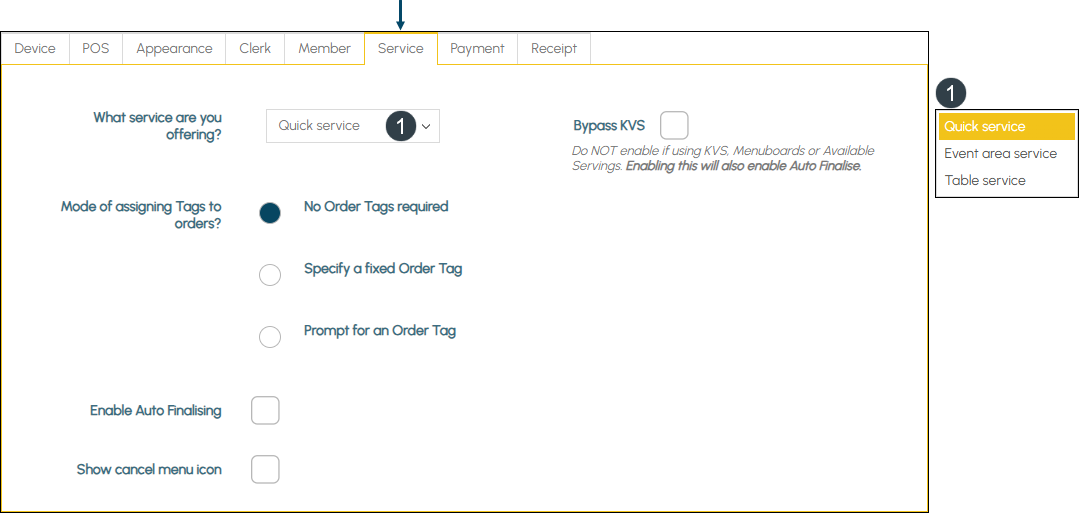
- What service are you offering? - Select the service being offered from the following:
- Enable Auto Finalising – Select to ensure paid Orders are automatically finalised at Touch. When selected this option will override the Auto Finalise option at Touch.
- Show cancel menu icon - Select to ensure a Cancel option will appear in the header to allow for the cancelling of the Order.
Once selected the following options will be available:

- Show cancel menu icon continued ...
- Pre-cancel message - Displays/Enter a message for the prompt that will be displayed when the Cancel menu option is selected.
- Bypass KVS - Select to ensure KVS is bypassed. Used in conjunction with Quick Service and ensures dependency on Table Tracking is removed.
IMPORTANT
DO NOT SELECT if the Venue is making use of Menu Boards or Available Serving features.
Notes...
Selecting this option will also ensure the Enable Auto Finalising option is selected.
Refer to Patron Service Configurations for more information.
Quick Service ▲ ▼
Select to ensure the TouchMini device is ready to be used in a Quick Service mode. If selected, then the following options will be available:
- Mode of assigning Tags to orders - Select one of the following:
- No Order Tags required - Select to ensure Orders are NOT tagged.
Notes...
Order Tags are tags that are added to an Order and generally provide information regarding the delivery location of an Order. This can be in the form of a fixed location (VIP room), a buzzer, a name, a table, a seat, etc.
- Mode of assigning Tags to orders continued ...
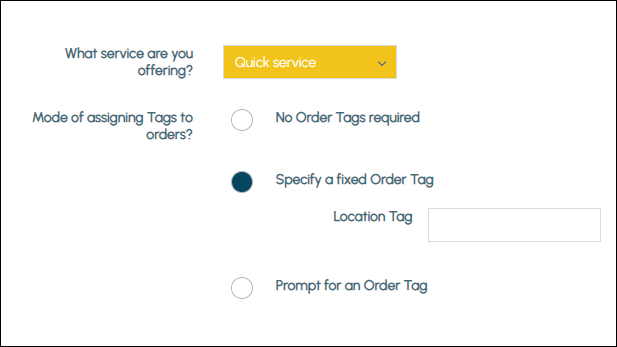
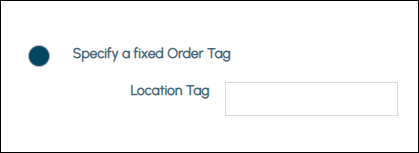
- Specify a fixed Order Tag - Select to specify a fixed location the TouchMini device is assigned to. For example, the Table number to which the TouchMini Tablet is assigned. Once entered, this information will be tagged to the Order. Once selected the following setting will be available:
- Mode of assigning Tags to orders continued ...
- Specify a fixed Order Tag continued ...
- Location Tag - Displays/Enter the fixed location. For example, the Table 10.
- Specify a fixed Order Tag continued ...
Notes...
This option requires the Direct To POS Terminal option to be selected when the OrderAway Location is activated.
- Mode of assigning Tags to orders continued ...
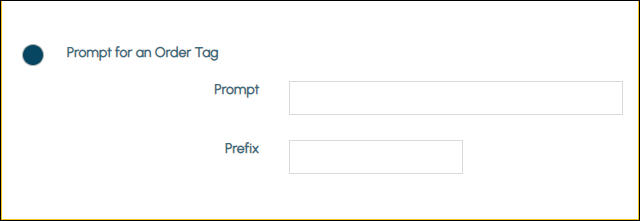
- Prompt for an Order Tag - Select to prompt Clerks/Staff for the entry of the patron's location in support of the delivery of the Order. Once entered, this information will be tagged to the Order. Select to display the following fields:
- Mode of assigning Tags to orders continued ...
- Prompt for an Order Tag continued ...
- Prompt - Displays/Enter the prompt a patron will see when being prompted for the location of the TouchMini device. For example, Enter your Table number.
- Prefix - Displays/Enter an appropriate description that best describes the location the patron enters. For example, Table. This will then result in Table 15 being displayed on the TouchMini device, as opposed to just the identifier 15 (being the Table number the patron enters).
- Prompt for an Order Tag continued ...
Notes...
This option requires the Direct To POS Terminal option to be selected when the OrderAway Location is activated.
Event Area Service ▲ ▼
Select to ensure the TouchMini device is Event aware and is primed for use in assigned Event Areas. Refer to How To Configure For Event Service Mode for more information.
Notes...
When the Event area service option is selected, by default the configuration of the Member tab is disabled. Instead it will appear as follows:
To ensure configuration of the Member’s tab is enabled, ensure this option is NOT selected.
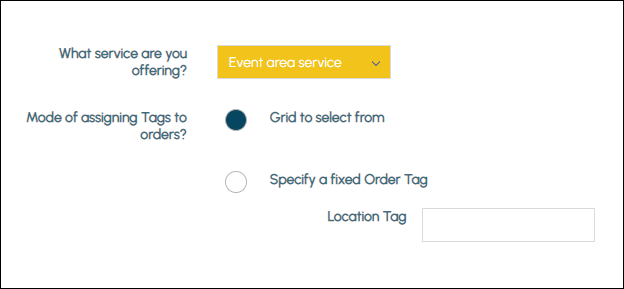
- Mode of assigning Tags to orders - Select one of the following:
- Event area service - Select to ensure the device is Event aware and able to be used for Venues holding Events.
- Mode of assigning Tags to orders - Select one of the following:
- Grid to select from - Select to display the TouchMini's Event Areas in the form of a grid. For example:

Notes...
Event Areas will only be displayed when there is an Event Session currently in progress and the TouchMini is assigned to a Location that is associated with the same Event Session.
- Mode of assigning Tags to orders continued ...
- Specify a fixed Order Tag - Not applicable to the Event area service option.
Table Service ▲ ▼
This option only applies to TouchMini v2. Select to ensure the TouchMini v2 device is ready to be placed into Table Service mode to facilitate the taking of Table Orders.
- What service are you offering? - Select from the drop down list the Table Service option. Once selected Clerks/Staff using TouchMini will be able to pay for or submit to Touch, Table Orders.
How To? ▲ ▼
How To Configure For Table Service Mode? ▲ ▼
The following will need to be configured to ensure the TouchMini device can operate successfully in Table Service mode:
- Ensure the Table ranges are correctly configured in the Table / TAB # Ranges in Touch for the Location in which the TouchMini device is to be used.
- Ensure the Table Service option is selected from the What service are you offering? drop down list in the Service tab of the settings for the selected device.
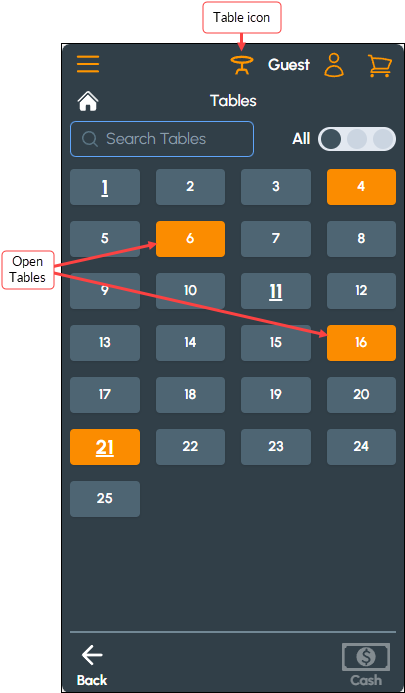
How To Use Table Service Mode? ▲ ▼
Do as follow:
- Select the Table icon at the top of the screen, this will then display the Tables in a grid format for all the Tables configured in the Table / TAB # Ranges setting in Touch.
- Select the Table # for which the Order is to be placed.
- Add Items/Products to the Order.
- Submit the Order.
- While still open in Touch, the Table will be displayed as open (orange background) in TouchMini v2.
- Select the radio buttons above the grid to toggle between views of All / Open and Closed Tables.
End of article. ▲