
Refer HERE for more information.
Subjects ▲ ▼
About ▲ ▼
What To Consider? ▲ ▼
- Inventory/Stock Management - The following is a guide to understanding those functions in Swiftpos that can affect stock levels (SOH).
| Functions That Increase SOH | Functions That Decrease SOH |
| Credit Sales (Voids) | Location Transfers Out |
| Location Transfers In | Loss/Theft |
| Positive Stocktake Variances | Negative Stocktake Variances |
| Supplier Invoices | Orders/Sales |
| Supplier Rebate Stock | Promotional Sales |
| Staff Drinks/Meals | |
| Supplier Credits | |
| Wastage |
- Locked Locations - A Location is considered locked while a stocktake is undertaken. This ensures that any stock level changes as a result of orders/sales are held while the stocktake is underway. Only when the stocktake is committed and the Location is released will the stock levels be adjusted to include the held stock changes.
Notes ...
Only stock associated with orders/sales are affected by locked Locations. Anys outstanding Stock movements such as Supplier Invoices, Adjustments and Transfers will all be processed as per normal while a Location is locked. Any Supplier Invoices posted after the date and time the Location was locked will not effect stock-on-hand until the stocktake has been completed and the Location has been released.
- Locked Locations continued ...
A Location is locked when it is selected using the Add option in the footer section and added to the grid in the Stocktake & Period End screen. In the Locations screen, a padlock icon will appear in the first columns opposite those Locations that have been locked. For example:

- Locked Locations continued ...
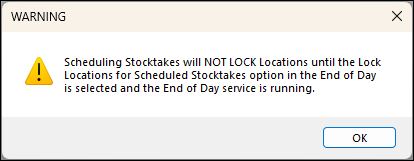
To unlock a locked Location select the Release option. To unlock all Locations, select the Release All option from the Release option. - Locations can be scheduled to be locked using Schedule Stocktakes option HERE and the Lock Locations for Scheduled Stocktakes option HERE in the End of Day process.
- Not all Locations may be listed in the Locations screen when adding a new stock count. This may be due to the fact that:
- Some of the Locations are Drawing Stock from another Location.
- The Locations screen will only display those Locations the logged in clerk/staff member is authorised to access. Access is managed HERE.
- The Stock Hold feature - A stock hold can be applied to each Location in Swiftpos, allowing any stock level changes from processed sales to be held temporarily while a Stocktake is underway. The way in which this feature works is that all of the sales processed for a locked Location will be held until the Location is released. Upon releasing stock again, the totals will be moved back to the Location stock table and trading will continue as normal. Please see the following instructions for details regarding the process of locking and releasing stock:
When Is It Used? ▲ ▼
Used to lock Locations and record a Stocktake, as well as record a Period opening stock.
File Formats ▲ ▼
CSV Stocktake Import File ▲ ▼
The following is the format required when using the Import from File option in the Import Stock Count screen to import a CSV file containing stocktake count data. This provides users with the flexibility of being able to perform their stocktake using any application/device that is capable of creating a CSV file in the appropriate format.
Notes ...
While the format for the file is provided for all users of the Swiftpos we do not provide support for creating such files.
| Field | Length | Mandatory | Description |
| Barcode | 14 characters | Yes | This field stores the barcode of the item/product that has been scanned. For example, 4500032693876. |
| Quantity | 5 characters | Yes | This field stores the quantity of the item/product that has been scanned. For example, 2. |
| Location | 4 characters | Yes | This field stores the Location where the item/product has been scanned. For example, 0001. |
| Date | 6 characters | No | This field stores the date that the stocktake was counted on. For example, 01012007. This value is currently NOT used by the Swiftpos import. |
How To? ▲ ▼
Screens ▲ ▼
- Import Stock Count
- Location Inventory Count
- PDE Upload
- Products Wizard
- Location Scheduled Stocktakes
- Stocktake & Period End
- Unmatched Products
Import Stock Count Screen ▲ ▼
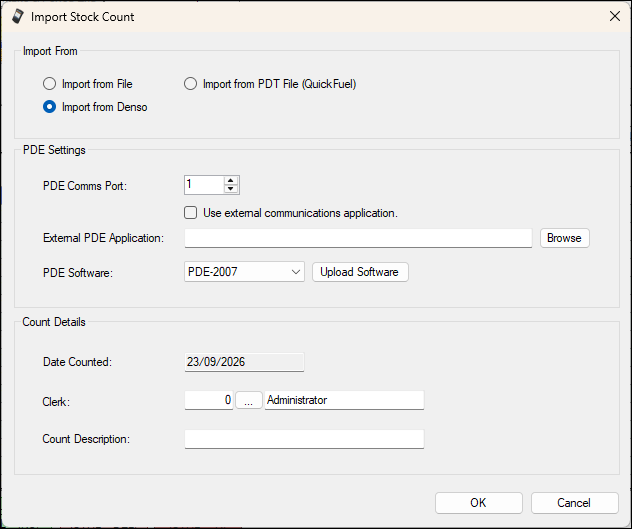
To access, select the Import Stock Count option from the Tools option in the footer section.
Sections ▲ ▼
Import From Section ▲ ▼

- Import from file - Select to import from a CSV file.
- Import from Denso - Select to import from a connected Denso device.
- Import from PDT File (QuickFuel) - Select to import from a PDT file.
PDE Settings Section ▲ ▼
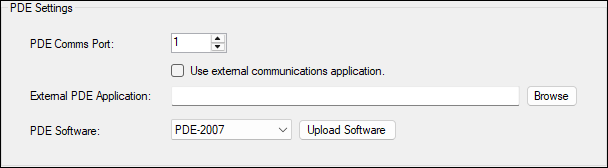
Ensure that the relevant settings are configured correctly.
Count Details Section ▲ ▼
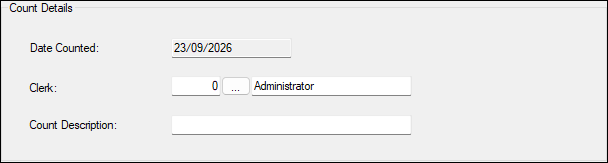
- Date Counted - Displays today's date.
- Clerk - Select to open the Search Clerks screen to select a Clerk.
- Count Description - Enter an appropriate description to identify the stocktake file to be imported. For example, Duke's Stock Count Section 10B.
Location Inventory Count Screen ▲ ▼
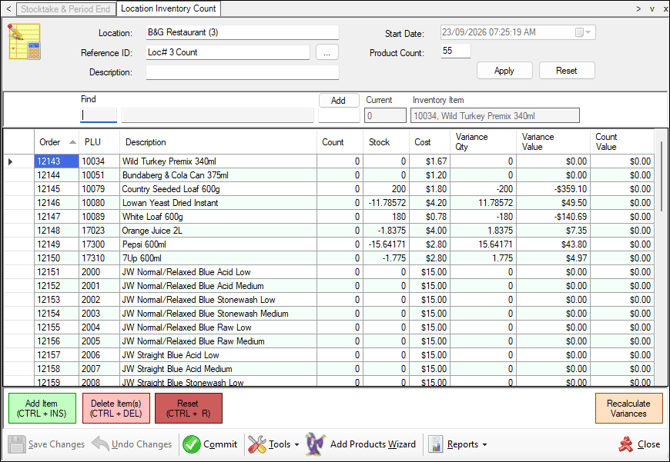
To access, select the Count Entry option in the footer section of the Stocktake & Period End screen. Used to add items/products for a manual count or import Stocktakes from the PDE.
Sections ▲ ▼
Header Section ▲ ▼

Used to limit the number of rows displayed in the grid section. Once all filters have been selected, select the Apply option to apply them. Otherwise, select the Reset option to clear all filter selections.
Find fields are also provided to facilitate the locating of a specific row in the grid section.
Grid Header Section ▲ ▼

The Find fields item's/product's Code/PLU and Description are provided to facilitate the locating of a specific row in the grid section.
-
Add/Replace - Toggle select the Add option until the Replace option is dislayed, or toggle select the Replace option until the Add option is displayed.
- Add - Used to increase or decrease the count of an already counted item/product.
- To increase the count of an already counted item/product, select the already counted item/product and enter a positive count value in the field below the Add option and select the Enter option. The positive value entered will added to the value in the Count column for the selected item/product.
- To decrease the count of an already counted item/product, select the already counted item/product and enter a negative count value in the field below the Add option and select the Enter option. The negative value entered will added to the value in the Count column for the selected item/product.
- Replace - Used to replace the count of an already counted item/product.
- To replace the count of an already counted item/product, select the already counted item/product and enter the new count value in the field below the Replace option and select the Enter option. The new count value entered will appear in the Count column for the selected item/product.
- To replace the count of an already counted item/product, select the already counted item/product and enter the new count value in the field below the Replace option and select the Enter option. The new count value entered will appear in the Count column for the selected item/product.
- Add - Used to increase or decrease the count of an already counted item/product.
- Current - Displays the current count value of the selected item/product.
- Inventory Item - Displays the item/product Code/PLU and Description of the currently selected item/product.
Grid Section ▲ ▼
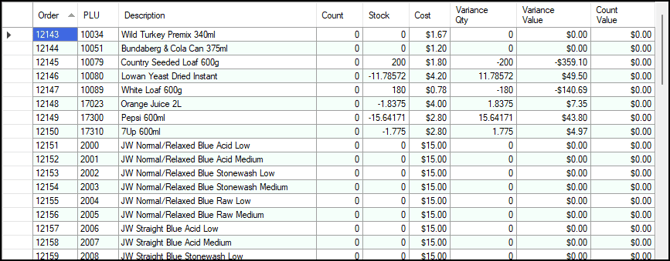
Lists the items/products included in the stocktake, along with their Order, PLU, Description, Count, Stock, Cost, Variance Qty, Variance Value and Count Value.
Noteworthy
- Order - Displays a sequence number, which represents the order in which the items/products are counted.
- Count - Displays/Enter the item's/product's counted stock quantity.
- Stock - Displays the item's/product's current Stock on Hand (SOH).
- Cost - Displays the item's/product's current cost in the selected Location.
- Variance Qty - Displays the difference between the Stock quantity and the Count quantity.
- Variance Value - Displays the value of the difference between the Stock quantity and the Count quantity.
- Count Value - Displays the value of the Count quantity.
Notes ...
Select the Save Changes option and then select the Recalculate Variances option to recalculate the Variance Qty, Variance Value and Count Value.
Grid Footer Section ▲ ▼

- Add Item - Select to open the Search Product screen and select an item/product to add to the grid. Only Purchased Item Products that are active in the selected Location will be displayed in the Search Product screen.
- Delete Item(s) - Select to delete the selected items/products from the grid. To select multiple items/products press and hold the Ctrl key while selecting the rows to be deleted.
- Reset - Select to clear the grid of all items/products.
- Recalculate Variances - Select to refresh the Variance Qty, Variance Value and Count Value (for use when other stock movements have occurred whilst the Location is locked for stocktake).
Footer Section ▲ ▼
-
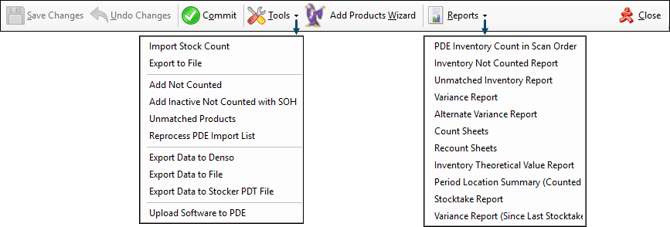
Save Changes - Select to save changes
-
Undo Changes - Select to undo the changes.
-
Commit - Select to commit the stocktake, disable the Stock Hold feature and release any locked Locations. Also, a Browse for Folder prompt will be displayed to locate and select a folder in which the following stocktake reports will be saved:
- PDE Inventory Count in Scan Order (Example of the report file saved: 20170103T151606 Location 3 PDEInventoryCountInScanOrder.pdf)
- PDE Expected Variance Report (Example of the report file saved: 20170103T151606 Location 3 PDEExpectedVarianceReport.pdf)
- Status Report (Example of the report file saved: 20170103T151606 Location 3 StatusReport.pdf)
- Value by Location (Example of the report file saved: 20170103T151606 Location 3 ValueByLocation.pdf)
- Tools - Select from the drop-down list one of the following options:
- Import Stock Count - Select to open the Import Stock Count screen to import stocktake counts from a connected PDE device and save it as a CSV file on the local PC or import from a CSV file. Refer HERE for the CSV file format information.
- Export to File - Select to export Stocktake data to a CSV file for later importing using the Import from file option.
- Add Not Counted - Select to add all active items/products in the selected Location that have a non-zero SOH value to the grid.
Notes ...
When using a PDT, use this feature to retrieve any items NOT counted that have SOH. Only use after all Stock counts have been imported from the PDT.
- Tools continued ...
- Add Inactive Not Counted with SOH - Select to add all inactive items/products in the selected Location that have a non-zero SOH value to the grid.
- Unmatched Products - Select to open the Unmatched Products screen.
- Reprocess PDE Import List - This allows you to reprocess the import file again and match to existing items/products.
- Export Data to Denso - Select to open the PDE Upload screen to export all items/products with barcodes up to 14 characters and all Locations to a connected PDE device.
Notes ...
When using a PDT, use this feature to retrieve any items NOT counted that have SOH. Only use after all Stock counts have been imported from the PDT.
- Tools continued ...
- Export Data to File - Select to select a folder into which all items/products and Locations will be exported as .TSV files (see below) for uploading to a PDA device.
- BARCODES.TSV
- LOCATION.TSV
- Export Data to File - Select to select a folder into which all items/products and Locations will be exported as .TSV files (see below) for uploading to a PDA device.
Notes ...
Only items/products with barcodes of 14 characters or less will be exported.
- Tools continued ...
- Export Data to Stocker PDT File - Select to create an Stocktaker_ddmmyyyy.xml file of the stocktake data.
- Upload Software to PDE - Select to upload the stocktaking Application to the PDE or PDA.
- Add Product Wizard - Select to open the Products Wizard which is used to return a list of items/products to add to the grid to create a stocktake list.
- Reports - Select from the drop-down list one of the reports listed. Noteworthy are:
- PDE Inventory Count in Scan Order - Select to display the Select Count screen to select a stocktake count.
- Count Sheets - Select to display and configure the Count Sheets Report Options screens, in order to generate stocktake Count Sheets to facilitate a manual stocktake. The Count Sheet options default to the same defaults as those used by the Add Products Wizard, to ensure the items/products listed on stocktake Count Sheets are in the same order as those listed Location Inventory Count screen.
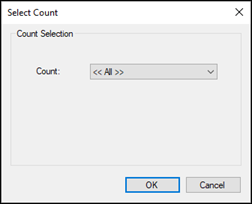
- Unmatched Inventory Report - Select to display the Select Count screen (below) to select a Stocktake count.
Recount Sheet - Select to display and configure the Recount Sheet Report Options screens, in order to generate stocktake Recount Sheet to facilitate a manual recount. Variance Options can be specified to ensure only certain items/products are included.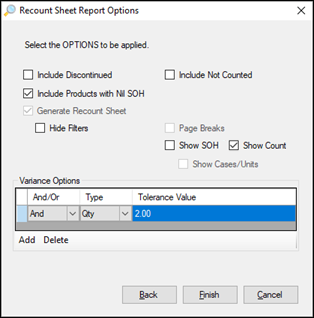
- Show Count - Select to ensure the previous count result are also reported.
- Variance Options - Use the options available to specify Variance tolerances which will then ensure that only those items/products that have a variance outside of the Tolerance options set, will be included in stocktake Recount Sheet.
- Variance Report (Since Last Stocktake) - Adds the following features:
- No stocktake has been done on this item in the last 60 days.
- Previously held stock has been mistakenly released into this trading period.
- Recipes have changed/added/deleted during the course of this item being sold.
PDE Upload Screen ▲ ▼
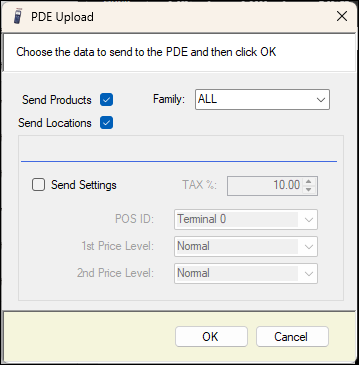
To access, select the Export to Denso option from the Tools option in the footer section of the Location Inventory Count screen.
Products Wizard Screen ▲ ▼
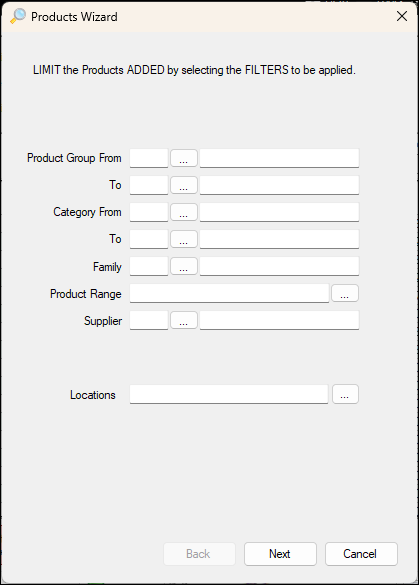
To access, select the Add Products Wizard option in the footer section of the Location Inventory Count screen. Used to limit the items/products added by selecting the filters to be applied. Once selected, select the Next option to continue to the next screen.
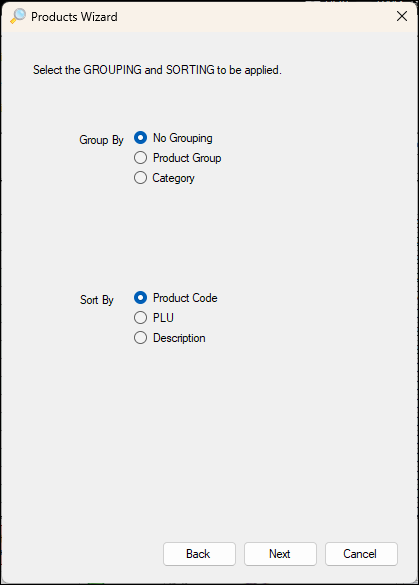
Used to select the grouping and sorting to be applied to the items/products for how they will appear when added to the grid. Once selected, select the Next option to continue to the next screen.
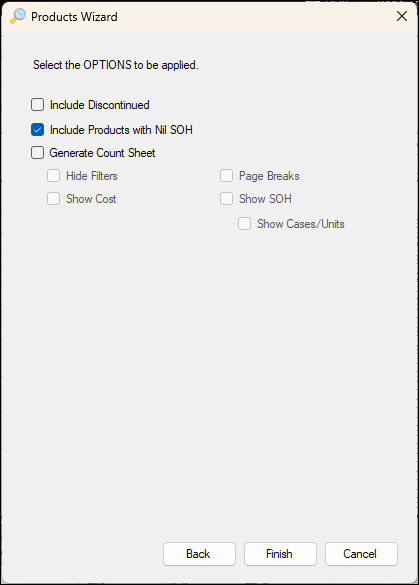
Used to select the options to be applied to further limit the items/products to be added and to specify the options required when generating the stocktake count sheets. Once selected, select the Finish option to complete the wizard and add the items/products returned by the wizard to the grid.
Location Scheduled Stocktakes Screen ▲ ▼
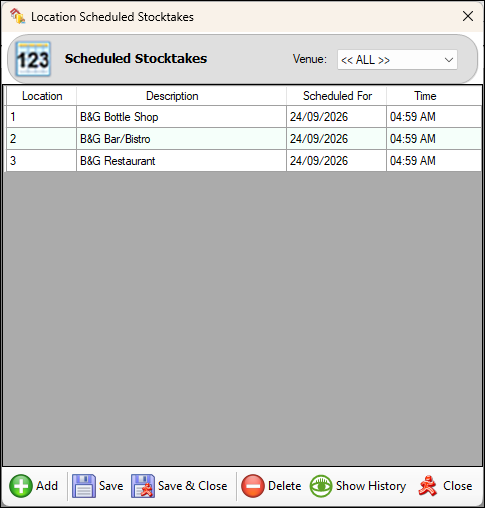
To access, select the Schedule Stocktakes option in the footer section of the Stocktake & Period End screen. Used to schedule the automatic locking of Locations in preparation for stocktaking. Once a Stocktake has been scheduled for a particular Location (by adding an entry into this screen) the schedule will be checked as part of the End of Day process to see if a Location must be locked.
Notes ...
For this check to occur the Lock Locations for Scheduled Stocktakes option must be selected. If the scheduled date/time falls on the same day the EOD process runs and the Location is not already locked for a Stocktake, the Location will be locked and remain locked until it is manually released.
Sections ▲ ▼
Header Section ▲ ▼

Used to limit the number of rows displayed in the grid section.
Grid Section ▲ ▼
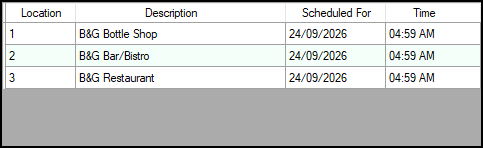
Lists the Locations the have been scheduled for stocktakes, along with their scheduled date/time.
Footer Section ▲ ▼

Add - Select to open the Locations screen to add a Location to the grid.
- Select one or more Locations
-
Select/Enter the date/time in the Schedule For option displayed in the footer section of the Locations screen. For example:

Notes ...
The following prompt maybe displayed first:
- Save - Select to save the changes.
- Save & Close - Select to save the changes and exit.
- Delete - Select to delete the selected row in the grid.
- Show/Hide History - Toggle select to show/hide stocktakes that have been scheduled in the past.
- Close - Select to exit.
Stocktake & Period End Screen ▲ ▼
To access, select the Stocktake & Period End option in the Inventory menu in Back Office. Used to lock Locations and record a stocktake, as well as record a period opening stock.
Sections ▲ ▼
Header Section ▲ ▼

-
Search - Enter the full/partial description of a Location to locate a specific Location in the grid section.
Grid Section ▲ ▼
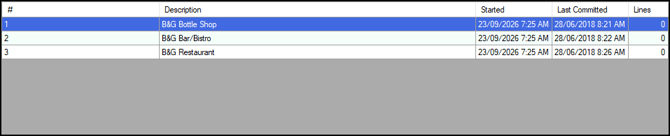
Lists the Locations that have been added to the grid, along with their:
-
Started - Displays the date/time they were added to the grid.
-
Last Committed - Displays the date/time they last had a Stocktake committed.
- Lines - Displays the number of item/products have been added to the stocktake using the Count Entry option in the footer section of the Stocktake & Period End screen.
Footer Section ▲ ▼

- Add - Select to open the Locations screen to select the Location for which a stocktake is to take place. Refer to HERE for more information.
Notes ...
Once a Location has been selected, saved and confirmed, the inventory will be locked for the duration of the Stocktake.
- Count Entry - Select to open the Location Inventory Count screen.
Notes ...
If another user is currently counting the selected Location, a message will be displayed, alerting the user that they should NOT continue unless they wish to overwrite the other user's count data.
- Record Period Opening Stock - Normally done once monthly. Refer HERE for more information.
Notes ...
This option will only be displayed if the Clerk currently logged in has the appropriate access in the Clerks Security Groups option and the Clerk Group to which they are assigned has access to all Venues via the Venue Assignment option. Also, recording a period is now logged and can be found in the Swiftpos SQL Application section of the Event Logs.
- Release - Select to release the selected Location's held stock and unlock the Location by removing it from the grid of Location Inventory Count screen.
Notes ...
When releasing the selected Location, any uncommitted stocktake entries will be deleted.
- Schedule Stocktake - Select to open the Scheduled Stocktakes screen to schedule stocktakes for Locations into the future.
- Tools - Select from the drop-down list one of the following options
- Export Data to File - Select to select a folder into which all items/products and Locations will be exported as .TSV files (see below) for uploading to a PDA device.
- BARCODES.TSV
- LOCATION.TSV
- Export Data to File - Select to select a folder into which all items/products and Locations will be exported as .TSV files (see below) for uploading to a PDA device.
Notes ...
Only items/products with barcodes of 14 characters or less will be exported.
- Tools continued ...
- Export Data to Denso - Select to export all items/products with barcodes up to 14 characters and all Locations to a connected PDE device.
Notes ...
Only items/products with barcodes of 14 characters or less will be exported.
- Tools continued ...
- Import Stock Count - Select to open the Import Stock Count screen to import stock counts.
- Reports - Select from the drop-down list one of the stocktake reports listed.
- Refresh - Select to refresh the grid with the latest stocktake data available.
Unmatched Products Screen ▲ ▼
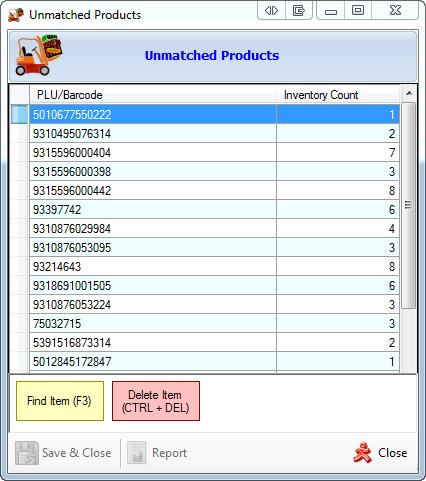
To access, select the Unmatched Products option from the Tools option in the footer section of the Location Inventory Count screen.
Sections ▲ ▼
Grid Section ▲ ▼
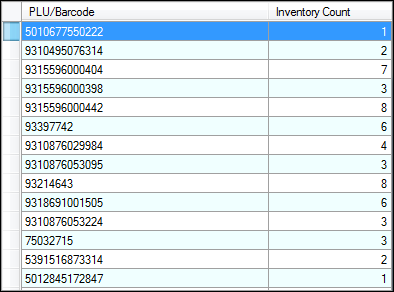
Lists all unmatched items/products along with their PLU/Barcode and the Inventory Count (the imported stock count) An unmatched item/product is one that has been imported into the Location Inventory Count screen but has not as yet been matched to an item/product in Back Office.
Grid Footer Section ▲ ▼

- Find Item - Select to open the Search Products screen and select the item/product that matches the unmatched item/product currently selected in the grid.
- Delete Item - Select to delete the selected item/product from the grid.
Footer Section ▲ ▼

- Save & Close - Select to save the changes and exit.
- Report - Select to generate a report.
- Close - Select to exit.
End of article ▲