This provides an overview of the Floor Plan Display (#402) POS Key. Refer HERE for more information.
Subjects ▲ ▼
About ▲ ▼
What Is Required? ▲ ▼
- Swiftpos v10+
What To Consider? ▲ ▼
- If required, access to this POS Key can be restricted by the Clerk Security feature.
When Is It Used? ▲ ▼
Used to display the Floor Plan layout to view and manage Tables.
How To? ▲ ▼
GET STARTED? ▲ ▼
- Review About and ensure the steps outlined HERE are addressed.
- In Keyboard Designer, ensure the Floor Plan Display (#402) POS Key is added to a Layout.
- Ensure it is given an appropriate Caption. For example, Floor Plan Display.
- Select the More Settings option to display the Settings screen and configure the POS Key as required.
- Once configured, ensure a Full Update is sent to all the Touch terminals that will be using the POS Key. Refer HERE for more information.
Screens ▲ ▼
Settings Screen ▲ ▼
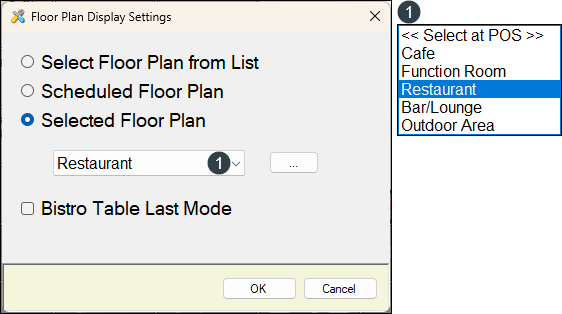
To access, select the More Settings option in Keyboard Designer. Used to configure the settings for this POS Key.
-
Select Floor Plan from List - Select to display the Floor Plan selected from a list of available plans.
-
Scheduled Floor Plan - Select to display the Floor Plan applicable to the Floor Plan Layout Times settings.
-
Selected Floor Plan - Select from the drop-down list one of the available layouts.
Notes...
Use this option when using a Floor Plan that includes multiple Locations. This way other Locations (that is, the Locations that are NOT assigned to the Floor Plan but are included on the Floor Plan) will be able display the same Floor Plan as well. Refer HERE more information.
-
Bistro Table Last Mode - This allows you to use the Floor Plan in conjunction with Bistro Mode. For example, sell a meal, select the Table on the Table layout and press the payment option.
End of article ▲