This outlines the How To Configure Floor Plans For Displaying Multi Locations in Touch.
Subjects ▲ ▼
About ▲ ▼
When Is It Used? ▲ ▼
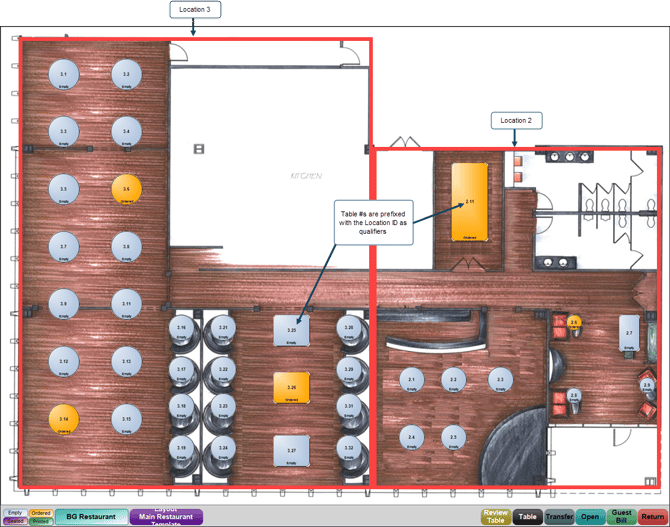
Floor Plans are now able to include the Table seating arrangements from multiple Locations, as well as providing the necessary Table information for all Tables in all Locations. Given Tables can now be numbered similarly in different Locations, that is, the same Table # can be used in more than one Location, Floor Plans that are to include Tables in multiple Locations will need to have Tables #s qualified with their Location ID. For example, Table 1 in Location 2 will need to be numbered on the Floor Plan as 2.1. Similarly, Table 1 in Location 3 will need to be numbered as 3.1, and so on.
Notes...
When Re-Numbering Tables and a starting from Table # is entered (including the Location qualifier) that already exists, then the Tables selected will be automatically re-numbered based on the highest existing Table number (within the same Location entered as the Location qualifier) plus one.
How To? ▲ ▼
- The Master Terminals in both Locations will need to have the Location Active status set to True to ensure that they are both visible to each other.
Notes...
To ensure the Floor is displayed (using the Floor Plan Display (#402) POS Key) from the other Locations (that is, the Locations that are NOT assigned to the Floor Plan, but are included on the Floor Plan) then ensure the Selected Floor Plan option is selected and the appropriate Floor Plan selected from the drop-down list.
- To access to the Multi Location Floor Plan from the other Locations (that is, the Locations that are NOT assigned to the Floor Plan, but are included on the Floor Plan) ensure the Floor Plan Display (#402) POS Key in Keyboards Designer has the Selected Floor Plan option selected and the Multi Location Floor Plan selected in the drop-down list.
End of article ▲