Micros XML-POS+
3rd Party Integration with swiftpos NetPOS
Subjects ▼
About ▲ ▼
Micros XML-POS vs Micros XML-POS+ ▲ ▼
- Micros XML-POS+ interface supports up to 16 Master Groups in swiftpos linked to the Opera Front Office, compared to only 4 supported by Micros XML-POS.
- The Micros XML-POS+ interface supports the posting of non-room charge transactions to Micros.
To Be Considered ▲ ▼
- Each time a new Location is created in swiftpos Back office it needs to be configured in the costing centres in Opera PMS. As a rule, when a Location is created in swiftpos, a corresponding cost centre MUST BE created in Opera. if there are going to be room charges in that Location.
- You can only have a maximum of 16 Master Groups in swiftpos linked to the Opera Front Office. For example, Food, Beverage, Retail and Other.
What Is It? ▲ ▼
The Micros Fidelio XML-POS is a swiftpos NetPOS interface that is used to interface with Oracle's cloud-based property-management systems (PMS) Opera. Refer HERE for more information.
What Is Required? ▲ ▼
- Micros-Fidelio XML-POS Specification v1.08+ (released February 1, 2012) for MICROS OPERA
- A NetPOS registration with the Micros Fidelio (XML-POS) interface selected.
- A Local Area Network connection between the POS PC and the Front Office Software.
- Ensure the Single Transaction Sales Mode option is selected when using this interface.
How To? ▲ ▼
How To GET STARTED? ▲ ▼
- Provide list of all the swiftpos Locations to Micros, that will be posting sales. That includes IDs & Names. This is to ensure these are configured as cost centres in their system.
- Confirm Micros have a Waiter ID configured that will match with the one you enter in the Interface setup in NetPOS.
- Configure the Serving Times.
- Micros will provide the Host Name/IP as well as the Port Number to connect to.
- Ensure the Room Charge (#59) and Room Lookup (#115) POS Key s are added to the appropriate Keyboard Layout using the Keyboard Designer in the swiftpos Back Office.
- Ensure the Customer setup for the Micros XML-POS interface in NetPOS is marked as Primary Validation and Search.
- # = Room Number
- Code = Reservation ID
- Use the Room Lookup (#115) POS Key to search for a room by name or room number.
- # = Room Number
- Code = Reservation ID
- Use the Room Charge (#59) POS Key to charge the room. Charges will record as Media 150 in swiftpos Back Office. The charge is Live, so the charge will be processed immediately.
- # = Room Number
- Code = Reservation ID
-
To send non-room charge transactions, configure as follows:
- The Sales Interface option must be set to True. This can be found HERE.
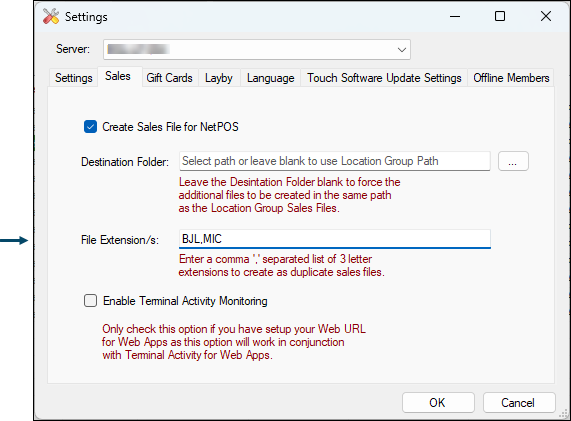
- A NetPOS sales file needs to be created. To do this, add the MIC file extension in the File Extensions field HERE.

- Micros XMLPOS+ allows Orders/Sales to be charged to a Room using the swiftpos API.
Screens ▲ ▼
NetPOS Micros-Fidelio (XML-POS+) Settings Screen ▲ ▼

To access, refer HERE and then select Settings option from the NetPOS menu. Then select the Micros Fidelio (XML-POS+) option on the left-hand side of the screen. Used to configure the settings for the Micros XML-POS+ interface.
NOTEWORTHY
- Host Name - Displays/Enter the name as provided by Micros.
- Port Number - Displays/Enter the number as provided by Micros.
- Waiter ID - Displays/Enter the ID. Ensure this ID is provided to Micros, to ensure they have a Waiter ID configured that will match the ID entered here.
- Top-up Master Group - Displays/Enter the Master Group ID to post to for Account Payments.
- Exclude Locations - Displays/Enter the Location IDs to be excluded from sending Non-room charge transactions. Enter Location IDs separated by a comma.
- Serving Times - Displays/Configure the serving times that will apply to the Venue. For example,
- Breakfast
- Lunch
- Dinner
- Snacks or Other (for everything outside the first three)
End of Article ▲
