
Subjects ▲ ▼
About ▲ ▼
What To Consider? ▲ ▼
- When an imported invoice is saved and committed as a pending Supplier invoice all of the case quantities of the items/products in the invoice are used to update the matching items/products in Swiftpos. This must be done to ensure that the costing of each item/product remains accurate for items/products that are supplied in varying case quantities.
- Modify Invoice Import screen as follows:
- Import File process - During the import process, if the procedure is unable to match the barcode being imported to an existing item/product it is currently ignored for the selected Supplier to provide the Clerk/Staff Member with an option to manually select the matching item/product. If they do select an item/product add the relevant Barcode/Supplier/Product references. If they choose not to match the item/product then ignore the line logging the details in the event log (for the line) for reference.
- When selecting the invoice from the “Import Invoices” combo have it update the Supplier for that invoice.
When Is It Used? ▲ ▼
Used to import Supplier invoices. Invoices which can then be matched and opened as Pending or saved as Pending Invoices.
How To? ▲ ▼
Screens ▲ ▼
Import from PDT File (Quickfuel) Screen ▲ ▼
-
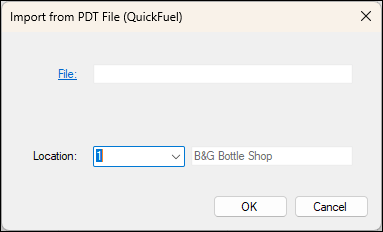
OK - Select to open the Open file screen and select the file to be imported. If the file selected contains a Supplier that cannot be matched to an existing Supplier, the following prompt will be displayed:
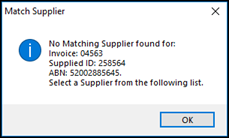
Select OK to open the Match supplier to invoice screen to select a Supplier from a list of existing Suppliers. - Cancel - Select to exit the Import process.
Import Invoice Screen ▲ ▼
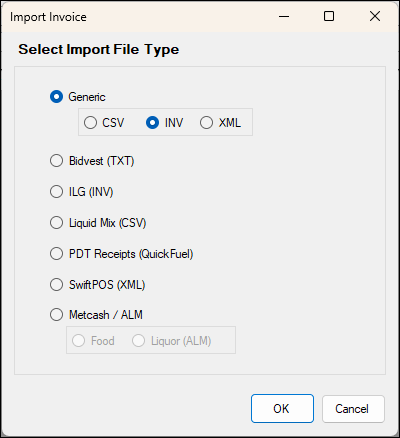
To access select the Import option in the footer section of the Import Invoices screen. Used to select and import a Supplier invoice file.
Sections ▲ ▼
Select Import File Type Section ▲ ▼
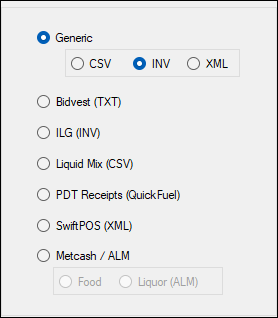
- Generic - Select to import a Swiftpos Generic Supplier invoice file in either one of the following formats:
- CSV - Select to open File Explorer to select a Swiftpos generic invoice CSV file to import. The file is generated using Swiftpos PDA software. Refer HERE for the file format information.
- INV - Select to open File Explorer to select a Swiftpos generic invoice INV file to import. Refer HERE for the file format information. The matching process is as follows:
- Match the value from field 1 (Account ID in the INV file) to the Supplier's Account ID.
- Match the value from field 4 (Supplier ABN in the INV file) to the Supplier's ABN.
- If there is still no match, then prompt to select a Supplier.
- XML - Select to open File Explorer to select a Swiftpos generic invoice XML file to import. This is generally used for Warehouse round tripping. The file can be manually generated using the Swiftpos Supplier invoice file format (XML). Refer HERE to download an example of a Supplier invoice XML file.
- Bidvest (TXT) - Select to open File Explorer to select a pipe (|) delimited Bidvest invoice TXT file to import.
- ILG (INV) - Select to open File Explorer to select an ILG invoice INV file. The file is downloaded from ILG via FTP to import.
- Liquid Mix (CSV) - Select to open File Explorer to select a Liquid Mix invoice CSV file to import. The file is provided by Liquid. For more information go to www.liquidsb.com.au.
- PDT Receipts (QuickFuel) - Select to open the Import from PDT File (Quickfuel) screen to select the PDT Receipts (Quickfuel) TXT file to import. This file is downloaded from the PDT. Refer HERE for the file format information.
- Swiftpos XML - Select to import a Swiftpos generated XML Supplier invoice (*.xml) file. Contact Swiftpos Support to request the format required.
- Metcash / ALM - This option will only be visible with a Swiftpos Advanced eTrade Registration. Select one of the following options:
- Food - Select to open File Explorer to locate and select an invoice XML file to import. Also known as a Metcash Food v7 invoice.
Notes ...
it replaces the former ALM Grocery v5 DAT file, which is no longer available.
- Metcash / ALM continued ...
Notes ...
it replaces the former ALM Liquor v5 DAT file, which is no longer available.
Footer Section ▲ ▼

-
OK - Select to open the Open file screen and select the file to be imported. If the file selected contains a Supplier that cannot be matched to an existing Supplier, the following prompt will be displayed:
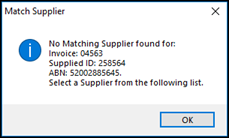
Select OK to open the Match supplier to invoice screen to select a Supplier from a list of existing Suppliers. - Cancel - Select to exit the Import process.
Import Invoices Screen ▲ ▼
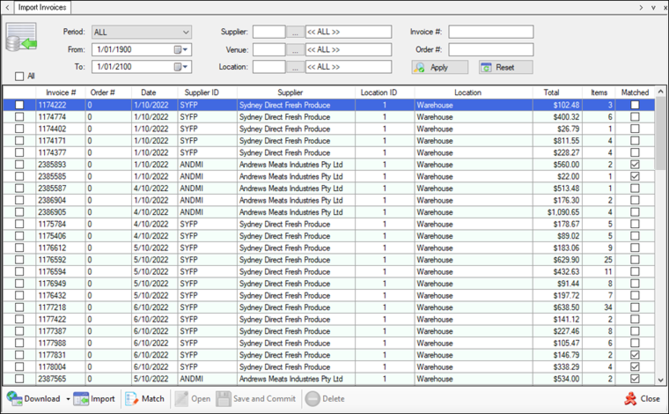
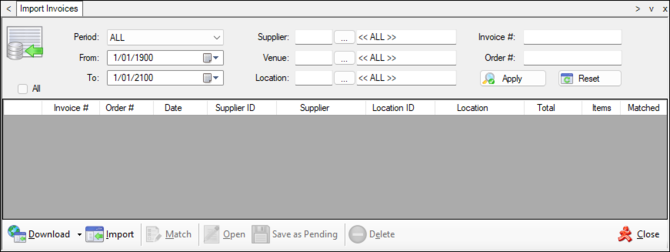
To access, select the Import Invoices option in the Suppliers menu. Used to select and import a Supplier invoice file.
Sections ▲ ▼
Header Section ▲ ▼

Used to limit the number of rows displayed in the grid section. Once all filters have been selected, select the Apply option to apply them. Otherwise, select the Reset option to clear all filters.
Grid Section ▲ ▼
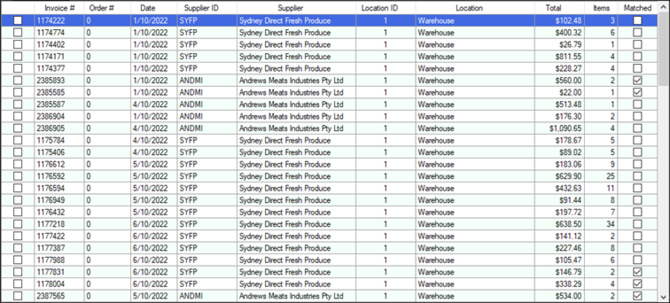
- All/Select - Select the All option in the Header section to select all invoices listed in the grid, otherwise select the individual invoices by selecting the checkbox in the first column opposite the appropriate invoice.
- Invoice # - Displays the number of the imported invoice.
- Order # - Displays the number of the invoice's associated Purchase Order.
- Date - Displays the invoice Date.
- Supplier ID - Displays the Supplier's Swiftpos ID.
- Supplier Name - Displays the Supplier's Name.
- Location ID - Displays the Location's Swiftpos ID
- Location Name - Displays the Location's Name.
- Total - Displays total value of invoice.
- Items - Displays the total number of invoice Items.
- Matched - Displays as checked if all the items/products contained in the invoice have been matched to Swiftpos items/products during the download process.
Footer Section ▲ ▼
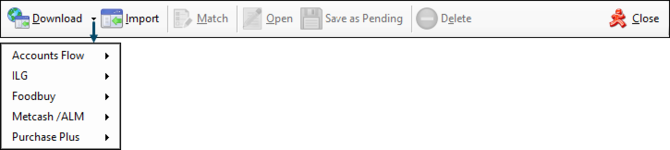
-
Download - Select from the drop-down list one of the following:
- Accounts Flow - Select to open the Download Accounts Flow Invoices screen.
- Settings - Select to configure settings to establish a connection.
- ILG - Select to open the ILG Invoice Download screen to download invoices. Once downloaded the files on the FTP site will be renamed to avoid downloading the same file again.
- Settings - Select to configure settings to establish a connection.
- FoodBuy - Select to open the Download Foodbuy Invoices screen to retrieve and download/Import invoices.
- Accounts Flow - Select to open the Download Accounts Flow Invoices screen.
- Download continued ...
- FoodBuy continued ...
- Settings - Select to configure settings to establish a connection via the Foodbuy API and to also configure settings to facilitate the Importing/syncing of Foodbuy Catalogue Items, Suppliers and invoices.
- Metcash / ALM - Select to open the Metcash Invoice Download screen to download and import Metcash / ALM invoices.
- FoodBuy continued ...
- Download continued ...
- Metcash / ALM continued ...
- Settings - Select to configure settings to establish a connection.
- Purchase Plus - Select to open the Purchase Plus Invoices screen.
- Metcash / ALM continued ...
- Download continued ...
- Purchase Plus continued ...
- Settings - Select to configure settings to establish a connection.
- Purchase Plus continued ...
- Import - Select to open the Import Invoice Selection screen to select the type of invoice file to be imported.
- Match - Select to open the Match Invoice screen to match invoice items/products to Swiftpos items/products.
- Open - Select to open the currently selected invoice.
- Save as Pending - Select to commit the invoice as pending. Once committed the invoice will be retrievable from the Invoices/Receipt Goods screen.
- Delete - Select to delete the currently selected invoices.
- Close - Select to exit.
Match Invoice Screen ▲ ▼
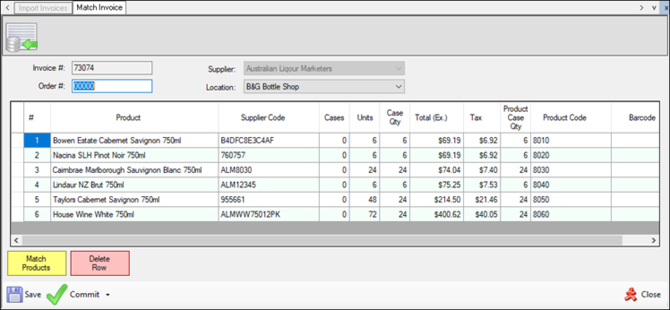
To access, select the Match option in the footer section of the Import Invoices screen. Used to match the imported invoice items/products, that were NOT matched during the import process, to Swiftpos items/products. Select the Match Products option to match the items/products listed. If after matching, there are items/products that still do not have a value displayed in the Product Code column, then these are considered unmatched. To manually match, select the Product Code column and select Enter. The Search Products screen will be displayed to facilitate the searching for a matching item/product.
Sections ▲ ▼
Header Section ▲ ▼

Used to limit the number of rows displayed in the grid section.
Grid Section ▲ ▼
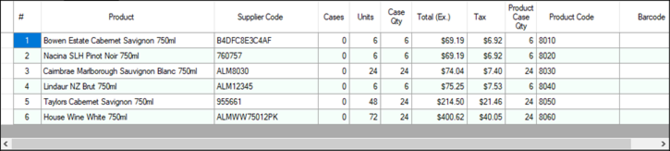
Lists the invoice items/products for the selected invoice to be matched, along with their item/product, Supplier Code, Cases, Units, Case Qty, Total (Excluding tax), Tax, Product Case Qty, Swiftpos Product Code and Barcode.
Noteworthy
- Product - Select to open the Match Product screen to select from the list of Swiftpos items/products displayed, that matches the invoice item/product.
Notes ...
If the Enable Location Based Suppliers option has been selected, then only those items/products, currently associated with the currently selected Supplier and Location, will be returned in the list of items/products displayed.
Grid Footer Section ▲ ▼

- Match Products - Select to Match the currently selected invoice items/products to a Swiftpos items/products.
- Delete Row - Select to delete the selected row.
Footer Section ▲ ▼

- Save - Select to save the changes and exit.
- Commit - Select from the drop-down list either Save as Pending and Print or Save as Pending, to save the invoice and exit. The invoice will no longer be listed in the Import Invoices screen. To continue to process the invoice, it can be accessed by selecting the Pending Invoice option from the Retrieve options in the Invoices/Receipt Goods screen.
- Close - Select to exit.
End of article ▲