-
Installers / Links / Releases
-
API
-
Back Office
-
Cloud Back Office
-
Events
-
Events Portal
-
How To
-
KVS
-
Member Portal
-
Notify
-
Oolio Pay
-
Orderaway
-
POS Keys
-
Self-Service Kiosk
-
Self-Service POS
-
Swiftpos
-
Touch
-
Touchmini
-
Troubleshooting
-
Venue Hub
-
Venue Manager
-
3rd Party Integrations
- Business Intelligence
- Cash Management
- eCommerce
- Exports / Imports
- Front Office Systems
- Fuel Systems
- Gaming
- General Ledger
- Gift Cards / Promotions / Vouchers
- Membership / Loyalty
- Middleware Applications
- Payment Integrators
- Product Level Blocking
- Reservations
- Swiftpos
- Tab Management
- Time & Attendance
- Value Added Services
-
Uncategorized
- API
- Back Office Accounts
- Back Office Administration
- Back Office - Clerks
- Back Office - Data Export
- Back Office - Inventory
- Back Office - Members
- Back Office - Menus
- Back Office - Products
- Back Office - Services
- Back Office - Suppliers
- Back Office - Swiftpos
- Back Office - Terminal Sales
- Back Office - Touch Settings
- Back Office - Vouchers / Discounts
- How To
- KVS
- OrderAway
- Venue Manager
- 3rd Party Integrations
- Touch
- Cloud Back Office
-
Touchmini v1 (End Of Life)
Transfer
Touchmini v1 (End Of Life)
IMPORTANT
Touchmini v1 has reached it's end of life and will NO LONGER be enhanced/improved. It is now superseded by Touchmini v2.

This is accessed by selecting the Transfer option from the TouchMini menu in Venue Manager. Refer to HERE for more information.
Subjects ▼
What Is It Used For? ▲ ▼
It is used to transfer TouchMini devices from one Location to another within a Venue.
Transfer ▲ ▼
Transfer Devices ▲ ▼
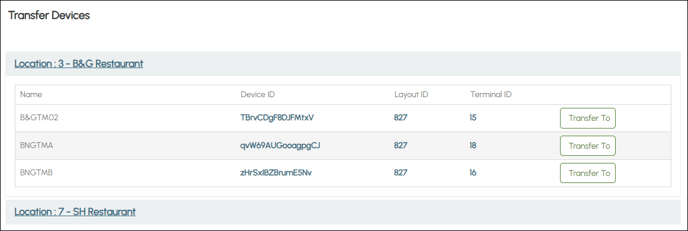
Initially lists the Locations currently activated for the Venue. Select a Location to expand and list the devices it has currently assigned to it. The following is listed for each device currently assigned to the selected Location:
- Name - Displays the name of the device.
- Device ID - Displays the device's unique ID.
- Layout ID - Displays the ID of the Keyboard Layout it has set as it's Home menu.
- Terminal ID - Displays the ID of the Terminal it is assigned to in Back Office.
- Transfer To - Select to open the Transfer Device prompt.

- From - Displays the Location the selected device is currently assigned to.
- To - Select from the drop down list the Location to which the selected device is to be transferred to.
- Transfer - Select to initiate the Transfer. Refer HERE for information on How To Transfer Devices Between Location.
End of article. ▲
