
-
Installers / Links / Releases
-
API
-
Back Office
-
Back Office Cloud
-
Events
-
Events Portal
-
How To
-
KVS
-
Member Portal
-
Notify
-
Oolio Pay
-
Orderaway
-
POS Keys
-
Self-Service Kiosk
-
Self-Service POS
-
Swiftpos
-
Touch
-
Touchmini
-
Troubleshooting
-
Venue Hub
-
Venue Manager
-
3rd Party Integrations
- Business Intelligence
- Cash Management
- eCommerce
- Exports / Imports
- Front Office Systems
- Fuel Systems
- Gaming
- General Ledger
- Gift Cards / Promotions / Vouchers
- Membership / Loyalty
- Middleware Applications
- Payment Integrators
- Product Level Blocking
- Reservations
- Swiftpos
- Tab Management
- Time & Attendance
- Value Added Services
-
Uncategorized
- API
- Back Office Accounts
- Back Office Administration
- Back Office - Clerks
- Back Office - Data Export
- Back Office - Inventory
- Back Office - Members
- Back Office - Menus
- Back Office - Products
- Back Office - Services
- Back Office - Suppliers
- Back Office - Swiftpos
- Back Office - Terminal Sales
- Back Office - Touch Settings
- Back Office - Vouchers / Discounts
- How To
- KVS
- OrderAway
- Venue Manager
- 3rd Party Integrations
- Touch
-
Touchmini v1 (End Of Life)
Configuration Tabs
Venue Hub - Screens
This provides information relating to the screens and configuration tabs for Venue Hub.
The content is targeted at Resellers and Swiftpos Venue administrators who have a sound knowledge of and experience with Swiftpos. For further information or assistance, please contact your Swiftpos Reseller or Swiftpos Support.
Subjects ▲ ▼
Configuration Tabs ▲ ▼
To access refer HERE. Used to configure Venue Hub.
IMPORTANT
DO NOT FORGET to select the Save option to ensure all changes are saved.
General Tab ▲ ▼
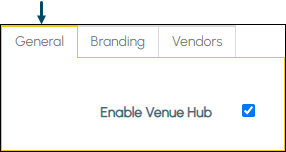
- Enable Venue Hub - Select to ensure the selected Cloud Client will be available to Venue Hub.
Notes ...
This will need to be selected for both the Host Venue and each of the Vendors.
Branding Tab ▲ ▼
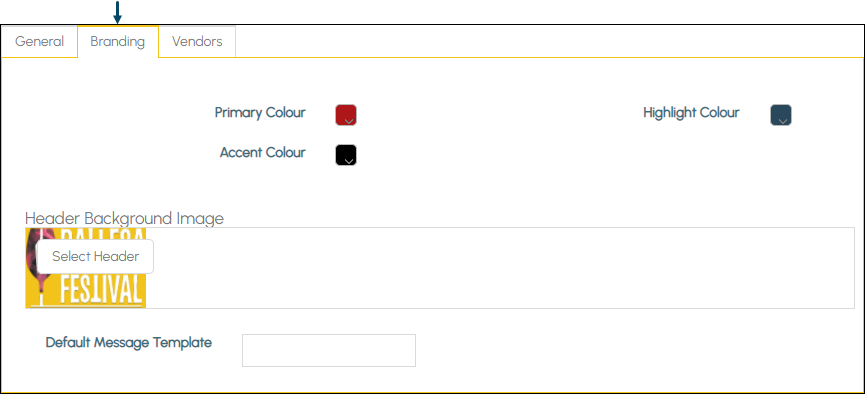
- Select from the colour options available to adjust colours as required for the following:
- Primary
- Accent
- Highlight
- Header Background Image - Select the Select Header option to select an Image that will be displayed as the background image in the header section for the selected Cloud Client.
- Default Message Template - Not used.
Vendors Tab ▲ ▼
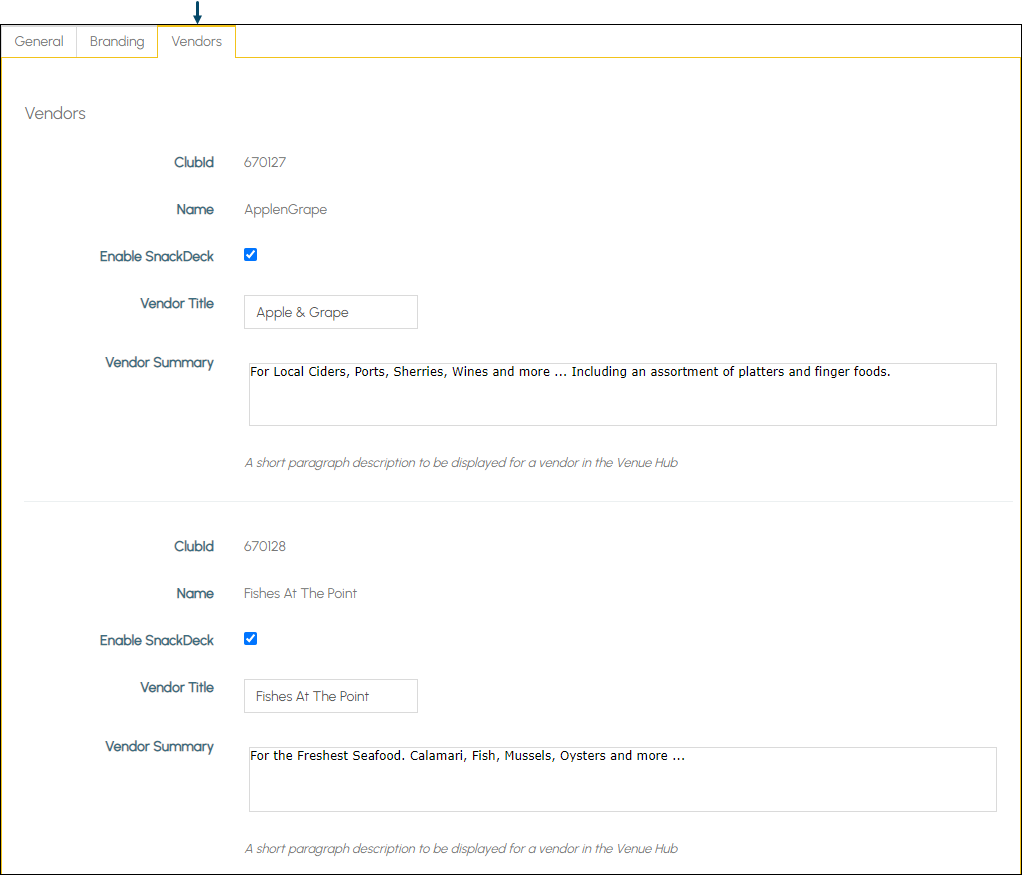
- Clubid - Displays the ID of the selected Cloud Client.
- Name - Displays the name of given to the select Cloud Client. This can be changed via the Venues menu option.
- Enable SnackDeck - Select to ensure that Vendor will be displayed and will be able to be selected by patrons from the Host Venue's main Venue Hub screen.
Notes ...
If it is NOT enabled the Vendor will NOT be accessible to patrons.
- Vendor Title - Displays/Enter the name patrons will see in the Host Venue's main Venue Hub screen.
- Vendor Summary - Displays/Enter a short description of the Vendor and their offerings that patrons will see in the Host Venue's main Venue Hub screen.
End of article ▲