-
Installers / Links / Releases
-
API
-
Back Office
-
Cloud Back Office
-
Events
-
Events Portal
-
How To
-
KVS
-
Member Portal
-
Notify
-
Oolio Pay
-
Orderaway
-
POS Keys
-
Self-Service Kiosk
-
Self-Service POS
-
Swiftpos
-
Touch
-
Touchmini
-
Troubleshooting
-
Venue Hub
-
Venue Manager
-
3rd Party Integrations
- Business Intelligence
- Cash Management
- eCommerce
- Exports / Imports
- Front Office Systems
- Fuel Systems
- Gaming
- General Ledger
- Gift Cards / Promotions / Vouchers
- Membership / Loyalty
- Middleware Applications
- Payment Integrators
- Product Level Blocking
- Reservations
- Swiftpos
- Tab Management
- Time & Attendance
- Value Added Services
-
Uncategorized
- API
- Back Office Accounts
- Back Office Administration
- Back Office - Clerks
- Back Office - Data Export
- Back Office - Inventory
- Back Office - Members
- Back Office - Menus
- Back Office - Products
- Back Office - Services
- Back Office - Suppliers
- Back Office - Swiftpos
- Back Office - Terminal Sales
- Back Office - Touch Settings
- Back Office - Vouchers / Discounts
- How To
- KVS
- OrderAway
- Venue Manager
- 3rd Party Integrations
- Touch
- Cloud Back Office
-
Touchmini v1 (End Of Life)
Pay / Top Up An Account
This outlines How To Pay / Top Up An Account in conjunction with using the Account Payment (#200) POS Key in Touch.
Subjects ▼
What Is Required? ▲ ▼
- Ensure the Account Payment (#200) POS Key has been added to the appropriate Keyboard Layout using the Designer. Refer to How To Add A POS Key To A Keyboard Layout for more information.
How To Pay / Top Up An Account? ▲ ▼
In Touch, do as follows:
- Select the Customer (#102) POS Key to open the Customer Search screen to search for a Customer/Member OR enter a Customer/Member Number and select the Customer POS Key to retrieve the Customer/Member's details in the sales grid.
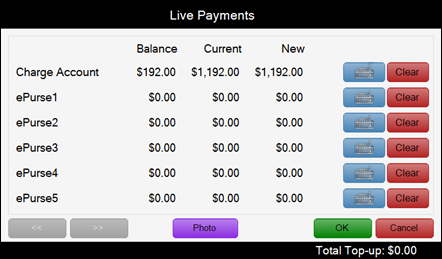
- Select the Account Payment (#200) POS Key to open the Live Payments screen.

Accessed from HERE and HERE and this screen is used to make Payments / Top Ups into an Account.
- Keyboard icon - Select to enter the Payment / Top Up amount to be deposited into the selected account.
- Clear - Select to remove the Payment / Top Up amount from the selected account.
- In the Live Payments screen:
- Select the Keyboard icon opposite the Charge Account and enter the amount using the Numeric Keypad.
- Select Ok.
- Complete the Payment / Top Up.
End of article. ▲
