This outlines how to Lookup A Bistro Table / TAB / Table in Touch using the Table (#30) POS Key.
Subjects ▲ ▼
- What Is Required?
- When Is It Used?
- How To Lookup A Bistro Table?
- How To Lookup A TAB?
- How To Lookup A Table?
When Is It Used? ▲ ▼
It is used to lookup an already opened Bistro Table, TAB or Table in Touch. To open a Bistro Table, TAB or Table, refer HERE for more information.
How To Lookup A Bistro Table? ▲ ▼
To lookup an existing Bistro Table in Touch, do as follows:
- In Back Office, ensure the Table (#30) POS Key is configured for Bistro Table use. For example, the following is an example of a configuration of the Table (#30) POS Key configured for Bistro Table use:
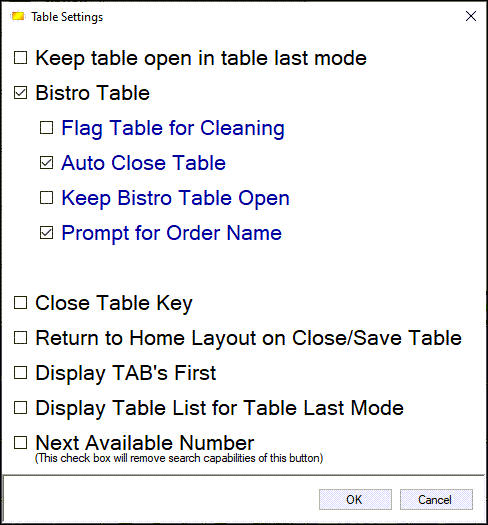
Refer to the Table (#30) POS Key for more information.
- In Touch, select the Table (#30) POS Key (configured for Bistro Tables) to open the Open TABs for All Clerks screen.
- Select one of the Bistro Tables listed in the grid to ensure it is opened in the sales grid.
- The Bistro Table can now be processed further, by either:
- Adding further Items to it.
- Partially or fully finalising it.
- Viewing and then saving it again.
How To Lookup A Tab? ▲ ▼
To lookup an existing TAB in Touch, do as follows:
- In Back Office, ensure the Table (#30) POS Key is configured for TAB use. For example, the following is an example of a configuration of tthe Table (#30) POS Key configured for TAB use:
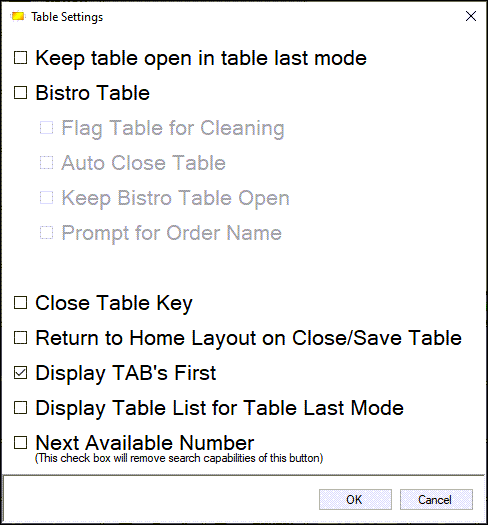
Refer to the Table (#30) POS Key for more information.
- In Touch, select the Table (#30) POS Key (configured for TABs) to open the Open TABs for All Clerks screen.
- Select one of the TABs listed in the grid to ensure it is opened in the sales grid.
- The TAB can now be processed further, by either:
- Adding further Items to it.
- Partially or fully finalising it.
- Viewing and then saving it again.
How To Lookup A Table? ▲ ▼
To lookup an existing Table in Touch, do as follows:
- In Back Office, ensure the Table (#30) POS Key (configured for Tables) is configured for Table use. For example, the following is an example of a configuration of the Table (#30) POS Key configured for Table use:

Refer to the Table (#30) POS Key for more information.
- In Touch, select the Table (#30) POS Key to open the Open Tables for All Clerks screen.
- Select one of the Tables listed in the grid to ensure it is opened in the sales grid.
- The Table can now be processed further, by either:
- Adding further Items to it.
- Partially or fully finalising it.
- Viewing and then saving it again.
End of article ▲