
This provides information relating to the Swiftpos Back Office interface in NetPOS.
The content is targeted at Resellers and Swiftpos Venue Administrators who have a sound knowledge of and experience with Swiftpos. For further information or assistance, please contact your Swiftpos Reseller or Swiftpos Support.
Subjects ▲ ▼
Swiftpos Back Office ▲ ▼
Settings Tab ▲ ▼
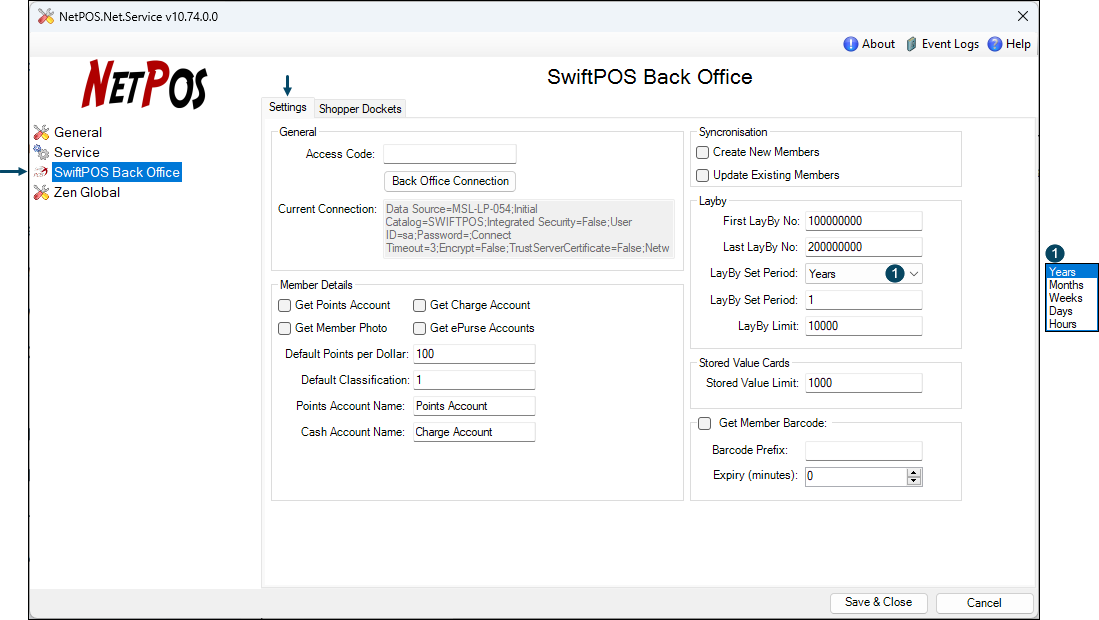
This screen is accessed from HERE. In order to be able to access this screen, the Swiftpos Back Office Interface will need to be added to the NetPOS Registration screen.
Notes ...
Stop/Start the service to ensure changes will take effect.
General Section
- Access Code - Default is blank. If you are running multiple sites on a single server, you can add a unique Access Code here that must match the same access code at the Swiftpos Touch terminal.
- Back Office Connection - Select to open the Connect to Server - Back Office screen and add an SQL Server Connection to establish a connection to the Swiftpos Back Office.
Notes ...
An invalid or incorrectly configured connection may result in the following prompt being displayed at Touch whenever the NetPOS service is invoked:
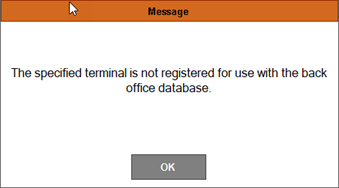
- Current Connection - Displays the current connection string.
Member Details Section
- Get Points Account - Select to ensure the Points Account information is retrieved and displayed. For example, the Live Charge screen and the Account Status will display the balance of Loyalty Points remaining.
- Get Charge Account - Select to ensure the Account information is retrieved and displayed. For example, the Live Charge screen and the Account Status will display the balance of the Charge Account.
- Get Member Photo - Select to retrieve Customer/Member photos. When connecting over the Internet, and photos are not required, then it is recommended that this option is NOT selected. It will ensure speedier retrieval of Customer/member data.
- Get ePurse Accounts - Select to ensure the ePurse Account information is retrieved and displayed. For example, the Live Charge screen and the Account Status will display the balance of ePurse Accounts.
- Default Points per Dollar - Displays/Set the default number of points per dollar if offline.
- Default Classification - Displays/Set the default Classification if offline.
- Points Account Name - The name that you give Points.
- Cash Account Name - The name that you give Accounts.
Synchronisation Section
- Create New Members - Select to ensure that when the Gaming System returns a Customer/Member and the Customer/Member does not exist in Swiftpos Back Office then this option will create the Customer/Member.
- Update Existing Members - Select to ensure that any existing Customer/Members will get updated with their Member Classification from the Tiered Loyalty in the Gaming System.
Layby Section
- First Layby No - Default is 100000000 so that the number range does not conflict with your Member/Account numbers.
- Last Layby No - Default is 200000000 so that the number range does not conflict with your Member/Account numbers.
- Layby Set Period - Select from the drop down list one of the following:
- Years
- Months
- Weeks
- Days
- Layby Set Period - Displays/Set the duration period Layby's are held based on the Period selected above.
- Layby Limit - Displays/Set the maximum value allowed to be placed against a single Layby for a Member/Custiomer.
Stored Value Cards Section
- Stored Value Limit - Displays/Set the maximum value limit a Gift or Stored Value card can be Topped Up to. Default is $1000.00.
Notes ...
When the Stored Value Top Up (#86) POS Key is used at the Swiftpos Touch Terminal, a check will be done to see if the Top Up does not exceed the limit set here.
Get Member Barcode Section
Used to retrieve a Member Barcode via the SwiftAPI that will expire after the minutes configured below have elapsed. Designed to prevent Members from passing their Barcode around to other Non-Member patrons, who can then use it to gain access to Member specific services. Select to enable.
- Barcode Prefix - Displays/Enter the prefix that will identify that the Barcode scanned is a Member Barcode.
Notes ...
The appropriate Card Masking will need to be configured against the Barcode Scanner Peripheral.
- Expiry (minutes) - Displays/Set the time in minutes after which the Barcode will expire.
- In the NetPOS > Swiftpos Back Office:
- Enable the Get Member Barcode option above.
- Enter a Barcode Prefix. For example, 9999. This will ensure the Swiftpos Touch terminal will recognise the Barcode scanned as a special Member Barcode.
- Set the Expiry in minutes. For example, 1.
- At the Swiftpos Touch terminal or Reception Terminal (Door Entry):
- Add a Card Mask to the Barcode Scanner Peripheral.
- Set the Card Type to Member Barcode.
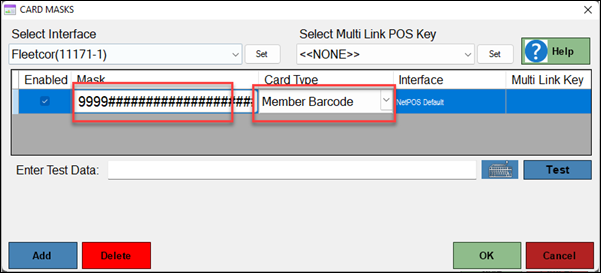
Notes ...
The Card Mask must have the same prefix as was set in NetPOS.
- Setup continued ...
- The Card Mask entered MUST have the NetPOS Prefix and at least 32 Hashes (#) and one X at the end. For example, 9999#########################################X
- The Member Barcode returned by the SwiftAPI is formatted as follows:
- {Prefix}{Member No}{Expiry Date/Time (encrypted)}, For example: 99991234p1JxMiJEdgLM5YwTwQPCau/2mw/rzhUC
Notes ...
The Member No is NOT the Member's Card/Alternate ID.
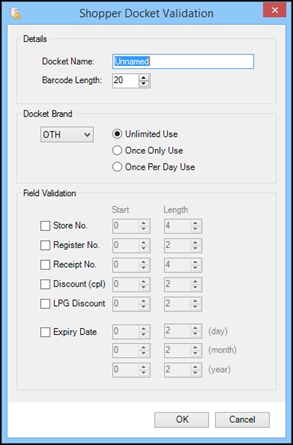
Shopper Dockets Tab ▲ ▼
This screen is accessed from HERE. In order to be able to access this screen, the Swiftpos Back Office Interface will need to be added to the NetPOS Registration screen.
- Add - Select to open the Shopper Docket Validation screen.
- Edit - Select to edit the selected Shopper Docket.
- Remove - Select to remove the selected Shopper Docket.
End of article. ▲