This outlines How To Configure Self Service in Back Office for both Kiosk & POS.
The content is targeted at Resellers and Swiftpos Venue Administrators who have a sound knowledge of and experience with Swiftpos. For further information or assistance, please contact your Swiftpos Reseller or Swiftpos Support.
Subjects ▲ ▼
How To Configure Self Service? ▲ ▼
In:
Back Office ▲ ▼
It is recommended to configure the following in relation to Clerks in Back Office:
- Configure a Clerk Group that will represent all patrons using the Self Service Kiosk. For example, Self Service Patrons.
- Ensure the newly created Clerk Group is assigned to the appropriate Location Group (Venue). That is, it should be assigned to all Location Groups (Venues) that have Self Service Kiosk in any one of their Locations. To do this, use the Venue Assignment option in the Clerk Groups screen.
- Configure a Clerk Security Group that will represent all patrons. This is to differentiate patrons from other Clerk Security Groups. For example, Patrons.
- Ensure that the newly created Clerk Security Group has all Clerk Group Permissions and Clerk Group Reports UNCHECKED. To do this, use the Reset All option at the bottom of both sections of the Security Group Full Edit screen.
- Configure a Clerk/Staff Member that will represent all patrons and be used to login to Self Service. For example, Self Service Patron.
- In the Clerk Full Edit screen, ensure the following:
- The new Clerk is given a memorable number (#). For example, 99.
- The Access > Back Office option is NOT selected.
- The Access > POS option IS selected.
- The Clerk Group created above is selected in the Clerk Group drop-down list.
- The Clerk Security Group created above is selected in the Security Group drop-down list.
- In the Clerk Full Edit screen, ensure the following:

Families ▲ ▼
This is OPTIONAL. In Families, it is recommended to create a Family of the Products for the following:
Menus ▲ ▼
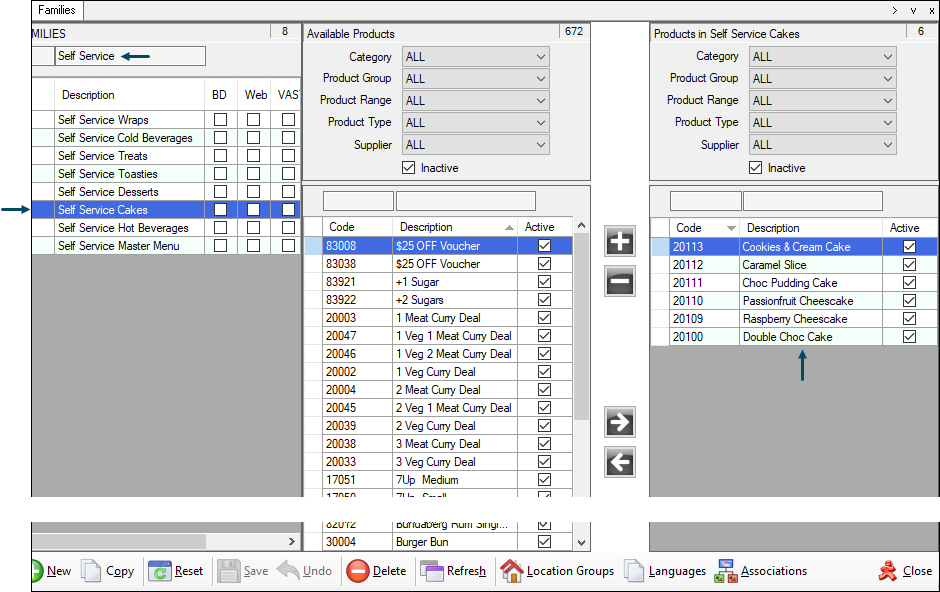
Create a Family of Products loosely based on of the Menus available to patrons. This of course is optional. However, it does assist greatly in configuring and maintaining Self Service Products and Menus. For example, for the following Menus patrons will be able to order from, create one or more Families for each and ensure each contains the Products appropriate to the specific Family they represent.
| Self Service Menu | Family |
| Home | Self Service Master (Only recommended if Products specific to this Menu are to be listed.) |
| Beverages | Self Service Cold Beverages Self Service Hot Beverages |
| Cakes | Self Service Cakes |
| Desserts | Self Service Desserts |
| Toasties and Wraps | Self Service Toasties Self Service Wraps |
| Treats | Self Service Treats |
An example of the Family created for the Cakes Menu can be seen below.
Create a Family of Products for each grouping of the Modifier/Instruction Products and assign each of the Products created to their respective Family. Refer HERE for more information.
| Modifier/Instruction Products | Family |
| Small Regular Large |
What Size? |
| Almond Milk Full Cream Milk Oat Milk Skim Milk Soy Milk |
With Milk? |
| +1 Sugar +2 Sugar |
With Sugar? |
| Extra Hot Extra Shot |
Extras? |
An example of the Family created for the With Milk? grouping of Modifier/Instruction Products can be viewed HERE.
Keyboards ▲ ▼
The Keyboard created will depend on the type of Self Service being configured. It can be any one of the following:
Kiosk ▲ ▼
To configure the Keyboard for a Self Service Kiosk, do the following:
Create The Keyboard ▲ ▼
In Keyboard Designer, do as follows:
- Select the New Keyboard option in the footer section of the Keyboards screen, to open the New Keyboard Wizard screen.
- Give the Self Service Keyboard an appropriate Name to easily identify it.
- Select the Self Service option from the Style drop-down list.
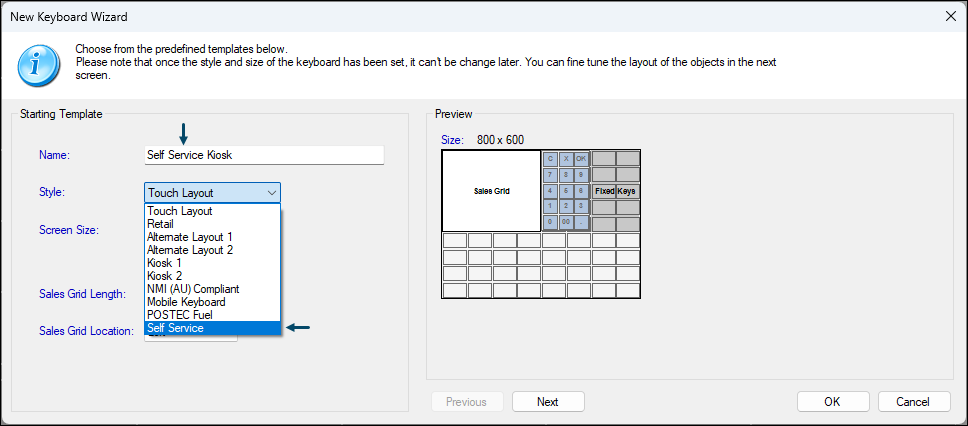
- When the Self Service option is selected, settings tabs will appear in the right side of the above screen (replacing the Preview section).
- Configure each of the tabs where appropriate for the Venue:
- Select OK to create the Self Service type Keyboard.
Select one of the following options and configure accordingly:
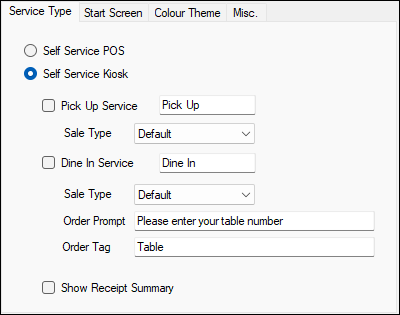
- Self Service Kiosk - Select to ensure the Keyboard being created will be for a Kiosk type Self Service. Refer HERE for more information. Now configure the following:
- Pick Up Service - Select to ensure this type of service is enabled. The text Pick Up displays as the default. Change to rename it as required by the Venue. For example, Collect, Take Away, etc.
- Sale Type - Select from the drop-down list the Sale Type to be associated with the above type of service. This is only required in Venues that make use of Sale Types.
- Dine In Service - Select to ensure this type of service is enabled. The text Dine In displays as the default. Change to rename it as required by the Venue. For example, Eat In.
- Sale Type - Select from the drop-down list the Sale Type to be associated with the above type of service. This is only required in Venues that make use of Sale Types.
- Pick Up Service - Select to ensure this type of service is enabled. The text Pick Up displays as the default. Change to rename it as required by the Venue. For example, Collect, Take Away, etc.
Notes ...
If Sales Types are configured for either or both of the above types of service, the selected Sales Type will be included in the transaction sent to Back Office, and can be viewed via the Search Transactions screen. For example: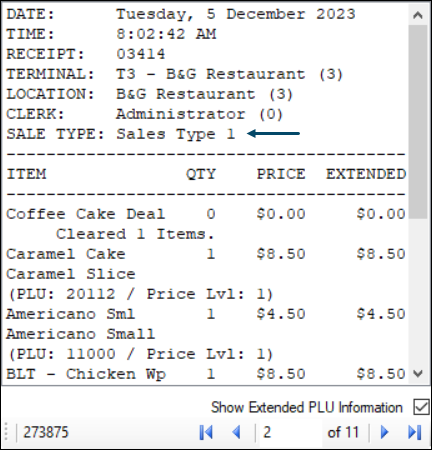
- Self Service Kiosk continued ...
- Dine In Service continued ...
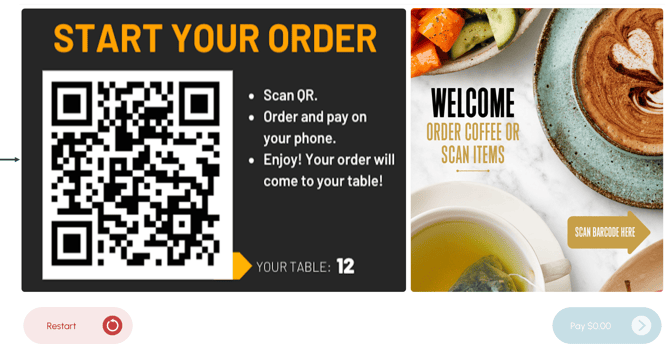
- Order Prompt - Displays/Enter the prompt presented to the patron requesting the entry of a number relating to where they are located in the Venue. For example, that could be a Table or Seat number. This only applies to the Dine In Service option. For example, Please enter your table number
- Order Tag - Displays/Enter the text describing what number was entered by patrons when prompted by the Order prompt above. For example enter, Seat or Table. The value entered here along side the number they enter when prompted, will then be displayed in the Checkout when patrons go to view their Order.
- Show Receipt Summary - Select to ensure a summary of the purchase is displayed on the Summary screen.
- Dine In Service continued ...
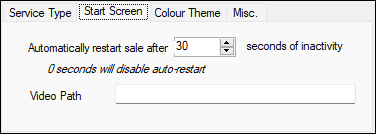
Configure as is appropriate for the Venue:
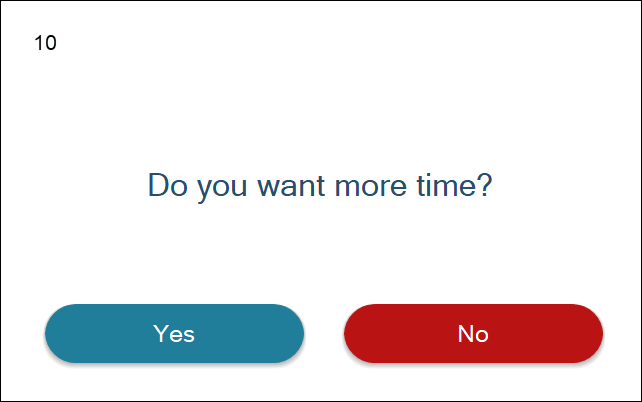
- Automatically restart sale after X seconds of inactivity - Displays/Enter the time in seconds of inactivity that must elapse before an Order is restarted. If an Order is currently open and not yet completed, the following prompt will be presented to the patron. If the patron selects No in response, the open Order will be cancelled and the Start (Welcome) Layout will be presented. If the patron fails to respond within the 10 second count down (top left hand corner of the prompt), the open Order will be cancelled and the Start (Welcome) Layout will be presented.
- Video Path - Enter the file path (location) and name of the video (mp4) file. The path value entered here, must contain the name of an .mp4 file. it CANNOT be a folder. It can be a local, network or a web path. eg. \\PCName\Advertsing\{location}.mp4 or http://localhost/Advertising/SelfServiceStart/{location}.mp4. Where {location} is the ID of the Location the Self Service Touch terminal is assigned to.
Notes ...
If a Video Path has been specified, the video will be played instead of displaying the Upsell Layout.
Also, it is possible to schedule the playing of the above video file. Keep in mind, this ONLY applies to web paths. This is because the video is locked when playing locally and cannot be updated by the Service Monitor. Scheduling a video file can be done via the Advertising Scheduler by creating a schedule for a Self Service Start type schedule. If scheduling it going to be implemented, then Media Schedules must be enabled, and the Service Monitor must be running.
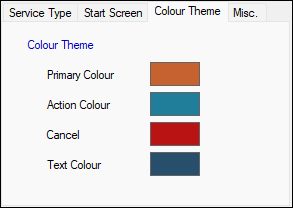
Configure as is appropriate for the Venue:
- Colour Theme - Select from the colour customisation options available to configure the colours for the Self Service.
Configure as is appropriate for the Venue:
- Upsell Prompt - Displays/Enter the prompt to be displayed to patrons at the top of the Upsell screen. The default is Would you like to ask?
- Restricted Family - Select the select option to open the Search Families screen and locate and select the Family that contains the Products that CANNOT be sold when finalising a sale with a SmartCard.
Configure Layouts ▲ ▼
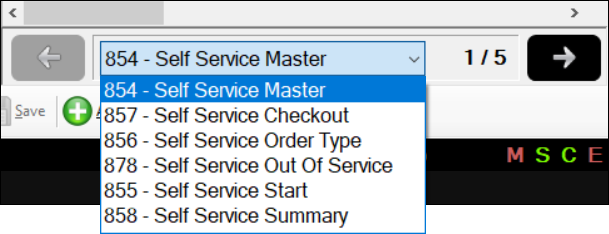
The Self Service Master Layout will be displayed initially. Refer HERE for more information. 6 Layouts in total will automatically be generated as a result of selecting the Self Service Kiosk option. These are:
Also, the following Layouts will need to be configured:
Optionally, the following layouts may need to be configured:
Checkout ▲ ▼
- Navigate to and select the Checkout Layout from the Layouts drop-down list.
- Once displayed select the Add Layout Image option from the Layouts menu. This will open the Images Menu. Refer HERE for more information. Select the Venue's Advertising/Banner (300h x 1080w pixels) image. Refer HERE for more information.
- Save the changes.
Notes ...
Images added won’t appear In the Keyboard Designer but will appear in Touch when the Self Service Keyboard is loaded.
Images, by default, will be centred and cropped when displayed in Self Service. They will NOT be resized (shrunk/stretched) to fit to screen size.
Notes ...
Images added won’t appear In the Keyboard Designer but will appear in Touch when the Self Service Keyboard is loaded.
Images, by default, will be centred and cropped when displayed in Self Service. They will NOT be resized (shrunk/stretched) to fit to screen size.
Master ▲ ▼
- Navigate to and select the Master Layout from the Layouts drop-down list.
- Once displayed select the Add Layout Image option from the Layouts menu. This will open the Images Menu. Refer HERE for more information. Select the Venue's Advertising/Banner (300h x 1080w pixels) image. Refer HERE for more information.
- Save the changes.
Notes ...
Images added won’t appear In the Keyboard Designer but will appear in Touch when the Self Service Keyboard is loaded.
Images, by default, will be centred and cropped when displayed in Self Service. They will NOT be resized (shrunk/stretched) to fit to screen size.
Order Type ▲ ▼
- Navigate to and select the Order Type Layout from the Layouts drop-down list.
- Once displayed select the Add Layout Image option from the Layouts menu. This will open the Images Menu. Refer HERE for more information. Select the Venue's Advertising/Banner (700h x 1080w pixels) image. Refer HERE for more information.
- Save the changes.
Notes ...
Images added won’t appear In the Keyboard Designer but will appear in Touch when the Self Service Keyboard is loaded.
Images, by default, will be centred and cropped when displayed in Self Service. They will NOT be resized (shrunk/stretched) to fit to screen size.
Out Of Service ▲ ▼
- Navigate to and select the Out Of Service Layout from the Layouts drop-down list.
- Once displayed select the Add Layout Image option from the Layouts menu. This will open the Images Menu. Refer HERE for more information. Select the Venue's Out Of Service (1920h x 1080w pixels) image. Refer HERE for more information.
- Save the changes.
Notes ...
Images added won’t appear In the Keyboard Designer, but will appear in Touch when the Self Service Keyboard is loaded.
Images, by default, will be centred and cropped when displayed in Self Service. They will NOT be resized (shrunk/stretched) to fit to screen size.
Start ▲ ▼
- Navigate to and select the Start Layout from the Layouts drop-down list.
- Once displayed select the Add Layout Image option from the Layouts menu. This will open the Images Menu. Refer HERE for more information. Select the Venue's Welcome advertising/branding (1920h x 1080w pixels) image. Refer HERE for more information.
- Save the changes.
Notes ...
Images added won’t appear In the Keyboard Designer, but will appear in Touch when the Self Service Keyboard is loaded.
Images, by default, will be centred and cropped when displayed in Self Service. They will NOT be resized (shrunk/stretched) to fit to screen size.
Summary ▲ ▼
- Navigate to and select the Summary Layout from the Layouts drop-down list.
- Once displayed select the Add Layout Image option from the Layouts menu. This will open the Images Menu. Refer HERE for more information. Select the Venue's Advertising/Banner (700h x 1080w pixels) image. Refer HERE for more information.
- Save the changes.
Admin Tools ▲ ▼
Before anything else, it is highly recommended to ensure an Admin Tools Layout is added to the Self Service. Refer HERE for more information. This is to ensure critical functions are accessible from the Self Service (Touch). For example, these could be to:
- Go To Start Menu
- Exit Self Service (Touch)
- Request a Full Update
- Access the Tools menu
- Minimise the Self Service (Touch) screen
- Along with any others that are deemed significant to have access to, by the Venue.
To do this, add a Layout to the Self Service Keyboard and ensure the Admin option is selected in the Layout Type drop-down list. Give it an appropriate name, for example, Self Service Admin. Once added, ensure it is selected and then add the following POS Keys:
- Home (#001) - Special Function - With HOME as a caption.
- Return (#002) - Special Function - With BACK as a caption.
- Cancel Sale (#005) - Function - With CANCEL Order as a caption and with the Suppress Cancel Sale Message option selected in More Settings.
Notes ...
Another option is to add a Multi Link (#999) POS Key with the caption CANCEL Order and to then add Links to cancel the current sale and then to go to the Start Layout.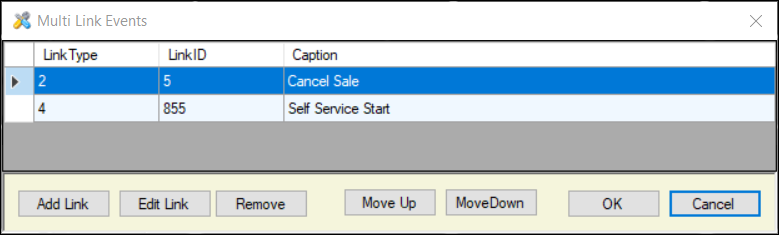
- Run Tool (#900) - Function - With EXIT Self Service as a caption and with the EXIT Application option selected in the Run Tool drop-down list of the settings.
- Layout Link to the Start Layout - With Go To START as a caption and with the Self Service Start layout selected and it’s ID displaying in the Link Item.
- Run Tool (#900) - Function - With Go To TOOLS as a caption and with the Show Tools Menu option selected in the Run Tool drop-down of the settings.
- Run Tool (#900) - Function - With LOCK Self Service as a caption and with the Lock Terminal option selected in the Run Tool drop-down of the settings.
- Run Tool (#900) - Function - With MINIMISE Self Service Screen as a caption and with the Minimise Application option selected in the Run Tool drop-down of the settings.
- Run Tool (#900) - Function - With Request UPDATE as a caption and with the Request Full Update option selected in the Run Tool drop-down of the settings.
Notes ...
Another option is to add a Multi Link (#999) POS Key with the caption Request UPDATE and to then add Links to cancel the current sale (with the Suppress Cancel Sale Message option NOT selected) and then to request a Full Update. This way a confirmation prompt is displayed to confirm the cancellation of the current Order.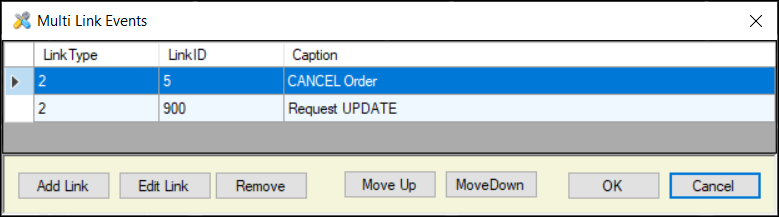
- Save the changes.
IMPORTANT
The Admin layout can be accessed in Self Service by touching the very top right-hand corner of any one of the Layouts (Menus included). There is no visible indication that there is a touch button there. This is to ensure it's existence is NOT visible to patrons.
Menus ▲ ▼
- Now add Layouts for each of the Menus patrons will have access to. Refer HERE for more information. In The Coffee Drop coffee shop example mentioned in GET STARTED, the following Layouts will need to be added for:
- Beverages
- Cakes
- Desserts
- Toasties And Wraps
- Treats
Notes ...
When adding the above Layouts, ensure the Menu option is select from the Layout Type drop-down list in the New Layout prompt.
- For each of the above Layouts added do as follows:
- If required, add the Venue's Advertising/Banner (300h x 1080w pixels) image using the Add Layout Image option from the Layouts menu. Refer HERE for more information.
- Add the Products to be made available to patrons for ordering. The Product Families recommended to be created previously, can now be used to quickly select and add Products to Layouts by using the Products option in the Quick Buttons section of the Keyboard screen, and then using the Families drop-down filter to select the Self Service Family appropriate to the Layout currently being configured.
Notes ...
Images added won’t appear In the Keyboard Designer, but will appear in Touch when the Self Service Keyboard is loaded.
Upsell ▲ ▼
- Optionally, Upsell Layouts can be added so that when configured, these will be displayed to patrons when they select the Pay option on any one of the Menu Layouts. Upsell Layouts are used to prompt patrons to potentially add additional items to their Order prior to completing it. Upsell Layouts will only be displayed if they exist. Currently, there are no rules in place to conditionally display an Upsell Layout. If they exist they will be displayed.
- Add the Products to be presented to patrons as part of the Upsell offering.

Example of an Upsell Layout displayed in Self Service with the prompt Would you like to Add?
Notes ...
Currently only ONE Upsell Layout can exist per Self Service Keyboard.
The Touch terminal to be used must be able to cater to a 1920h x 1080w pixel resolution.
POS ▲ ▼
To configure the Keyboard for a Self Service Kiosk do the following:
Create The Keyboard ▲ ▼
In Keyboard Designer, do as follows:
- Select the New Keyboard option in the footer section of the Keyboards screen, to open the New Keyboard Wizard screen.
- Give the Self Service Keyboard an appropriate Name to easily identify it.
- Select the Self Service option from the Style drop-down list.
- When the Self Service style option is selected, settings tabs will appear in the right side of the above screen (replacing the Preview section).
- Configure each of the tabs where appropriate for the Venue:
- Select OK to create the Self Service type Keyboard.
Service Type Tab ▲ ▼
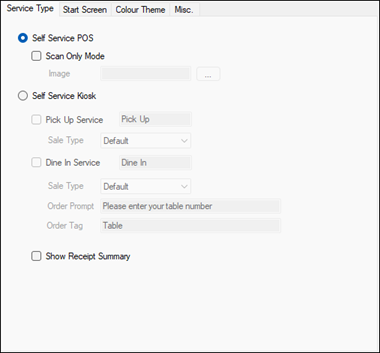
Select one of the following options and configure accordingly:
- Self Service POS - Select to ensure the Keyboard being created will be for a POS type Self Service. Refer HERE for more information.
- Scan Only Mode – Select to ensure that Items/Products can only be scanned, and NOT selected when using the Self Service POS.
- Image – Displays/Select the image to be displayed on the left-hand side, when in Scan Only mode. For example:
- Show Receipt Summary - Select to ensure a summary of the purchase is displayed on the Summary screen.
Start Screen Tab ▲ ▼
Configure as is appropriate for the Venue:
- Automatically restart sale after X seconds of inactivity - Displays/Enter the time in seconds of inactivity that must elapse before an Order is restarted. If an Order is currently open and not yet completed, the following prompt will be presented to the patron. If the patron selects No in response, the open Order will be cancelled and the Start (Welcome) Layout will be presented. If the patron fails to respond within the 10 second count down (top left hand corner of the prompt), the open Order will be cancelled and the Start (Welcome) Layout will be presented.
- Video Path - Enter the file path (location) and name of the video (mp4) file. The path value entered here, must contain the name of an .mp4 file. it CANNOT be a folder. It can be a local, network or a web path. eg. \\PCName\Advertsing\{location}.mp4 or http://localhost/Advertising/SelfServiceStart/{location}.mp4. Where {location} is the ID of the Location the Self Service Touch terminal is assigned to.
Notes ...
If a Video Path has been specified, the video will be played instead of displaying the Upsell Layout.
Also, it is possible to schedule the playing of the above video file. Keep in mind, this ONLY applies to web paths. This is because the video is locked when playing locally and cannot be updated by the Service Monitor. Scheduling a video file can be done via the Advertising Scheduler by creating a schedule for a Self Service Start type schedule. If scheduling it going to be implemented, then Media Schedules must be enabled, and the Service Monitor must be running.
Colour Theme Tab ▲ ▼
Configure as is appropriate for the Venue:
- Colour Theme - Select from the colour customisation options available to configure the colours for the Self Service.
Miscellaneous Tab ▲ ▼
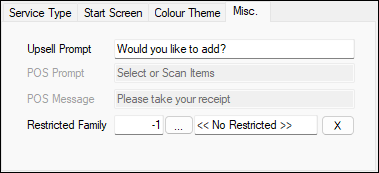
Configure as is appropriate for the Venue:
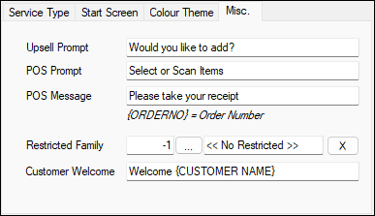
- Upsell Prompt - Displays/Enter the prompt to be displayed to patrons at the top of the Upsell screen. The default is Would you like to ask?
- POS Prompt - Displays/Enter the prompt to be displayed to patrons at the top of each menu screen. The default is, Select or Scan Items?
- POS Message - Displays/Enter the prompt to be displayed to patrons once an order has been paid for and submitted. The default is, Please take your receipt. The {ORDERNO} variable can be used in the POS message to display the Order number.
- Restricted Family - Select the select option to open the Search Families screen and locate and select the Family that contains the Products that CANNOT be sold when finalising a sale with a SmartCard.
Configure Layouts ▲ ▼
The Self Service Master Layout will be displayed initially. Refer HERE for more information. 6 Layouts in total will automatically be generated as a result of selecting the Self Service POS option. These are:
- Checkout - Does NOT need to be configured for a POS Self Service Keyboard.
- Master
- Order Type - Does NOT need to be configured for a POS Self Service Keyboard.
- Out Of Service
- Start
- Summary - Does NOT need to be configured for a POS Self Service Keyboard.
Also, the following Layouts will need to be configured:
Optionally, the following layouts may need to be configured:
Master ▲ ▼
- Navigate to and select the Master Layout from the Layouts drop-down list.
- Add any Products (optional) that will be displayed on the Home menu.
- Save the changes.
Notes ...
The Product Families recommended to be created previously, can now be used to quickly select and add Products to Layouts by using the Products option in the Quick Buttons section of the Keyboard screen, and then using the Families drop-down filter to select the Self Service Family appropriate to the Layout currently being configured.
Out Of Service ▲ ▼
- Navigate to and select the Out Of Service Layout from the Layouts drop-down list.
- Once displayed select the Add Layout Image option from the Layouts menu. This will open the Images Menu. Refer HERE for more information. Select the Venue's Out Of Service (1920h x 1080w pixels) image. Refer HERE for more information.
- Save the changes.
Notes ...
Images added won’t appear In the Keyboard Designer, but will appear in Touch when the Self Service Keyboard is loaded.
Images, by default, will be centred and cropped when displayed in Self Service. They will NOT be resized (shrunk/stretched) to fit to screen size.
Start ▲ ▼
- Navigate to and select the Start Layout from the Layouts drop-down list.
- Once displayed select the Add Layout Image option from the Layouts menu. This will open the Images Menu. Refer HERE for more information. Select the Venue's Welcome image that suits the resolution of the Touch terminal is being configured for. Refer HERE for more information.
- Save the changes.
Notes ...
Images added won’t appear In the Keyboard Designer but will appear in Touch when the Self Service Keyboard is loaded.
Images, by default, will be centred and cropped when displayed in Self Service. They will NOT be resized (shrunk/stretched) to fit to screen size.
Admin Tools ▲ ▼
Before anything else, it is highly recommended to ensure an Admin Tools Layout is added to the Self Service. Refer HERE for more information. This is to ensure critical functions are accessible from the Self Service (Touch). For example, these could be to:
- Go To Start Menu
- Exit Self Service (Touch)
- Request a Full Update
- Access the Tools menu
- Minimise the Self Service (Touch) screen
- Along with any others that are deemed significant to have access to, by the Venue.
To do this, add a Layout to the Self Service Keyboard and ensure the Admin option is selected in the Layout Type drop-down list. Give it an appropriate name, for example, Self Service Admin. Once added, ensure it is selected and then add the following POS Keys:
- Home (#001) - Special Function - With HOME as a caption.
- Return (#002) - Special Function - With BACK as a caption.
- Cancel Sale (#005) - Function - With CANCEL Order as a caption and with the Suppress Cancel Sale Message option selected in More Settings.
Notes ...
Another option is to add a Multi Link (#999) POS Key with the caption CANCEL Order and to then add Links to cancel the current sale and then to go to the Start Layout.
- Run Tool (#900) - Function - With EXIT Self Service as a caption and with the EXIT Application option selected in the Run Tool drop-down list of the settings.
- Layout Link to the Start Layout - With Go To START as a caption and with the Self Service Start layout selected and it’s ID displaying in the Link Item.
- Run Tool (#900) - Function - With Go To TOOLS as a caption and with the Show Tools Menu option selected in the Run Tool drop-down list of the settings.
- Run Tool (#900) - Function - With LOCK Self Service as a caption and with the Lock Terminal option selected in the Run Tool drop-down list of the settings.
- Run Tool (#900) - Function - With MINIMISE Self Service Screen as a caption and with the Minimise Application option selected in the Run Tool drop-down list of the settings.
- Run Tool (#900) - Function - With Request UPDATE as a caption and with the Request Full Update option selected in the Run Tool drop-down list of the settings.
Notes ...
Another option is to add a Multi Link (#999) POS Key with the caption Request UPDATE and to then add Links to cancel the current sale (with the Suppress Cancel Sale Message option NOT selected) and then to request a Full Update. This way a confirmation prompt is displayed to confirm the cancellation of the current Order.
- Save the changes.
IMPORTANT
The Admin layout can be accessed in Self Service by touching the very top right-hand corner of any one of the Layouts (Menus included). There is no visible indication that there is a touch button there. This is to ensure it's existence is NOT visible to patrons.
Menus ▲ ▼
- Now add Layouts for each of the Menus patrons will have access to. Refer HERE for more information. In The Coffee Drop coffee shop example mentioned in GET STARTED, the following Layouts will need to be added for:
- Beverages
- Cakes
- Desserts
- Toasties And Wraps
- Treats
Notes ...
When adding the above Layouts, ensure the Menu option is select from the Layout Type drop-down list in the New Layout prompt.
- For each of the above Layouts added do as follows:
- Add the Products to be made available to patrons for ordering. The Product Families recommended to be created previously, can now be used to quickly select and add Products to Layouts by using the Products option in the Quick Buttons section of the Keyboard screen, and then using the Families drop-down filter to select the Self Service Family appropriate to the Layout currently being configured.
Notes ...
Images added won’t appear In the Keyboard Designer but will appear in Touch when the Self Service Keyboard is loaded.
Upsell ▲ ▼
- Optionally, Upsell Layouts can be added so that when configured, these will be displayed to patrons when they select the Pay option on any one of the Menu Layouts. Upsell Layouts are used to prompt patrons to potentially add additional items to their Order prior to completing it. Upsell Layouts will only be displayed if they exist. Currently, there are no rules in place to conditionally display an Upsell Layout. If they exist, they will be displayed.
- Add the Products to be presented to patrons as part of the Upsell offering.
Example of an Upsell Layout displayed in Self Service with the prompt Would you like to Add?
Notes ...
Currently only ONE Upsell Layout can exist per Self Service Keyboard.
The Touch terminal to be used must be able to cater to a 1920h x 1080w pixel resolution.
Products ▲ ▼
The following will need to be considered with regards to those Products that will be available to patrons to order when accessing Self Service:
- Active in the Location the Self Service is located in.
- Pricing is appropriately configured.
- Descriptions are appropriate. That is, Products are adequately described to ensure patrons are NOT confused or misled when ordering. Product descriptions can be maintained either against the Product itself, or more specifically, they can be entered as Captions against the individual Product POS Keys in the Self Service Keyboard.
- Images will need to be patron friendly and of a size 500h x 500w pixels. This is OPTIONAL. Preferably these need to be set against each Product that is added to a Self Service Menu type layout. Refer HERE for more information.
- Post Linking maybe required for those Products that will need patrons to provide additional information or make additional choices when ordering a specific Product. Refer HERE for more information.
Ensure a Full Update is sent to the Self Service Touch terminal once all changes have been made.
Touch Settings ▲ ▼
Security ▲ ▼
It is recommended to configure the following in relation to the Touch POS Security for the Clerk Group created above (namely, Self Service Patrons) via Clerks in Back Office:
- In the Clerk Security Items screen with the Self Service Patrons Clerk Group selected, select the Uncheck All option to uncheck all permissions.
Touch ▲ ▼
Venues may want to consider adding a printing Item with the ITEM HAS VALUE option selected in the conditional printing drop-down list to their Kitchen Printer dockets, as per the following example:
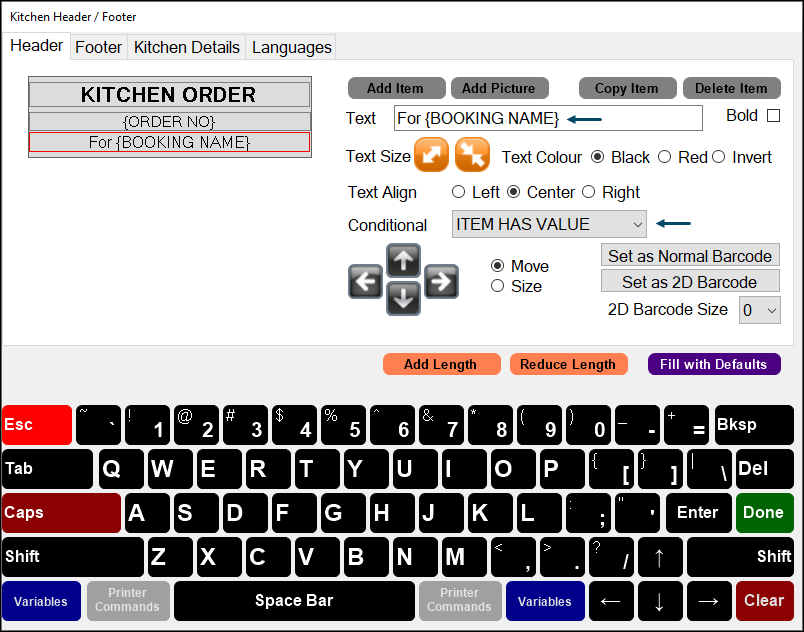
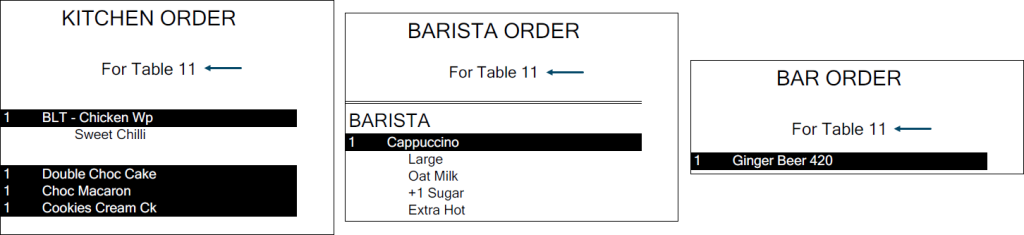
This will ensure that when the Dine In Service option is selected and a patron's location is provided at the prompt, their location is included on the docket. It will NOT apply to dockets printed for the Pickup Service option. For example:
End of article ▲