
Subjects ▲ ▼
About ▲ ▼
What Is Required? ▲ ▼
- The End of Day (EOD) service needs to be running in order for Price Change updates to take effect.
What To Consider? ▲ ▼
- Any items/products currently in an active Special/Promotion will NOT have their sell price changed when applying price changes via the wizard. If an item/product is on Promotion on the selected date, the item's/product's sell price will only be updated when the Promotion is finished.
- Price changes marked with today's date will take effect immediately, that is when the Price Change is saved.
When Is It Used? ▲ ▼
It is used to make changes to the sell price of a large number of items/products. Items/Products can be added in either of the following ways:
- Manually by using the Add Item option and adding individual items/products one at a time. This method is normally used when changes are limited to a small number of items/products.
- By using the Wizard option to add a large number of items/products.
File Specification? ▲ ▼
A price file can be imported. Refer HERE for more information. The file can have any name but must be in a CSV format and have an extension of either CSV or TXT. The file should NOT contain a header row. If a header row is included, an error will be encountered when importing. The required format for the CSV file to be imported is:
| Field Name | Description | Value |
| Price Level | The Swiftpos Price Level number that identifies the Price Level to which the Price Change will apply. | 1 |
| PLU | The Swiftpos PLU of the item/product to which the Price Change will apply. | 1203 |
| Barcode | The Swiftpos barcode of the item/product to which the Price Change will apply. | 4500032693876 |
| Price | The new Price that will be applied. | 4.85 |
Example:
1,,9320000503525,6.4
1,,9325528003175,8
1,,93302036,7.8
1,,9310441001018,75
How To? ▲ ▼
To be continued ...
Screens ▲ ▼
Price Changes Wizard ▲ ▼

To access, select the Price Changes Wizard option in the Products menu in Back Office. Used to make changes to the sell price of a large number of items/products.

- Price Change Name - Select the search option on the right of the Price Change Name field to open the Search Price Change screen to select a previously saved Price Change. If a new Price Change is being added, enter an appropriate name for the new Price Change. For example, Price Increases Jul 2026.
- Price Change Date - Enter/Select the date the Price Change is to come into effect.
- Hold Price Changes - Select to ensure the Price Change is held and NOT applied either immediately or automatically by the End of Day (EOD) service.
- Apply Held Price - Select to ensure the Price Change previously held is now applied.
- Field Selection - Toggle select to show/hide the Fields available, that can be toggle selected to add/remove them in the grid.

Displays the items/products the Price Change is to be applied to. The columns displayed in the grid can be customised using the Field Selection option.
- Current Price - Displays the current sell price. If an item/product is currently in a Special/Promotion then the promotional price will be displayed here. If not, then it will be equivalent to the Normal Price.
- Normal Price - Displays the normal sell price associated with the item/product.
- * - Displays an asterix (*) when the Source Price has any taxes applied.
- Source Price - Displays the price used to base the calculation of the Calculated and New Price on. This is the price selected in the Wizard in the From Where tab.
- Calculated Price - Displays the price as calculated by the Wizard.
- New Price - Displays the New Price as calculated by the Wizard. This price may differ from the Calculated Price when there is rounding involved. Enter a price if required.
Notes ...
The default price displayed is the rounded Calculated Price when using the Wizard option, or the Normal Price when using the Add Item option.
![]()
- Add Item - Select to open the Search Product screen and select an item/product to add to the grid.
- Single Item Price Level - Select to open the Search Price Levels screen and select a Price Level that will be applied to the next items added to the grid via the Add Item option.
- Delete Row - Select to delete the selected item/product from the grid.
- Reset Grid - Select to clear the grid of all items/products.
- New - Select to add a new Price Change.
- Open - Select to open the Search Price Change screen to select an existing Price Change.
Notes ...
This screen will only display Price Changes that have not been committed.
- Wizard - Select to invoke the Wizard which is used to list the items/products to which a Price Change is to be applied. It also determines the new calculated sell price. Refer HERE for more information.
- Save/Commit - Select to save/commit the Price Changes for all the items/products displayed in the grid. For Price Changes dated with today's date then a commit prompt will be displayed when the save option is selected. For Price Change dated in the future, a save prompt will be displayed. These can be opened at a later date using the Open option in the footer section.
- Delete - Select to delete the selected Price Change.
- Tools - Select from one of the options listed in the drop-down menu:
- Upload Product Barcodes to PDE - Select to export all item/product barcodes in Swiftpos to your PDE
- Download Prices from PDE - Select to download price change data from the PDE to Swiftpos.
- Upload PDE Software - Select to upload the Price Verification software to the PDE.
- Export Product Barcodes to XML - Select to export barcodes to an XML file.
- Import Prices from XML (PLU) - Select to import data from an XML file which has been created by the Stock taker application.
- Import Prices from XML (Barcode) - This option is similar to the Import Price from XML (PLU) option, except it reads in an XML file produced by Task Manager. Upon importing the XML file Swiftpos does a lookup on the barcodes of the current iems/products and matches them to the barcodes in the XML file. This is useful for bureau systems which have multiple Swiftpos Back Office solutions, who wish to merge all pricing into one central database.
- Import Prices from CSV (PLU) - Select to import price changes from a CSV file based on PLUs. Refer HERE for file format information.
- Import Prices from CSV (Barcode) - Select to import price changes from a CSV file based in barcodes. Refer HERE for file format information.
- Reports - Select from one of the following options listed in the drop-down list:
- Price Changes - The Price Changes report is simply just a preview report, displaying the same data that appears in the price changes screen.
- Price Changed with GP - The Price Changes with GP report expands on the original report by including the price difference between the new and old prices and both old and new GP%.
- Close - Select to exit.
Sell Price Wizard Screen ▲ ▼
To access, select the Wizard option in the footer section of the Price Changes Wizard screen. Used to make price changes to multiple items/products quickly and easily by using the Price Change Wizard option.
To configure a Price Change, use the following tabs:
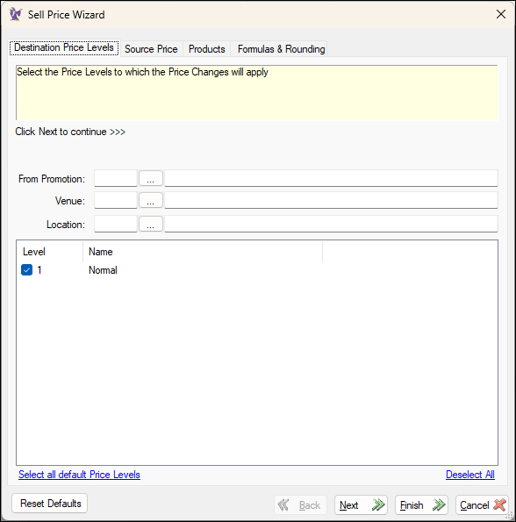
Destination Price Levels Tab ▲ ▼
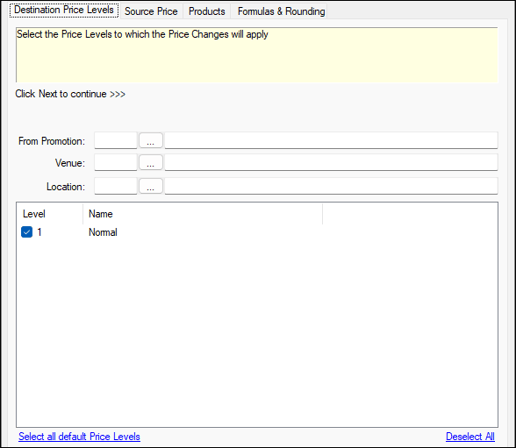
Used to select one or more of the Price Levels listed to which the Price Change will apply.
- Venue - Select a open the Search Venues screen to select a Venue and ensure all the Price Levels assigned to that Venue are automatically selected.
- Location - Select a open theSearch Locations screen to select a Location and ensure all the Price Levels assigned to the selected Location are automatically selected.
- Price Level - Select the individual Price Levels to which the Happy Hour is to apply.
- Select all Default Price Levels - Select to check all Price Levels.
- Deselect All - Select to uncheck all Price Levels.

Used to select the Price to be used as the SOURCE PRICE for determining the new Price. If the Cost Price is selected, then the Location from which the Cost Price will be sourced, must also be selected.
- From Price Level - Select to open the Search Price Levels screen to select the Price Level to be used, on which the new price will be calculated. For example, to set a Staff Price of 30% less than the normal retail price, select the Price Level that reflects the normal retail price. The 30% calculation is configured in the Formulas & Rounding tab.
- From Cost Price - Select to open the Search Locations screen to select the Location from which the Cost Price is to be retrieved and used, on which the new price will be calculated. This feature is particularly useful for setting up new items/products that have just been purchased from Suppliers. Once a profit margin has been decided on, the prices can easily be updated.
- Add Tax - Select to add tax prior to any calculations being done.
- From Base Price Level - Select to ensure that the new price calculation is based on the Base Level Price as configured HERE.

Used to select the items/products to which the Price Change is to be applied. Use the filters below to limit the items/products returned by the wizard. By default, all items/products will be returned.
Notes ...
Items/Products in Locations using 'Cost as %' will not be returned.
- From/To Product - Select to open the Search Products screen to select the From/To Product range.
- From/To PLU - Select to open the Search Products screen to select the From/To PLU range.
- From/To Category - Select to open the Search Categories screen to select the From/To Category range.
- From Group/To Group - Select to open the Search Product Groups screen to select the From/To Product Group range.
- Family - Select to open the Search Families screen to select the Family.
- Product Range - Select to open the Search Product Range screen to select the Product Range.
- Barcode - Enter/Scan a barcode or select the option to open the Search Barcode screen to select the barcode.
- Sub Range - Select to open the Search Metcash Sub-Ranges screen to select the Metcash Sub-Range.
- Include Inactive Products - Select to ensure inactive items/products are returned.

Used to select the Formula and Rounding required to determine the new price.
- Formula Expression - Select from the drop-down list one of the following mathematical expressions required to calculate the new price:
- Add Percentage
- Add Value
- Divide by Value
- Equals
- GP%
- Multiply by Value
- None
- Subtract Percentage
- Subtract Value
- Value - Enter the value to be used in conjunction with the expression selected above. For example:
- A value of 0.9 entered and used in conjunction with the From Price Level option or the From Base Price Level option selected and with the Multiply by Value formula expression selected above, will result in a selling price being calculated with a 10% reduction in price.
- A value of 30 entered and used in conjunction the From Cost Price option selected and with the GP% formula expression selected above, will result in a selling price being calculated with a 30% gross profit margin.
- Update $0.00 Prices - Select to ensure prices currently set at $0.00 will be updated as well. This is only applied when the expressions Add, Subtract or Equals are selected.
Notes ...
Modifiers, cooking instructions and condiments may all have $0.00 prices and may need to remain at that price, so be sure to review the items/products displayed in the grid before committing/saving the Proce Change.
- Apply Tax - Select to apply tax after the formulas have been applied and when the Source Price does not include tax.
- Rounding - Select one of the following options and configure where required:
- Quick Service

- Rounding - Select from the drop-down list.
- Round to Nearest $ - Select from the drop-down list. For example: If a new price was calculated to be $2.93 and rounding was set to the nearest $0.05, then the resultant new price would be set to $2.95.
- Minus Offset $ - Enter a value to be subtracted from new calculated price. For example: If a value of $0.01 is entered and rounding is set to the nearest $1.00 then the new price will be 1 cent less the nearest dollar, resulting in a price ending in 99c (i.e. $14.99).
- Retail Shop
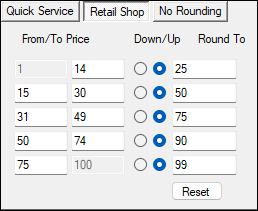
- From/To Price - Set the From/To prices for each of the five sets. This will determine which values will be rounded into each set.
- Down/Up - Specify whether to round up or down for each set.
- Round To - Specify a pre-set value that all prices within the From/To Price range will be rounded to.
- No Rounding - Select to NOT apply rounding.
- Quick Service
![]()
- Reset Defaults - Select to reset to default settings
- Back - Select to return to the previous step.
- Next - Select to proceed to the next step.
- Finish - Select to run the wizard.
- Cancel - Select to exit the wizard without running it.
End of article ▲