This outlines the information and steps that are needed to familiarise oneself with, when implementing swiftpos Member Portal at a Venue.
The content is targeted at Resellers and swiftpos Venue Administrators who have a sound knowledge of and experience with swiftpos. For further information or assistance, please contact your swiftpos Reseller or swiftpos Support.
Steps To Follow ▼
- Review About
- Configure Permissions
- Configure Login Settings
- Configure Member Signup
- Configure Portal Layout
- Configure Profile Layout
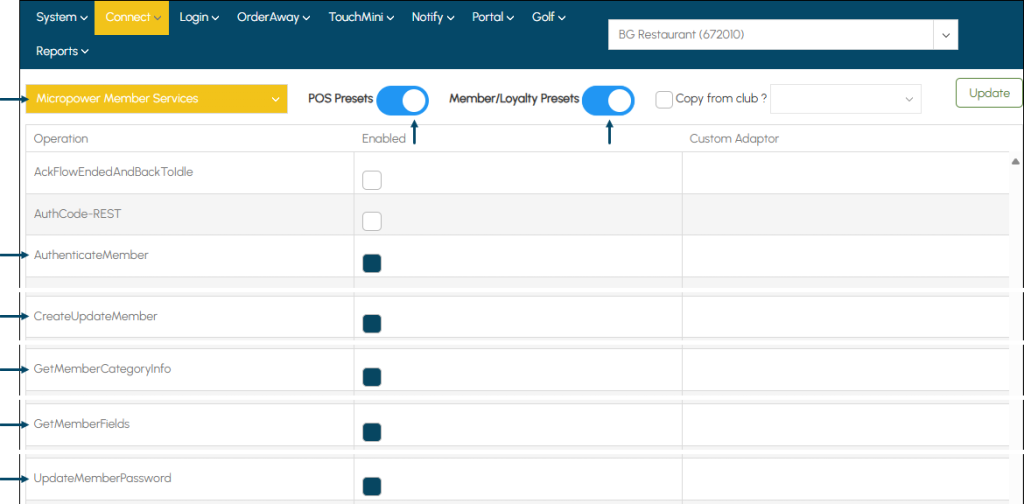
Configure Permissions ▲ ▼
Permissions must be configured to allow the Member Portal to communicate to the Venue's swiftpos system. To configure permissions in Venue Manager for Member Portal (refer HERE for more information), do as follows:
- Select the Connect menu.
- From the Connect drop down list select the MSL Connect API Permissions option.
- From the Select Integrator drop down list select the Micropower Member Services option.
- Ensure the POS Presets and Member/Loyalty Presets options are selected.
- In the grid, scroll down and ensure the following Operations are enabled:
- AuthenticateMember
- CreateUpdateMember
- GetMemberCategoryInfo
- GetMemberFields
- UpdateMemberPassword
- Ensure the changes made are saved by selecting the Update option.
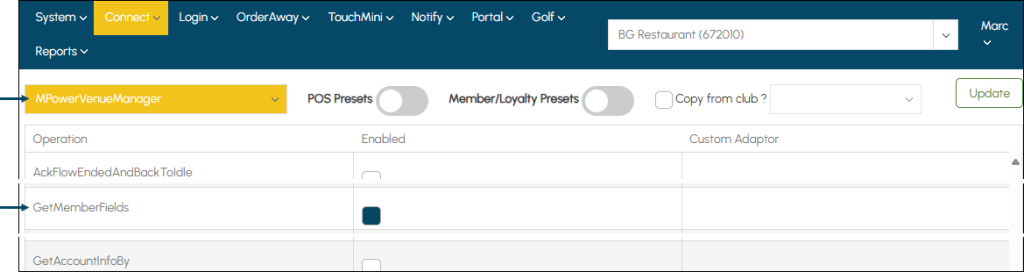
- Still with the Connect menu selected, select the MPowerVenueManager option.
- In the grid, scroll down and ensure the following Operations are enabled:
- GetMemberFields
- In the grid, scroll down and ensure the following Operations are enabled:
Configure Login Settings ▲ ▼
The Member Portal needs to have a login page configured to allow Members to login before they gain access to the Portal. The login page is shared across multiple Cloud applications. Follow the steps below to configure this.
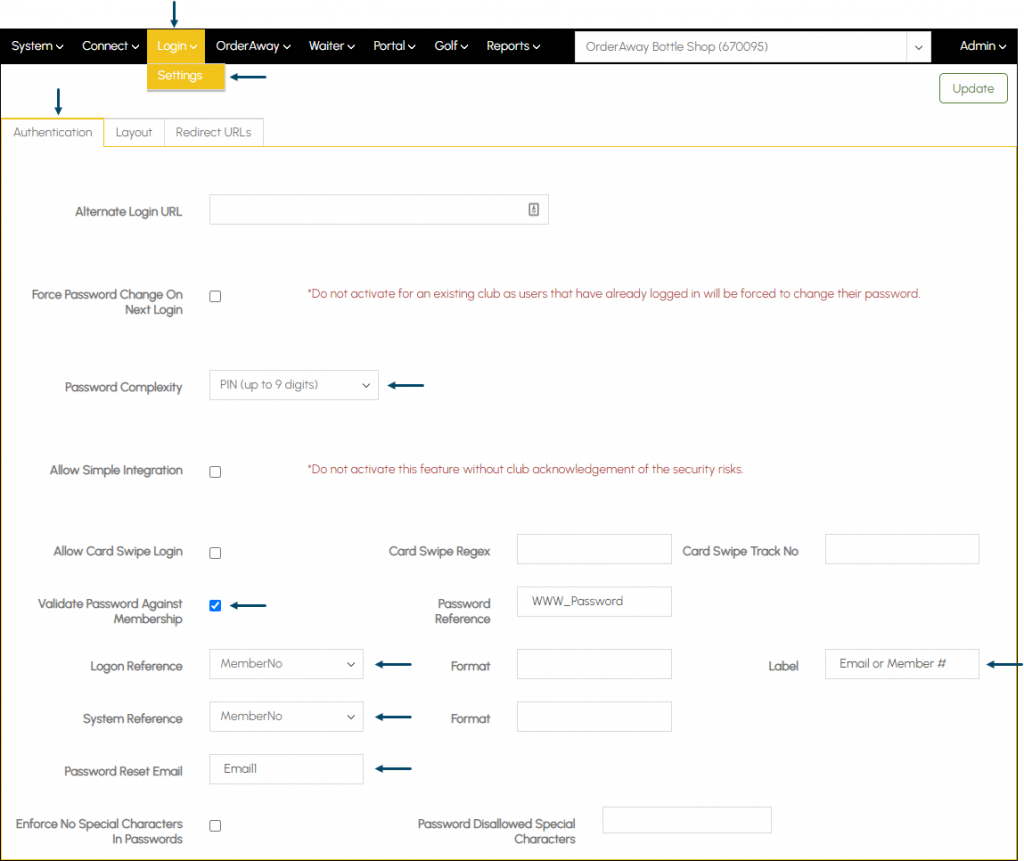
To configure Venue Manager for Member Logins (refer HERE for more information), do as follows:
- Select the Login menu.
- Select the Settings option to display the Login's Authentication tab.
- Ensure the PIN (up to 9 digits) option is selected against the Password Complexity setting.
- Ensure the Validate Password Against Membership option is selected. This will ensure the PIN entered is validated against their PIN currently recorded against their swiftpos Member account.
- Ensure the MemberNo option is selected in the Logon Reference drop-down list.
- Optionally enter the text of your preference in the Label field that will appear as default text in the Member Login prompt. For example Email or Member #.
- Select the Settings option continued ...
- Ensure the MemberNo option is selected in the System Reference drop-down list.
- Enter the text Email1 into the Password Reset Email field. This will ensure Members are able to reset their PIN by way of an authorisation Code being sent to their email, which when entered at the prompt will allow them to then enter a new PIN.
Notes ...
DO NOT select the either of the Secure options as these are not currently supported in SWIFTPOS.
- Ensure the changes made are saved by selecting the Update button.
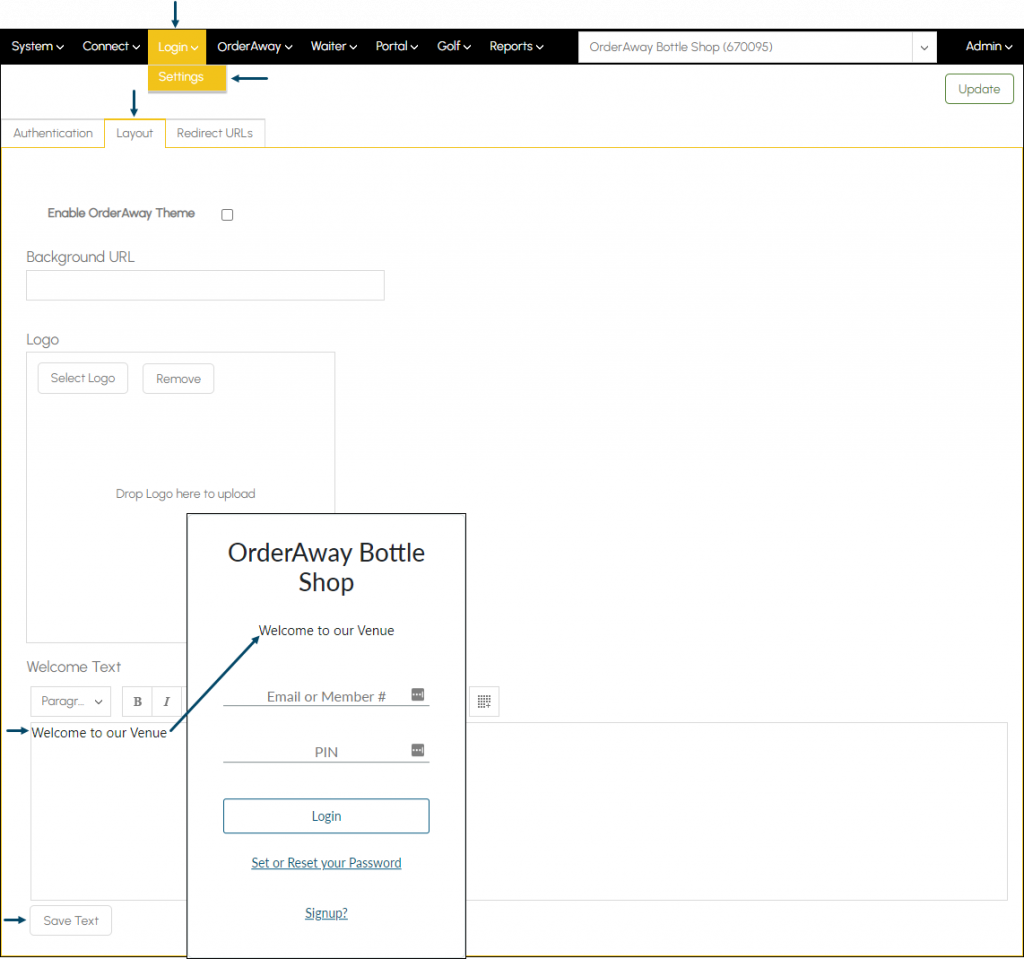
- Still with the Settings option selected, select the Layout tab.
- Enter an appropriate Welcome Text message in the Welcome Text section.
- Ensure the changes made are saved by selecting the Update button.
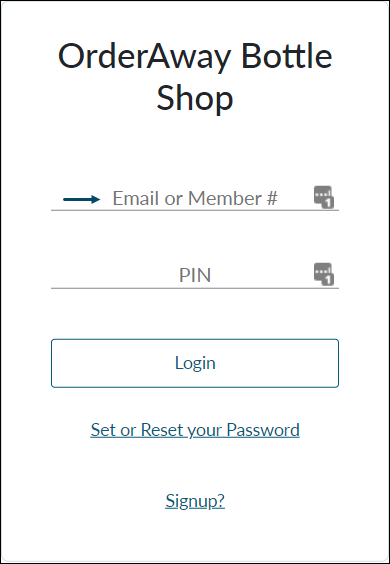
- The Welcome Text entered will now appear in the Member Login prompt as depicted below.
Configure Member Signup ▲ ▼
Follow these steps below to optionally configure & manage customers being able to signup as a Member via the Member Portal.
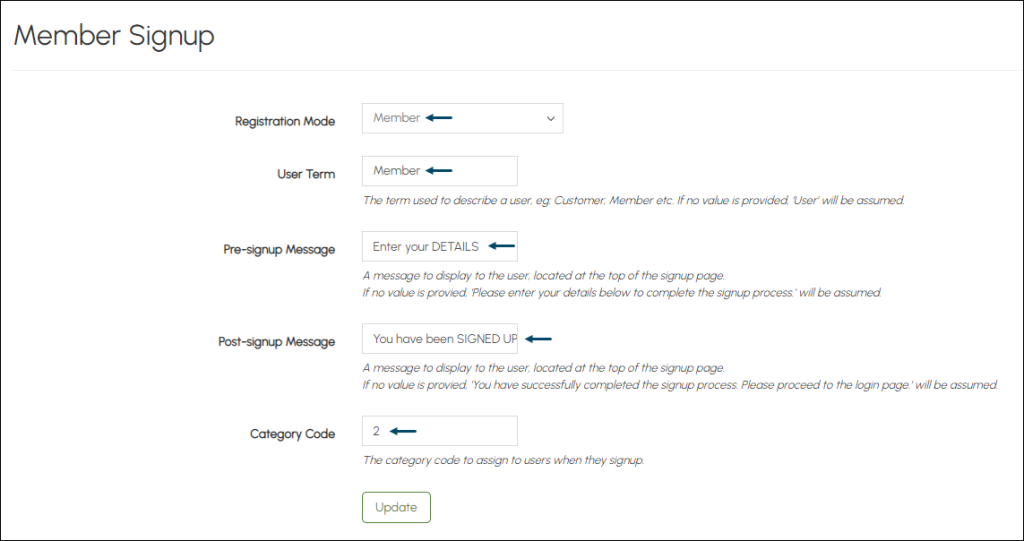
- In Venue Manager's Login menu select the Member Signup and then ensure the Member option is selected from the Registration Mode drop down list.
- Ensure the options/settings available are configured as required.
- Ensure Update button is selected to save the configuration changes.
Now when customers navigate to the Member Portal login page, there will be the option for them to "Signup?" as a Member of the Venue.
Configure Portal Layout ▲ ▼
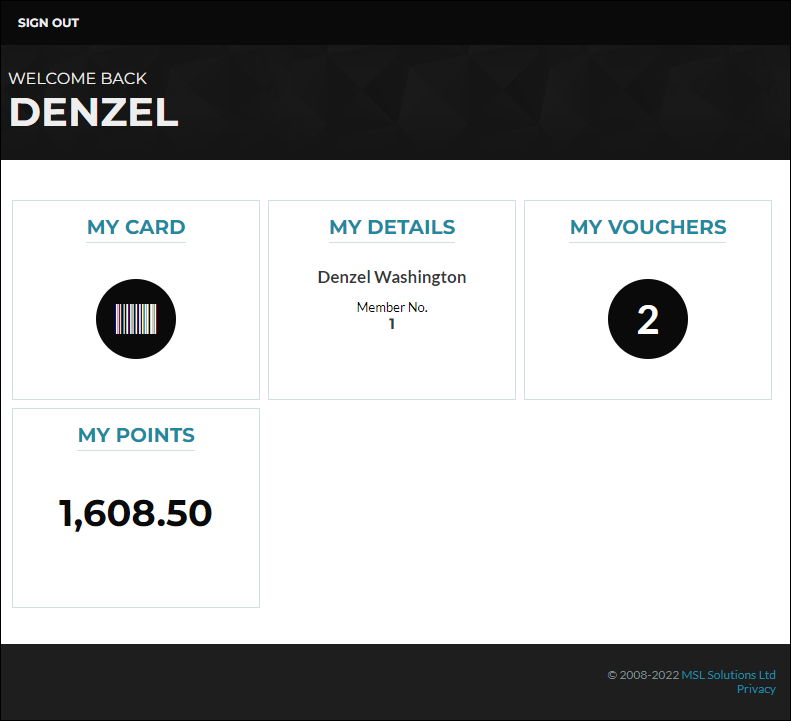
Follow these steps to manage/configure what members see once they login to the Member Portal. Venue's are able to add tiles & links for members to click/navigate through. Below is an example of some of the tiles which can be configured and members will see.
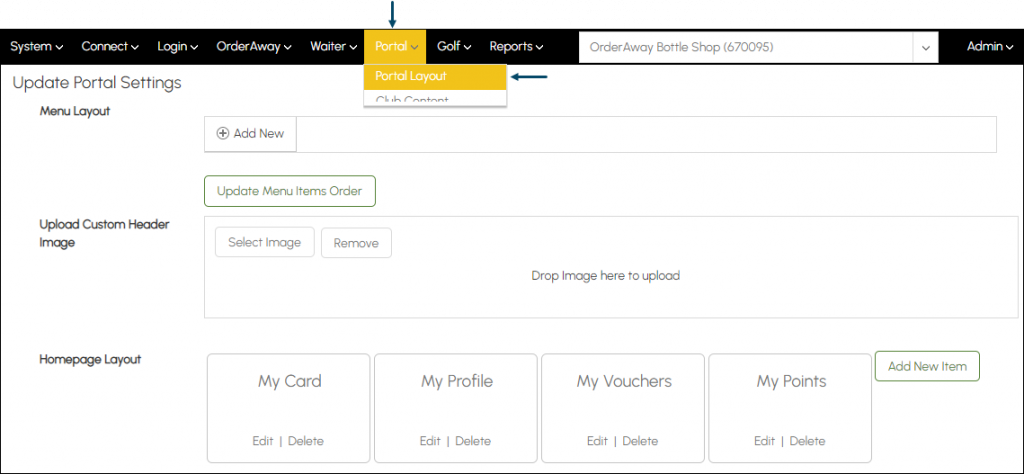
To manage this content, within Venue Manager's Portal menu select the Portal Layout option. You'll be presented with a page as per below:
Menu Layout Section ▲ ▼
Not applicable.
Upload Custom Header Image Section ▲ ▼
Displays the image currently visible in the Header section of the Members Portal after a Member logs in.
- Select Image - Select to locate and select an image.
- Remove - Select to delete the current image.
Homepage Layout Section ▲ ▼
Displays the Dashboard Items currently visible in the Members Portal.
- Add New Item - Select to add a new Dashboard Item from the drop-down list. The following Items are of relevance with for swiftpos Venues:
The Details item enables Members to view and change their details as required.

- Name - Enter the an appropriate name. For example My Details.
- Type - Ensure the Details option is selected.
- Accessible By - Ensure the Member option is selected.

Member’s will be able to display their Member Card which can then be presented within the Venue at a swiftpos Touch terminal where it can be scanned to receive the benefits their Membership offers. For example, Member pricing, promotions, etc. It is designed to function as a replacement for a physical Member Card.
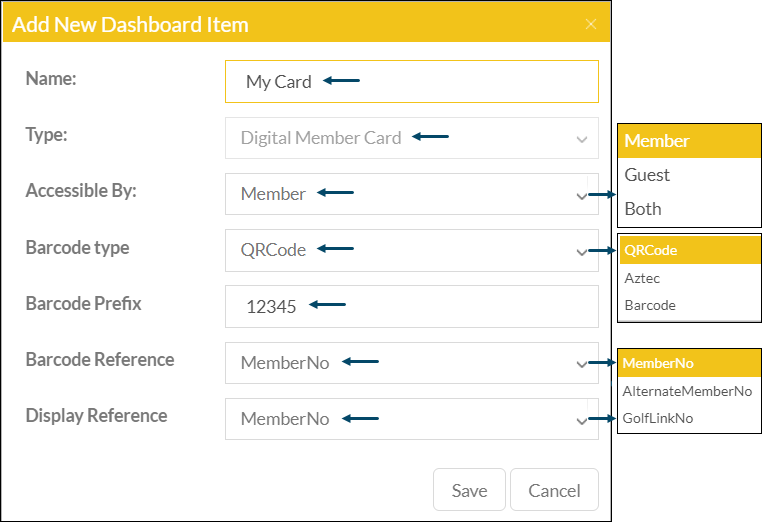
- Name - Enter the an appropriate name. For example My Card.
- Type - Ensure the Digital Member Card option is selected.
- Accessible By - Ensure the Member option is selected.
- Barcode Type - Select from the drop down list the type of Barcode to be used when the Member's digital Card is scanned. Normally this would be set to a QRCode.
- Barcode Prefix - Enter the Prefix that is required. The Prefix value entered will be prefixed to the selected Barcode Reference (MemberNo or AlternateMemberNo) to form masking that will be required by swiftpos Touch to do the appropriate Member lookup.
- Barcode Reference - Select from the drop down list. Normally this would be set to MemberNo.
- Display Reference - Select from the drop down list. Normally this would be set to MemberNo.
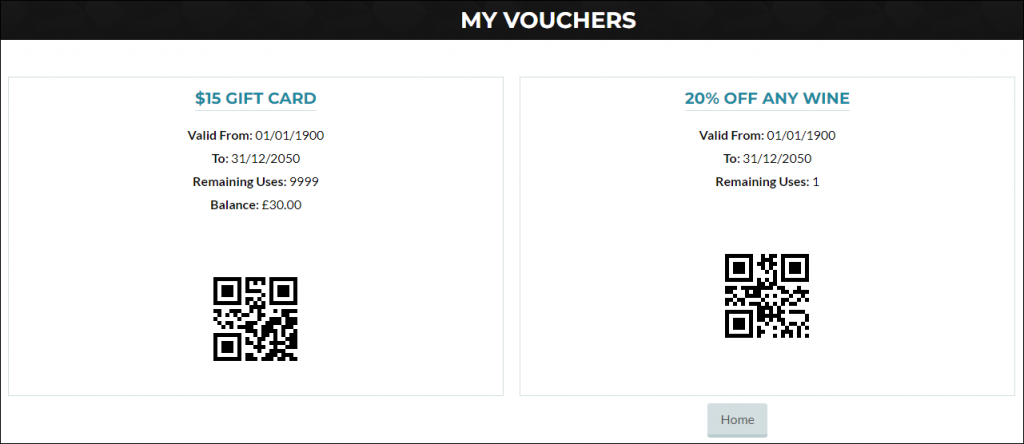
The My POS Vouchers item enables Members to view a list of their active Vouchers as well as have the option of redeeming them, by having the Voucher's barcode scanned at a swiftpos Touch terminal.
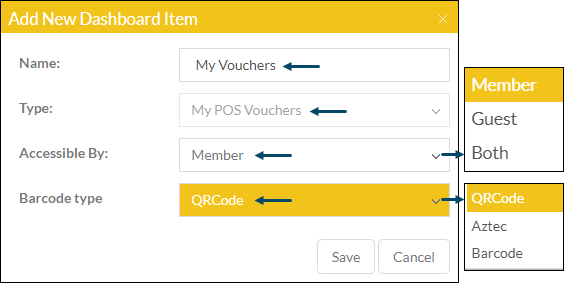
- Name - Enter an appropriate name. For example My Vouchers.
- Type - Ensure the My POS Vouchers option is selected.
- Accessible By - Ensure the Member option is selected.
- Barcode Type - Select from the drop down list the type of Barcode to be used when the Member's Digital Card is scanned. Normally this would be set to a QR code.
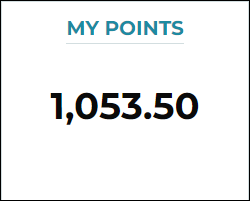
The Loyalty item enables Members to quickly access their current swiftpos Loyalty Points tally.
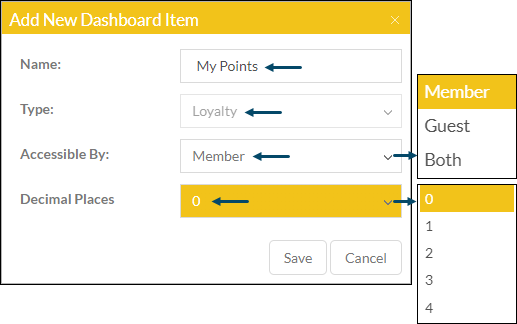
- Name - Enter the an appropriate name. For example My Points.
- Type - Ensure the Loyalty option is selected.
- Accessible By - Ensure the Member option is selected.
- Decimal Places - Select from the drop down list. The default is 0 with Points rounded to the nearest whole number.
Configure Profile Layout ▲ ▼
Follow these steps to manage/configure what data/contact information a member can edit via the Member Portal.
In Venue Manager's Portal menu select the Profile Layout option as shown below:
- PROFILE FIELDS - First ensure the Profile Fields section displays a list of Member fields. If not, then first check that the:
- Correct Venue Location has been selected and is being displayed in the Menu toolbar.
- Permissions identified above have been applied correctly. Specifically the GetMemberFields option should be selected for both of the following Integrators:
- Micropower Member Services
- MPowerVenueManager
- MEMBER DETAILS - Select the Member Details tab and ensure the following:
- The Enable Member's Profile Picture option is selected. This will provide a Member with the opportunity to add a Profile picture.
- The remaining Enable options are NOT selected.
- From the Profile Fields list drag the required Member Fields into the Identification Details and Other Details sections. See an example of how this is done below:
Notes ...
DO NOT select the Enable Change Password option as passwords can be changed using the Set and Reset your Password option in the login prompt.
- Once done, select the Update button to save changes. Members will now be able to view and change their contact information via the Details/Profile tile within the Member Portal.
End of article. ▲