This outlines how to Login Using Fast Clerks in Touch.
Subjects ▼
When Is This Used? ▲ ▼
When a Venue wants to make use of Touch's Fast Clerks feature.
What Is Required? ▲ ▼
- Clerk/Staff will need to exist in Back Office and be configured with the appropriate authorisation to ensure they are able to login to operate Touch.
- Ensure the appropriate Fast Clerk Layout option is selected against the Entry Type setting in Clerk Settings. Refer to How To Login Using Fast Clerks? for more information.
How To Login Using Fast Clerks? ▲ ▼
Once the What Is Required? above has been completed, then Venue's have a choice of two configurations when it comes to logging into Fast Clerks. These are either:
Once a Clerk/Staff Member has successfully logged in they maybe prompted to select a Cash Drawer. Refer to How To Prompt For Cash Drawer Assignment for more information.
Using the Layout option ▲ ▼
This option is used to invoke the Fast Clerk Layout screen above each time an Order/Sale is completed.

Configuration ▲ ▼
- Ensure the Fast Clerk Layout option is selected against the Entry Type setting in Clerk Settings.
How To ▲ ▼
Once the Setup above has been completed, then In Touch to:
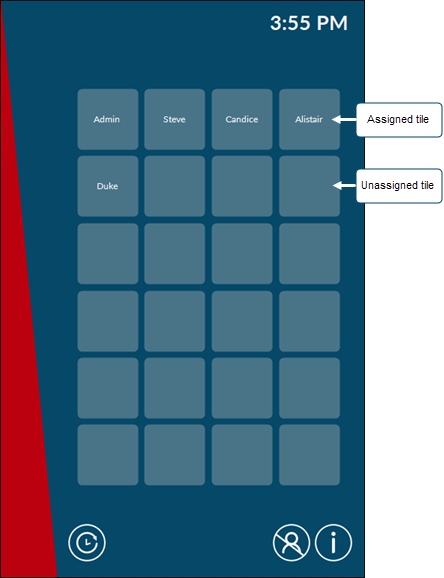
- Login - Select one of the Unassigned tiles on the Fast Clerk Layout screen to open the Clerk Login screen and Login. The Clerk/Staff Member's name will appear on the button and will remain there until the Clerk/Staff Member logs off.
- Switch Clerks - To switch from one Clerk/Staff Member to another during POS operations, select the Clock In button. The Fast Clerk Layout screen will be displayed. Select one of the Clerk/Staff Member assigned Fast Clerk POS Keys. The POS home Keyboard Layout will be displayed. The subsequent Order/Sale will be recorded against the last Clerk/Staff Member selected. Once the Order/Sale is finalised the Fast Clerk Layout screen will be displayed again ready for the next Order/Sale.
- Log Off - Select the LOG OFF button and then select one of the Clerk/Staff Member POS Keys assigned in the grid. An Authorisation popup will be displayed ensuring that only authorised personnel are able to logoff Clerk/Staff Members. The security is configured here. The selected POS Key will appear as unassigned once the Logoff has succeeded.
Notes...
The Floor Plan will not be displayed if using Fast logins. To ensure the Floor Plan is displayed when Fast Clerks is selected, then ensure the Show Floor Plan Layouts after xx seconds settings is set to 1 second or higher.
If the Cash Off By Cash Drawer option is also selected with Fast Clerks, then in order to Log Off from Fast Clerks mode unselect the Cash Off By Cash Drawer option before you can exit Fast Clerks mode.
- Once a Clerk/Staff Member has successfully logged in they maybe prompted to select a Cash Drawer. Refer to How To Prompt For Cash Drawer Assignment for more information.
- Refer to the Clerk/Staff Login Operation for more information.
Using the Keyboard option ▲ ▼
This option is to make use of Fast Clerk (#111) POS Keys added to a Keyboard Layout.

Configuration ▲ ▼
- Ensure the Fast Clerk Keyboard option is selected against the Entry Type setting in Clerk Settings.
Notes...
If NO Fast Clerk (#111) POS Keys are found on the HOME Layout in Touch when this option is selected, then a prompt will be displayed and this option will NOT be able to be selected. Refer HERE for more information.
- Ensure a Fast Clerk (#111) POS Key, for each Clerk/Staff Member, is added to the appropriate HOME Layout using the Designer. Refer to How To Add A POS Key To A Keyboard Layout for more information.
Notes...
The Fast Clerk (#111) POS Key is only activated when the Fast Clerk mode is selected.
The number of Fast Clerk (#111) POS Keys added will limit the number of Clerks/Staff able to login to Touch at any one time.
- Ensure the Clerk Log Off (#112) POS Key is added to the appropriate Keyboard Layout using the Designer. Refer to How To Add A POS Key To A Keyboard Layout for more information.
How To ▲ ▼
Once the Setup above has been completed, then in Touch to:
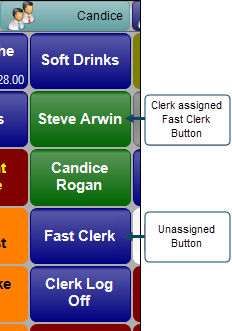
- Login - Select one of the unassigned Fast Clerk POS Keys to open the Clerk Login screen and Login. The Clerk/Staff Member's name will appear on the POS Key and will remain there until the Clerk/Staff Member logs off.
- Switch Clerks - To switch from one Clerk/Staff Member to another during POS operations, select one of the Clerk/Staff Member assigned Fast Clerk POS Keys. The Clerk/Staff Member's name will appear on the Clerk button in the Toolbar. The subsequent Order/Sale will be recorded against the last Clerk/Staff Member selected. Once the Order/Sale is finalised, then before the next Order/Sale, ensure a Clerk/Staff Member assigned Fast Clerk POS Key is selected, otherwise the following message will be displayed:
- Log Off - Select the Clerk Log Off (#112) POS Key and then select a Clerk/Staff Member assigned Fast Clerk (#111) POS Key associated with the Clerk/Staff Member to be logged off. The selected POS Key will appear as unassigned.
- Once a Clerk/Staff Member has successfully logged in they maybe prompted to select a Cash Drawer. Refer to How To Prompt For Cash Drawer Assignment for more information.
- Refer to the Clerk/Staff Login Operation for more information.
End of article. ▲
