Login
Touch
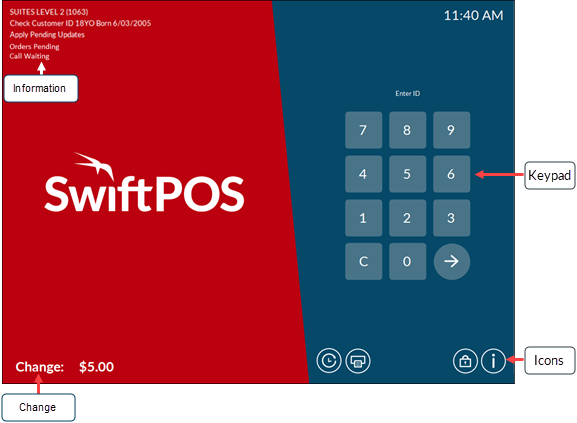
When logging into Touch a Clerk/Staff Member will be presented with a Login screen.
Login Screens ▼
Standard Login ▲ ▼

Notes ...
If the No Clerk log in required option has been selected then the above Login screen will NOT be displayed.
Displays when either:
- The Manual Log In/Out or Log off when sale finalises option is selected.
- An empty tile on Fast Clerk Login has been selected.
- The Clerk Login (#101) POS Key is selected.
Sections ▲ ▼
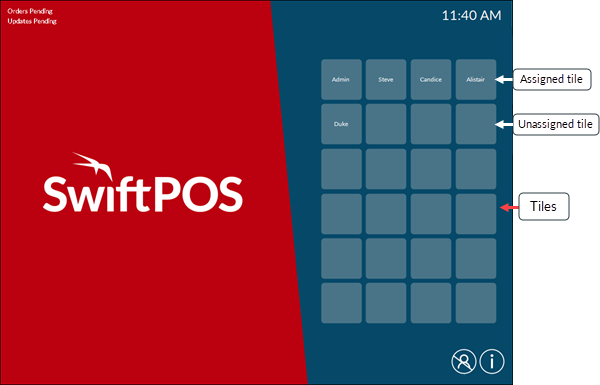
Fast Clerks Login ▲ ▼

Notes ...
If the No Clerk log in required option has been selected then the above Login screen will NOT be displayed.
Displays when the Fast Clerks option is selected. The Fast Clerks Login screen will automatically display when a sale is finalised. Otherwise in all other instances select either one of the following to return to the Fast Clerk Login screen:
- The Clerk button in the Tool bar
- The Clerk Login (#101) POS Key is selected.
Sections ▲ ▼
Information Section (Top Left Corner) ▲ ▼
- Check Customer ID - Displays when the Required Birthdate Date option is selected.
- Apply Pending Updates - Displays when Updates are pending and can be selected to ensure updates are downloaded and applied.
- Orders Pending - Displays when Orders are Pending. Pending Orders can be viewed via the Orders button after logging in.
- Call Waiting - Displays when a call comes in.
Notes ...
This is only displayed if a Caller ID Peripheral has been configured and is in use.
Change Section (Bottom Left Corner) ▲ ▼
- Change - Displays the change to be returned to the customer from the last sale.
Keypad Section (Bottom Left Corner) ▲ ▼
This is only displayed when the entry of a Clerk's/Staff Member's ID or PIN is required to be entered.
- Change - Displays the change to be returned to the customer from the last sale.
Tile Section (Right Hand Side) ▲ ▼
This only displayed when the Fast Clerks option is selected. Select an unassigned tile (that is, a tile without a Clerk's/Staff Member's name displayed) to display the Login screen and initially login. The Clerk's/Staff Member's name will appear on the tile once logged in successfully.
Icon Section (Bottom Right Hand Side) ▲ ▼
Clock In/Out - Select to display the Clock In Out screen to record the start/ending of shifts and breaks.
Print Receipt - Select to reprint the receipt for the last sale.
Change PIN - Select to display the Change PIN screen and change the PIN of the currently active Clerk/Staff Member.
Notes ...
This icon will NOT be displayed if the Don't Prompt for Pin option is selected.
Information - Select to display the Information screen.
The background colour of the above icon will change to red to alert the Clerk/Staff Member that something requires attention and more information can be found by selecting the red Information icon.
Log Off - Select to Log Off a Clerk/Staff Member.
End of article. ▲
