
To access, refer HERE. Used to configure KVS.
IMPORTANT
It is recommended to restart KVS whenever a change is made to anyone of the settings found in the tabs outlined in this article. To do this, refer HERE.
Notes ...
All settings are held in the Table Tracking database. If the database is cleared, then the KVS will need to be reconfigured.
Tabs ▲ ▼

- Appearance
- Behaviour
- Categories
- Colours
- Courses
- Customer Alerts
- General
- Input
- Order Alerts
- Printing
- Summary
Appearance Tab ▲ ▼

Sections ▲ ▼

- Columns/Rows - Displays/Select the number of columns and rows to be displayed in KVS. Maximum of 10 columns and 8 rows.
- Font Size - Displays/Select the size of the font that will be used to display all text associated with orders in KVS.

- Items - Select to ensure all items are displayed. If not selected, then only the header information of each order is visible.
- Bumped Lines (Served items) - Select to display served items. Items served will be displayed with a strike-through effect applied.
- Pass Served Lines - Select to ensure that when items have been served these will remain displayed with a strike-through effect applied. This setting only applies when the Pass Type is selected.
- Expedited - Select to ensure the text EXPEDITED (in red) is displayed in the background of the cell that has been served.

- Held - Select to ensure the Held status of orders is displayed.
Notes ...
This setting only applies when Journal mode is enabled.
- Paid - Select to ensure the Paid status of orders is displayed.
Notes ...
This setting only applies when Journal mode is enabled.
- Cell Numbers - Select to ensure cell numbers are displayed in each of the cells.
- Credited Items - Select to hide items than have been Credited.
- Detected Allergens - Select to ensure that when items are detected containing an Allergen, these will be displayed with the Prefix entered below.
- Prefixed - Displays/Enter a value that will be used to prefix any allergens detected in items in an order.

Notes ...
Refer HERE for more information.
- Held Count - Select to ensure the number of orders held is displayed.
- Instructions - Select to display Instructional items.
- Short Description - Select to ensure item's/product's Short Descriptions are displayed.
- Consolidate Lines - Select to consolidate similar lines option determines whether items similar items are kept separate as they are displayed in the sales grid or whether they are consolidated so that any item is only ever listed once per order with the total quantity of that item for each order. When this option is enabled all instructions for each item are separated by separator lines.
- Tables Only Between - Enter the range of Table numbers to ensure only those tables in the range entered are displayed.
Notes ...
The values displayed in the Available Servings section, the Stats tab and the Servings tab DO NOT take the range entered here into consideration.
- Order Time Mode - Select to allow Customers to choose whether the order time displayed in the header of each cell in KVS displays either:
- The time since the Order was last changed - This is the default and a change to an order is triggered when an order is Held/Recalled or Saved to a Table.
- The time since the Order was created.

Hide Toolbar Buttons Section ▲ ▼

Used to select/unselect the available options to hide/show their respective buttons displayed in the toolbar buttons section of the KVS screen. The options are:
- Recall Bump
- Notes
- Hold
- Working
- Wait Time
- Recall Hold
![]()
By default the Standard mode is applied to ensure orders are displayed on the KVS only after they have been finalised (paid) or saved to a Table/Tab.
- Enable - Select to enable Journal mode, which ensures orders are displayed on the KVS as soon items have been added to the sales grid in Touch POS. When running KVS in this mode it is not possible to Bump orders until they have been paid for.
Notes ...
Journal Mode is not compatible with Table Restrictions, nor is it compatible with Inventory Transfers In\Out. To do Inventory Transfers in Touch POS with KVS, select Standard Mode.
Section Journal Summary Section ▲ ▼

Notes ...
The settings in this section are only enabled when the Section Journal Type is selected.
When enabled a Journal Summary will display at the bottom of the Journal Section screen. It displays a count of all ordered items assigned to the Category selected. Items counted, are all those pending preparation. That is, if they maybe waiting on other items to be prepared first, or they have been ordered, but as yet have not been Called Away.

Example of a Journal Summary display with the Desserts Category selected
- Enable Journal Summary - Select to ensure a Journal Summary is displayed at the bottom of the KVS screen.
- Font Size - Displays/Select the Font Size from drop-down list of available sizes.
- Category - Select from the drop-down list of Categories the Category that will be used to determine what is summarised in the Journal Summary. In the screenshot above, Desserts was the Category selected.
- Consolidate Category - Select to ensure that a total of all items for the selected Category is displayed, rather than totals for each item.

Example of a Consolidated Journal Summary display with the Desserts Category selected
![]()
- Enable Review Tabs - Select to ensure Review tabs are displayed. This allows the viewing ONLY of all other KVS Peripherals connected to the same Table Tracking database.
Behaviour Tab ▲ ▼

Sections ▲ ▼

- Allow bump of Individual Items - Select to ensure the Bumping of individual items in an order can take place. When NOT selected only entire orders can be Bumped.
- Allow bump of Held Sales - Select to ensure the Bumping of held sales.
- Keyboard number to BUMP cell number - Select to ensure that an order can be bumped by selecting the order's cell number on a Keyboard or Bump Box. When NOT selected then the Bump option will need to be selected.
- Keyboard number to SELECT cell number - Select to ensure that an order can be selected by selecting the order's cell number on a Keyboard or Bump Box. When NOT selected then the order/cell will need to be selected.
Print Section ▲ ▼

- Completed Orders - Select to ensure bumped orders will be printed to a Complete Bump Printer.
- Individual Items/Orders - Select to ensure bumped items will be printed to a Bump Item Printer.

- Keep X days of records - Select to ensure old KVS records are deleted at start up and specify the number of days of KVS history to keep.
Notes ...
Enabling this option will cause KVS Reports to not be able to report any further back than the number of days specified.
- Automatic Restart - Select to reboot the KVS at a specified time each day.
- Bump All Orders on Automatic Restart - Select to ensure all orders are bumped when KVS is restarted automatically.
Notes ...
This is recommended to maintain a high level of performance.
- Print Groups must be called away - Select to ensure that items/products will only be displayed once they have been Called Away.
- Called Away Starts Item Timer - Select to enable
- Limit recalling of bumped Order to last XX - Select/Enter the appropriate limit
- Prompt to Move/Expedite Order - Select to ensure a Enter Cell Number prompt is displayed to allow for the moving of Kitchen orders to alternative positions on the KVS when Expediting.

Notes ...
This feature will only be enabled when a KVS Pro type device is in use. Also, only the cell numbers of pending orders can be entered. A cell number entered that is NOT assigned to an order or is a continuation of an order will result in a prompt being displayed indicating the correct cell numbers that can be entered.
- Display Newest Order First - Select to ensure new orders are displayed ahead of older orders. Basically, this is achieved by ensuring that all new orders are automatically Expedited.
Notes ...
This feature will only be enabled when KVS Pro is in use.

- Select one of the following order Types to ensure these are displayed:
- Eat In
- Take Away
- Pick Up
- Delivery
- Drive Through

- Send New Orders to Menuboard - Select to ensure orders that are Pending, Ready or On Hold are sent to the Menu Board's Call Item display. Once configured, a Call Item will need to exist on a Menu Board with the Display Type and Sort Order options selected. When selected the following option will be available:
- Display - Select from the drop-down list what will be displayed on the Menu Board:
- Booking Name
- Order Name
- Table Number
- Auto Number
- Display - Select from the drop-down list what will be displayed on the Menu Board:
Notes ...
They are CASE sensitive, so ensure they are entered into messages as depicted above. Also, when the Booking Name is blank, it reverts to the Table number then the Order number. And when the Order number is specified, it reverts to the Booking name then the Table number. etc depending on which option you have chosen in the settings screen of KVS.
- Update Menuboard for Bumped Orders - Select to ensure Bumped orders are sent to the Menu Board's Call Item display. When selected the following option will be available:
- Display - Select from the drop-down list what will be displayed on the Menu Board:
- Booking Name
- Order Name
- Table Number
- Auto Number
- Display - Select from the drop-down list what will be displayed on the Menu Board:
- Use serve function to send transactions to Menu board - Select to ensure orders can be sent (served) to the Menu Board before they are Bumped. A blue "serve" option is displayed on the main KVS and will send the order information to the Menu Board without having to Bump the order first. Once the order is served, the order can then be Bumped, and it is then removed from the Menu Board.
Categories Tab ▲ ▼

Refer HERE for more information.
Sections ▲ ▼

Lists all the Categories that are currently not selected along with their ID, Name and Instructional indicator.
- Instructions - Toggle select to hide/show Instructional Categories in the grid above.

- Add All - Select to add all Categories from the Category List and move them to the Selected Categories List.
- Clear - Select to remove all Categories from the Selected Categories list.
- >/< - Select to either add/remove the selected Category to/from the Selected Categories list.

List all Categories that have been selected along with their ID, Name, T (Trigger indicator), I (Instructional indicator), Ex (Exclude from printing indicator), C (Colour indicator) and X (Delete option).
Notes ...
When it comes to Combos, ensure that all the Categories are selected for all the items used in Combos.
- T (Trigger indicator) - Select to ensure items assigned to the associated Category, when sold will be sent to the kitchen/order printer or KVS. If unselected, this will ensure that when items/products in the associated Category are sold in Touch POS, they will also be sent to the kitchen/order printer or KVS, when sold in the same sale as items that are assigned to Categories that have the Trigger check box selected. Refer HERE for more information.
- I (Instructional indicator) - Displays a tick when the associated Category is an Instructional Category.
- Ex (Exclude from printing indicator) - Select to ensure printing of items/products assigned to the associated Category will NOT print. Useful when Kitchens have multiple printers and each required only specific items/products to be printed. For example, there could be a pass printer, a grill printer, a salad printer, pizza printer, dessert printer etc. The chefs in these different areas are only interested in the information that is relevant to their area.
- C (Colour indicator) - Select to select the colour of the font the items ordered in the selected category will be displayed in. For example:

- X (Delete option) - Select to remove the colour selection.
- Trigger All - Select to ensure all Triggers are selected.
- Remove All Triggers - Select to ensure all Triggers are deselected.
Colours Tab ▲ ▼

Sections ▲ ▼

- Scheme - Select from the drop-down list one of the following:
- Dark - Select to ensure the standard Dark colour theme is applied.
- Light - Select to ensure the standard Light colour theme is applied.
- Custom - Select to ensure the colour buttons are enabled in the section below, to allow for customised colour choices to be made.
Custom Colour Selection Section ▲ ▼

Select a colour button to open the Colour prompt to change the colours of the selected item.
Notes ...
Cooking Times can now be set against items/products here, which will then be used to determine the status of the item and hence the colour the item is displayed in. The colour items affected by the item/product Cooking Times are Cooking, Overtime and Overtime Waiting.
Courses Tab ▲ ▼

Sections ▲ ▼

- Enable - Select to enable the display of Courses in KVS.
- Grid - Lists the Print Groups added as courses along with their ID, Description, Course Time (min) and Course Warning (min).
- Add - Select to open the Courses screen to select a Print Group to add as a course to the grid. For example:

Lists the Swiftpos Print Groups along with their ID and Name
- Add continued ... Once courses have been added to the grid and the Enable option is selected, then for each course, a course option will appear at the top of the KVS screen along with an All option. By selecting anyone of the available course options listed at the top of the KVS screen, staff will be able to quickly and easily view the status of the items ordered based on the course selected. For example:

- Delete - Select to remove the selected course from the grid.
- Show Statistics - Select to ensure statistics are displayed in KVS. Once selected, a Stats tab will be available to be selected and will display the statistics gathered for each course added to the grid. Refer HERE for more information. The statistics displayed can be seen in the following example:

- Avg Times - Select to ensure the Statistic displayed are displayed based on average times.

Example of Stats tab displayed with the Avg Times option selected
Available Servings Section ▲ ▼

- Enable - Select to enable the display (in KVS) of the available servings of the items/products listed in the grid below. To add items/products displayed, refer HERE. To remove items/products displayed, refer HERE.

- Location - Select from the drop-down list the location.
- Grid - Lists the items/products added along with their PLU and Description.
- Add - Select to open the Available Servings Products screen to select an item/product to add to the grid. For example:

- Add continued ... Once items/products have been added to the grid and the Enable option is selected, then for each item/product added, an item/product option will appear at the top of the KVS screen along with an All option. By selecting anyone of the available item/product options listed at the top of the KVS screen, staff will be able to quickly and easily adjust available servings for that items/product. For example:

- Delete - Select to remove the selected item/product from the grid.
- Combined - Select to ensure the total Ordered to date and the Available Servings value set are displayed together below the item/product. For example:
| With the Combined option NOT SELECTED |
 |
| With the Combined option SELECTED |
 |
- Enable Servings Screen - Select to ensure a Servings tab is displayed in KVS. Once selected, the Servings tab will display the number ordered to date and available servings set values for each of the items/products listed in the grid. For example:

Customer Alerts Tab ▲ ▼

Customer Alerts will only be sent when the following criteria are met:
- In Keyboard Designer, ensure the Customer Alert (#580) POS Key has been added to a Layout.
- Ensure a KVS Peripheral is be added to Touch POS.
- Ensure the Send To KVS option is set to True.
- Ensure a Type below is selected. That is either Pager, SMS or Email.
Notes ...
The Customer Alert Type selected here must be the same as that selected against the Customer Alert (#580) POS Key in Keyboard Designer. That is, if Email is selected in Touch POS for the Customer Alert POS Key then the Email option here must be selected.
Sections ▲ ▼

Select from one or more of the following:
-
Pager
- SMS
Email SMTP Settings (Pro Version Only) Section ▲ ▼

- Outgoing server - Displays/Enter the domain name (host) or IP address of the SMTP server (email server for outgoing email) that will send emails. For example, mail@swiftpos.com.au. or 192.168.1.100.
- Sender Name - Displays/Enter the name that will appear in the From field of the email.
- From Email Address - Displays/Enter the email address that will appear as the return email address of the emails. This has to be a valid email address on the email server that is sending the emails.
- Username/Password - Displays/Enter the User Name and Password. If an Exchange Server is being used, then the Username entered must include the domain name and Username.
Notes ...
The Username/Password may not be required if the email server being used allows for anonymous logins. Check with your ISP.
- Message - Displays/Enter the default message that will be sent out as part of the body of emails sent. The following variables are available for use when configuring the appropriate message to be sent:
- {CUSTOMER NAME}
- {ORDERNUMBER}
- {TABLENUMBER}
- {BOOKING NAME}
- An example is : Hi {BOOKING NAME}, your order {ORDERNUMBER} is ready and can be picked up from the counter.
Notes ...
They are CASE sensitive, so ensure they are entered into messages as depicted above. Also, when the Booking Name is blank, it reverts to the Table number then the Order number. And when the Order number is specified, it reverts to the Booking name then the Table number. etc depending on which option you have chosen in the settings screen of KVS.
- Subject - Enter the subject of the message.
- Port - Displays/Enter the port number for the SMTP server connection. Port 25 is generally the default SMTP port. If Gmail SSL is being used then SSL works on port 25 and may not work on port 465 as the Gmail documentation recommends.
- SSL Encryption - Select to ensure SSL encryption is to be used when sending emails.
- Test Email - Select to send a test email to a specified email address, using the SMTP settings configured.
SMS Settings (Pro Version Only) Section ▲ ▼

Configure these settings to SMS Customers/Members alerts every time an order/item is Bumped.
Notes ...
SMS and Email Alerts will only be sent if the Customer/Member associated with the order being Bumped has a Mobile # and/or Email address recorded against them.
- SMS Provider - Select from the drop-down list the Venues current SMS Provider.
Notes ...
Once one of a SMS Provider has been selected, then complete the remaining settings specific to that provider.
- Country Code - Displays/Enter the Country Code.
- Message - Displays/Enter the default message that will be sent out. The following variables are available for use when configuring the appropriate message to be sent:
- {CUSTOMER NAME}
- {ORDERNUMBER}
- {TABLENUMBER}
- {BOOKING NAME}
- An example is : Hi {BOOKING NAME}, your order {ORDERNUMBER} is ready and can be picked up from the counter.
Notes ...
They are CASE sensitive, so ensure they are entered into messages as depicted above. Also, w hen the Booking Name is blank, it reverts to the Table number then the Order number. And when the Order number is specified it reverts to the Booking name then the Table number. etc depending on which option you have chosen in the settings screen of KVS.
- Log All SMS Sends - Select to enable.
General Tab ▲ ▼

Sections ▲ ▼
Terminal Connection Section ▲ ▼

KVS Pro connects to the Back Office in the same way as Touch POS. In order for this connection to be established, the following will need to be configured:
- Terminal ID - Displays/Select to enter the ID of the Devices entry to which this KVS is to be associated with.
Notes ...
The ID entered must be associated with a Devices entry, that is of the Type KVS Basic or Dynamic, and must have the Location selected that is the same as the Location the Touch POS Table Tracking Master device is located in.
- Host/IP - Displays/Enter the name of the PC hosting the Swiftpos Connect Service. This can be connected locally or over the Internet.
- Tenant ID - Displays/Enter the Tenant ID. This is generally the name of the Swiftpos Back Office database to which the device normally connects to.
- Access Code - Displays/Enter the Access Code (Database Reference ID) specific to the Swiftpos Back Office database configured in Tenant ID above.
- Port Number - Displays/Set the Port to the same one that has been configured HERE.
- Terminal Number - Displays/Set the Device ID assigned to the KVS.
- Auto Reconnect X Secs - Displays/Set the number seconds to lapse before attempting to reconnect to the Host or IP server.
- Send Heart Beat to Connect - Select to ensure a Heart Beat signal is sent to the Swiftpos Connect at periodic intervals. This signal is sent to inform the Connect service that the KVS device is alive and active.
- Security Policy - Refer HERE for more information.
Notes ...
It is recommended that this option is always selected.
- Visual Debug - Adds a visual panel to KVS which visually displays all events being logged by KVS. The visual debug panel also includes extra logging that is only ever displayed in the visual debug panel. This setting should only be enabled when recommended.
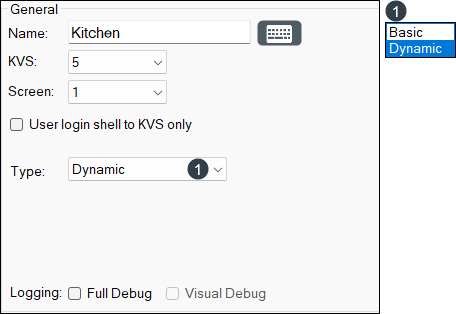
- Name - Display/Enter an appropriate name for the KVS being configured. The default is Kitchen Video System. The Name entered here will be displayed in the Kitchen Video System Monitor V2 screen in Touch POS, as well as in the top left corner of the KVS itself.

Notes ...
Although NOT required entering an appropriate Name maybe usefull in Venues that have multiple KVS installations.
- KVS Number - Select from the drop-down list the KVS number assigned to the KVS being configured. Up to 32 can be assigned per Business/Venue. In Touch POS the KVS Numbers (and now the name as well) differentiates each KVS installation and allows different orders to be sent to each KVS.
- Screen Number - Displays/Enter the screen number that refers to the monitor that KVS will be displayed on.
Notes ...
The list of available screen numbers will always be equal to the number of detected monitors installed on the PC.
- User login shell to KVS only - Select to enable and login the user without a windows desktop and instead loads only KVS. This setting defaults to off and is used in cases where Venues wish to stop Clerks/Staff Members from minimising or exiting the application in order to access the internet.
- Type - Select from the drop-down list one of the following:
- Basic - Select to ensure the select KVS functions in basic mode.
Notes ...
Venues will now need to have a sufficient number of KVS Device licences included in their registration in order to be able to make use of the KVS Basic Type option. Email registrations@Swiftpos.com.au to obtain the appropriate registration.
-
- Dynamic - Select to ensure the KVS functions in dynamic mode.
- Logging - Select from the options available to enable logging.
Notes ...
This should only be enabled when recommended.

- SQL Connection - Displays/Select the SQL Connection dialog to open the Connect to Server screen and configure the SQL Server Connection to establish a connection to the table tracking database which is where all KVS data and settings are stored.

- Bump All Orders - Select to remove all existing orders from the KVS. Useful when multiple screens of orders exist at the KVS.
- Software Update - Select to close KVS and start the Software Updater to check for updates.
- Reset and Upgrade DB - Select to Reset and upgrade the Table Tracking database. This is normally only performed after downloading a new version of the software or when attempting to resolve a database upgrade related issue.
- Event Log Reader - Select to open the Event Log reader to view KVS related logs.
Input Tab ▲ ▼

Sections ▲ ▼

- Input Type - Select from the options available the input device that is most appropriate:
- Touch and Keyboard - Select to ensure KVS will respond to touch and keyboard input.
- Touch and RS232 bump box - Select to ensure KVS will respond to different Bump Boxes that are available.
Notes ...
Keyboard input can be problematic in a multi monitor environment when KVS is not running on the primary monitor, especially if something like Touch POS is running on the primary monitor. It is recommended to use Touch and RS232 bump box input in a multi monitor environment.

- Notes button will expedite orders - Select to ensure the notes option on the Bump Box can be used to expedite orders to the front of the queue.
- RS232 Settings - Select to open the RS232 Settings screen and configure.
Notes ...
The above options will only be enabled when the Touch and RS232 bump box Input Type option is selected.

- Navigate Headers/Items - Select from the options available the method of navigation between orders within the KVS:
- Navigate Headers - Select to ensure left and right input will navigate forward and back through the orders while up and down input will move up and down a row of orders.
- Navigate Items - Select to ensure left and right input behaves the same as Navigate Headers but up and down input moves up and down the items of the currently selected order.

Dynamic KVS Type Only. Used to map Keyboard and/or Touch POS Keys and/or multi POS Key combinations to each of the KVS functions available.
Notes ...
Keyboard Mapping configuration is only available when the Touch and Keyboard Input Type option is selected.
- Type - Select from the drop-down list one of the following:
- Standard - Select to ensure the default mapping is applied.
- Custom - Select to enable the buttons below and allow the mapping of different input to each KVS function. To map, click the button opposite the required KVS function and then type the key that you wish to map the function to.
- Reset Defaults - Select to restore default mappings as per the Standard option.
- Clear All - Select to clear all KVS function mappings.
Order Alerts Tab ▲ ▼

Sections ▲ ▼

- Warning Time - Displays/Enter the amount of time in minutes, an order can display on the KVS before it starts flashing red. This is used to ensure orders are completed in a timely manner. When a time of 0 minutes is entered, no warning is given.
- Warning Sound - Select a sound to play when the Warning Time is exceeded.
- Flash Time - Select to ensure the time flashes when the Warning Time is exceeded.
- Flash Header - Select to ensure the header flashes when the Warning Time is exceeded.
- Reset timer when bumping print group - Select to ensure the Warning Time is reset when the Print Group has been Bumped.
- New Order Sound - Select a sound to play when a new order is sent to the KVS.
- Changed Order Sound - Select a sound to play when a KVS order is changed. An order is flagged as changed when a Table order is changed or new items are added to it.
Miscellaneous Alerts Section ▲ ▼

- Announce order via Text To Speech - Select to enable the announcing of orders using Text to Speech. When selected, the text specified in the Script field will be announced in the voice selected in the Voice field, when an order is Bumped.
- Voice - Select from the drop-down list of Windows' inbuilt voices to select the desired voice to be used for the announcing of Bumped orders.
- Script - Displays/Enter the text that will be converted to speech (in the voice selected above) to announce Bumped orders. The [OrderId] will be replaced with the Spoken option selected below.
- Spoken - Select from the drop-down list one the following:
- Booking Name
- Order Name
- Table Number
Printing Tab ▲ ▼
Used to add/configure/manage KVS Peripherals in the form of pagers and/or printers.

Sections ▲ ▼

Lists KVS specific printers and other peripherals along with their Type and Description.

- Add - Select to open the Add New Peripheral screen to add a KVS specific peripheral.
- Edit - Select to edit the peripheral selected in the grid. Once selected a peripheral specific screen will be displayed allowing for the peripheral to be configured/edited. For example:

Refer HERE for more information on the setting options available to be configured.
- Delete - Select to delete the selected peripheral.

This screen is accessed by selecting the Add option in the Printing tab.
- Peripheral Type - Select from the drop-down list one of the KVS specific available peripherals. Once selected, a peripheral specific screen will be displayed allowing for the peripheral to be configured.
- Bump Item Printer - Select to print individual items that have been Bumped.
- Complete Bump Printer - Select to print entire orders that have been Bumped. Useful for Venues that want to print to the Pass.
- Pager System - Select to ensure a Pager System is activated once an item is Bumped. Once selected, select from the drop-down list one of the Pager Systems currently supported. Refer HERE for more information.
- Description - Display/Enter an appropriate description for the peripheral being added.
Notes ...
Once a printer peripheral is added, their corresponding Print Options setting located in the Behaviour tab will also have to be selected.
Summary Tab ▲ ▼

Sections ▲ ▼

Used to display a summary of the orders that are Current or a Daily Total.
- Enable - Select to ensure the KVS summary panel 1 is visible. Once selected, the following options are enabled for selection:
- Current Orders - Select to ensure totals of all current orders are displayed in the KVS summary panel. That is orders that have NOT been Bumped.
- Daily Total - Select to ensure totals of all orders since the start of Trading are displayed in the KVS summary panel.
- Instructions - Select to ensure Instructional items are also displayed in the KVS summary panel.
- Start of Day - Displays/Set the time of day that the Show Daily Total option will use to determine which orders are displayed in the KVS summary panel.
- Filter Types - Select one of the following order Types:
- Eat In
- Take Away
- Pick Up
- Delivery
- Drive Through

Used to display a summary of the Current or Daily orders.
- Enable - Select to ensure the KVS summary panel 2 is visible. Once selected, the following options are enabled for selection:
- Current Orders - Select to ensure totals of all current orders are displayed in the KVS summary panel. That is orders that have NOT been Bumped.
- Daily Total - Select to ensure totals of all orders since the start of Trading are displayed in the KVS summary panel.
- Instructions - Select to ensure Instructional items are also displayed in the KVS summary panel.
- Start of Day - Displays/Set the time of day that the Show Daily Total option will use to determine which orders are displayed in the KVS summary panel.
- Filter Types - Select one of the following order Types:
- Eat In
- Take Away
- Pick Up
- Delivery
- Drive Through

- Alignment - Select from the drop-down list one of the options listed.
- ShowTotal Items On Order - Select to show.
- Show KVS Times - Select to show.
End of article ▲