This provides an overview of the Issue 3rd Party Gift Card (#241) POS Key used in conjunction with 3rd Party Interfaces. This can also be referred to as:
- Activate Gift Card
- Load Gift Card
Subjects ▲ ▼
About ▲ ▼
What Is Required? ▲ ▼
- Swiftpos v10+
- Ensure this POS Key is added to the appropriate Keyboard Layout using the Designer. Refer HERE for more information.
- Venues will need a NetPOS registration and the NetPOS settings will need to be configured for the appropriate 3rd Party Interface in order to use this POS Key.
What Is Supported? ▲ ▼
This function POS Key can be used in conjunction with the following 3rd Party Integrations:
What To Consider? ▲ ▼
- If required, access to this POS Key can be restricted by the Clerk Security feature.
When Is It Used? ▲ ▼
This can be used for activating/issuing/loading a 3rd Party Gift Card with an initial balance. For example, $50, $100, etc.
Notes ...
This function is NOT a Top Up. Gift Cards can only be activated/issued/loaded once and this normally done at the moment the Gift Card is sold. For a Top Ups refer to Top Up 3rd Party Account (#244) POS Key for more information.
How To? ▲ ▼
- GET STARTED
- Use This POS Key With?
How To GET STARTED? ▲ ▼
- Review About and ensure the steps outlined HERE are addressed.
- In Keyboard Designer, select the 3rd Party Gift Card (#241) POS Key that has been added to a Layout.
- Ensure it is given an appropriate Caption. For example, Issue 3rd Party Gift Card.
- Select the More Settings option to display the Settings screen.
- Once configured, ensure a Full Update is sent to all the Touch terminals that will be using the POS Key. Refer HERE for more information.
Screens ▲ ▼
Settings Screen ▲ ▼
Specific to:
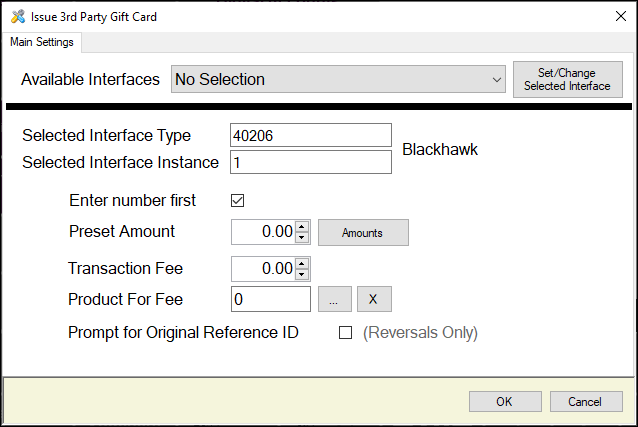
- Available Interfaces - Select from the drop down list the required Interface.
Notes ...
If no interface is selected, the default used will be the interface which is set as default in NetPOS.Net.
- Set/Change Selected Interface - Select to select the interface selected above and set the Selected Interface Type and Instance values.
- Enter number first - Select to ensure that the Gift Card/Voucher number is entered first. If not selected, entry for the Gift Card/Voucher number will be prompted as the end.
- Preset Amount - Displays/Enter the amount that will be used as the default amount to be loaded onto the Card.
Notes ...
A Preset Amount of ZERO will mean the amount will need to be entered at the time the Gift Card is issued in Touch.
OR
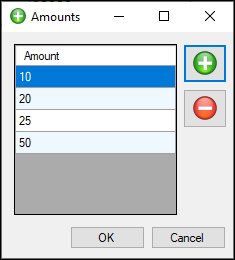
- Amounts - Select to open the Amounts screen (as depicted below) to configure up to 12 preset amounts. Once configured Clerks/Staff will be able to quickly select from one of the configured preset amounts when Issuing a Gift Card.
Notes ...
Once configured these will ONLY be displayed at Touch when the Preset Amount is set to ZERO. That implies a Preset Amount greater than zero will ensure the preset amounts configured in the Amounts screen are ignored and will NOT be displayed at Touch.
- Transaction Fee - Display/Set the amount that will be incurred in transaction fees each time an Activate Gift Card operation is completed.
- Product For Fee - Displays/Select the Product to which the Transaction Fee will be assigned to.
Notes ...
If required, create a Non-inventoried Product to assign the Transaction Fee to.
- Prompt for Original Reference ID - Select to ensure the prompt below is displayed, to facilitate the entry of the transactionUniqueId value when reversing a Blackhawk Activate Gift Card operation.
The transactionUniqueId value is sourced from the NetPOS log entry of the original transaction that is requiring to be reversed. For example:
0136 Blackhawk-1 LoadGiftCard: Response.
Body:
{"response":{"header":{"signature":"BHNUMS","details":{"productCategoryCode":"01","statusCode":"00","specVersion":"46"}},"transaction":{"primaryAccountNumber":"9877890000000000","processingCode":"725400","transactionAmount":"000000002500","transmissionDateTime":"230321045739","systemTraceAuditNumber":"002287","localTransactionTime":"145739","localTransactionDate":"230321","merchantCategoryCode":"5411","pointOfServiceEntryMode":"031","transactionFeeAmount":"000000000000","acquiringInstitutionIdentifier":"60300013772","retrievalReferenceNumber":"638150074597","authIdentificationResponse":"123456","responseCode":"00","merchantTerminalId":"00003 003 ","merchantIdentifier":"60300013772 ","transactionCurrencyCode":"036","additionalTxnFields":{"productId":"07675004390","balanceAmount":"C000000002500","transactionUniqueId":"SZT0614S9Z3ZTW04QT2VMJT3S8","correlatedTransactionUniqueId":"SZT0614S9Z3ZTW04QT2VMJT3S8","paymentDetails":{"paymentDetail1":{"tenderType":"Cash","paymentMode":"011"}}}}}}
In the above example the value of "SZT0614S9Z3ZTW04QT2VMJT3S8 would need to be entered into the prompt above.
This screen is accessed by selecting the More Settings button in Keyboard Designer.
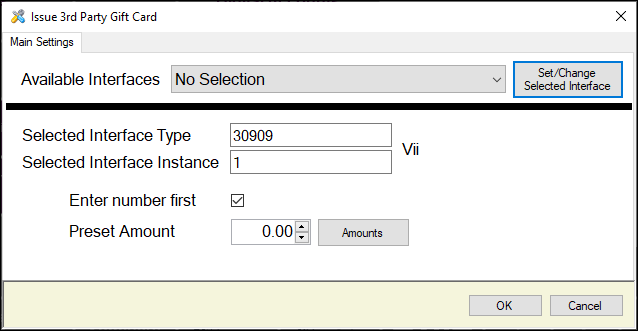
- Available Interfaces - Select from the drop down list the required Interface.
Notes ...
If no interface is selected, the default used will be the interface which is set as default in NetPOS.Net.
- Set/Change Selected Interface - Select to select the interface selected above and set the Selected Interface Type and Instance values.
- Enter number first - Select to ensure that the Gift Card/Voucher number is entered first. If not selected, entry for the Gift Card/Voucher number will be prompted as the end.
- Preset Amount - Displays/Enter the amount that will be used as the default amount to be loaded onto the Card.
Notes ...
A Preset Amount of ZERO will mean the amount will need to be entered at the time the Gift Card is issued in Touch.
OR
- Amounts - Select to open the Amounts screen (as depicted below) to configure up to 12 preset amounts. Once configured Clerks/Staff will be able to quickly select from one of the configured preset amounts when Issuing a Gift Card.
Notes ...
Once configured these will ONLY be displayed at Touch when the Preset Amount is set to ZERO. That implies a Preset Amount greater than zero will ensure the preset amounts configured in the Amounts screen are ignored and will NOT be displayed at Touch.

- Available Interfaces - Select from the drop down list the required Interface.
Notes ...
If no interface is selected, the default used will be the interface which is set as default in NetPOS.Net.
- Set/Change Selected Interface - Select to select the interface selected above and set the Selected Interface Type and Instance values.
- Preset Amount - Displays/Enter the amount that will be used as the default amount to be loaded onto the Card.
Notes ...
A Preset Amount of ZERO will mean the amount will need to be entered at the time the Gift Card is issued in Touch.
OR
- Amounts - Select to open the Amounts screen (as depicted below) to configure up to 12 preset amounts. Once configured Clerks/Staff will be able to quickly select from one of the configured preset amounts when Issuing a Gift Card.
Notes ...
Once configured these will ONLY be displayed at Touch when the Preset Amount is set to ZERO. That implies a Preset Amount greater than zero will ensure the preset amounts configured in the Amounts screen are ignored and will NOT be displayed at Touch.
- Prompt For Email Address - Select to ensure a prompt is displayed for the entry of an Email address. This option is MANDATORY when configuring the POS Key to Issue/Sell Digital Gift Cards.
- Voucher/Gift Card Type - Displays/Enter the text Gift. This is MANDATORY when configuring the POS Key to Issue/Sell Digital Gift Cards.
End of article ▲