
This outlines the information and the steps that are needed to familiarise oneself with the Doshii interface, prior to and during it's implementation.
The content is targeted at Resellers and swiftpos Venue Administrators who have a sound knowledge of and experience with swiftpos. For further information or assistance, please contact your swiftpos Reseller or SwiftPOS Support.
Steps To Follow ▼
- How To Configure When Interfacing With Doshii's For:
What Is Required? ▲ ▼
- swiftpos V10.72.5+
- In Back Office:
- A swiftpos Location must be activated with the Submit Orders directly to POS Terminal option selected. Refer to How To Activate a swiftpos Location for more information.
- The Cloud Sync service must be installed and running. This should happen automatically once the Venue has Cloud onboarded. Refer to How To Cloud Onboard A Venue for more information.
- In Touch:
- Start Touch as the Administrator. Confirm this is the case and it is NOT being blocked. This can be done by checking the Window's logs.
- Ensure the Gateway Client Service and the POS API interfaces are listed in the POS Interfaces screen in Touch. These should be added automatically when activated with the Submit Orders directly to POS Terminal option selected.
- The Cloud Sync service must have a status of Running when viewed in the Table Tracking settings for the Table Tracking Master terminal.
- Confirm whether Ports/Firewalls/Whitelist need to be amended.
- In Venue Manager:
- Configure Venue Manager as per the steps outlined HERE.
How To Configure For A Data Only Type Integration? ▲ ▼
Used to send sales data to Doshii, for:
- Business Intelligence
- Rostering
- Venue Management
To configure, do as follows:
- Ensure the steps outlined in What Is Required above have been addressed.
How To Configure For An Orders Type Connection? ▲ ▼
Used when placing Orders/Sales initiated online via an ordering app or via Touch, for:
- Pickup & Delivery
- In Venue Ordering
To configure, do as follows:
- Ensure the steps outlined in What Is Required above have been addressed.
- In Touch:
- An Orders Master Touch terminal must be configured for the Location.
How To Configure For A PAT (Pay At Table) Type Integration? ▲ ▼
Used when paying for Orders/Sales initiated from an In Venue Table, for:
- Payments
To configure, do as follows:
- Ensure the steps outlined in What Is Required above have been addressed.
- In Touch:
- Table Ranges need to be configured for the Location. Refer to the Table Ranges button for more information.
- Floor Plans need to be configured to ensure Tables are visible to Doshii. The ID of the Floor Plan Layout will need to be noted so that it can be entered when configuring Venue Manager.
- The Allow POS API to Finalise Tables With No Remaining Balance option must be selected to ensure Doshii closes the Table once it has been paid for.
Notes...
Other than the steps outlined in What Is Required and above, there are NO further setup required at Touch for Pay at Table type integration with Doshii. The Doshii integrated device will search for any open tables.
How To Configure For A PIP (POS Initiated Payment) Type Integration? ▲ ▼
Used when paying for Orders/Sales initiated online via an ordering app or via Touch using the Doshii PIP (#166) POS Key, for:
- Payments
To configure, do as follows:
- Ensure the steps outlined in What Is Required above have been addressed.
- Ensure NetPOS is registered for the MSL Solutions Connection interface. Refer to How To Register A NetPOS Interface for more information.
- Ensure the Doshii PIP (#166) POS Key has been added to the appropriate Keyboard Layout via the Designer. Refer to How To Add A POS Key To A Keyboard Layout for more information.
- The Cloud Sync service must be installed and running for the Table Tracking Master terminal in Touch.
How To Configure Venue Manager? ▲ ▼
To configure Venue Manager for Doshii (refer to How To Access Venue Manager for more information), do as follows:
- Select the Connect menu.
- From the Connect drop down list select the MSL Connect API Permissions option.
- Select the Samford Software option from the Select Integrator drop down list.
- Ensure the PIPApplications and PIPTransactions permission options are selected.
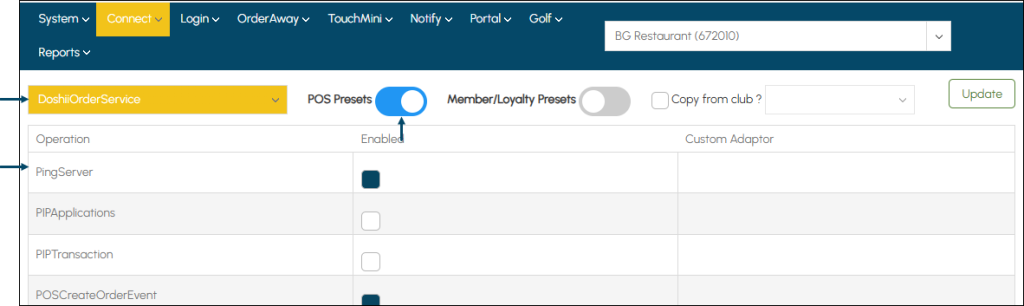
- From the Select Integrator drop down list select the DoshiiOrderService option.
- Ensure the POS Presets and Ping Server options are selected.
- Still with the Connect menu selected, expand the Doshii menu and select the Reseller option to display the Doshii Reseller Configuration screen.
- Ensure the details are prefilled with the Reseller's details.
- For the initial setup, the Doshii API Key will need to be obtained from Doshii and entered into the Doshii API Key field.
- Ensure the Enable Doshii option is selected.
- Still with the Connect menu selected, expand the Doshii menu and select the Settings option to display the Doshii Integration screen's General tab.
- In the General tab:
- Enter the Doshii Venue ID provided by Doshii into the Doshii Venue ID field.
- Enter the ID of the Floor Plan Layout that will be used by Doshii into the Floor Play ID field.
- If required, select the Enable Stock On Hand option.
- Ensure the ID of the swiftpos Surcharge (NOT the PLU of the Surcharge Product) to be associated with surcharges, is entered into the Surcharge ID field.
- Select the Media Mapping tab:
- Ensure the Doshii Media are mapped as is appropriate to a swiftpos Media by entering the ID of the swiftpos Media opposite the associated Doshii Media.
- In the General tab:
- Ensure all of the above changes are saved.
End of article. ▲