This outlines How To Requisition From A Warehouse in Back Office.
Refer to the Warehouse Requisition Workflow for more information.
Subjects ▼
How To Requisition From A Warehouse? ▲ ▼
Do as follows:
Create A Shopping List ▲ ▼
- The first step is to create a Shopping List. This acts as a template, and will help to facilitate quicker requisitioning of items from a Warehouse. A Shopping List only applies to a specific Warehouse.
- In the Inventory menu select the Warehouse Requisitioning menu item. The Warehouse Requisitions screen will be displayed.
- Create a Purchasing Shopping List:
- Create a Purchasing Shopping List:
- Select the Shopping List button and select the Purchasing option.
- In the Search Location screen, select the Location for which the Shopping List is applicable.
- In the Search Warehouse Locations screen, select the Warehouse from which the items are initially to be sourced.
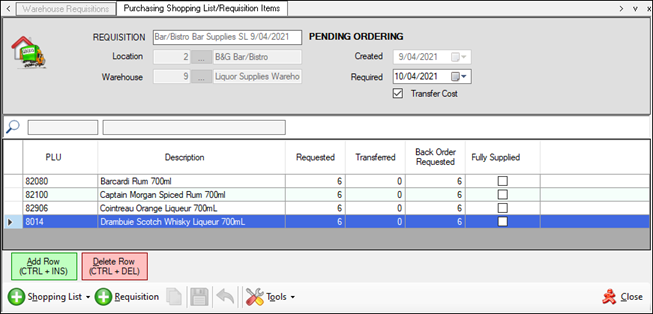
- In the Purchasing Shopping List/Requisition Items screen, ensure an appropriate Description is entered for the newly created Purchasing Shopping List.
- Using the Add Row button or Add Family Tools option, add Purchased items to the grid to establish the Purchasing Shopping List items.
- Select Save to save the Purchasing Shopping List.
- The newly created Purchasing Shopping List will have a status of Created.
- Now a Requisition can be created using the Purchasing Shopping List created. Of course, multiple Purchasing Shopping Lists can created for multiple Locations.
- Create a Purchasing Shopping List:
- OR create a Production Shopping List:
- Select the Shopping List button and select the Production option.
- In the Search Location screen, select the Location for which the Shopping List is applicable.
- In the Search Warehouse Locations screen, select the Warehouse from which the items are initially to be sourced.
- In the Production Shopping List/Requisition Items screen, ensure an appropriate Description is entered for the newly created Production Shopping List.
- Using the Add Row button or Add Family Tools option, add Production items to the grid to establish the Production Shopping List items.
- Select Save to save the Production Shopping List.
- The newly created Production Shopping List will have a status of Created.
- Now a Requisition can be created using the Production Shopping List created. Of course, multiple Production Shopping Lists can created for multiple Locations.
Create A Requisition ▲ ▼
In the Requisitioning Location:
- A Requisition can only be created based on either an existing Purchasing or Production Shopping List.
- In the Inventory menu select the Warehouse Requisitioning menu item. The Warehouse Requisitions screen will be displayed.
- Select the Requisition button option.
- Create either a:
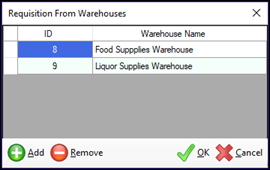
- Ensure the Warehouse(s) (from which stock will be requisitioned) are assigned to each of the non-Warehouse type Locations, that will be doing Warehouse Requisitioning. This can be done by selecting the Warehouses button in the Location Full Edit screen to open the Requisition from Warehouses screen:
- If necessary, create a Family of Products which can then be assigned to the Warehouse created in the above step. This will ensure that only those Products assigned to the Warehouse Family can be included in Requisitions and Shopping Lists.
- Lastly, but IMPORTANTLY, ensure the relevant Clerk Security authorisations have been configured in the Clerk Group Permissions > Inventory > Warehouse Requisitioning against the appropriate Clerks Security Groups.
Notes ...
By default, Clerk Security is NOT configured for all Security Groups.
Create A Purchasing Requisition ▲ ▼
- In the Search Shopping Lists screen, select Purchasing Shopping List.
- In the Requisition Items screen, ensure an appropriate Description is entered for the newly created Requisition.
- Ensure the correct Required date is selected.
- Ensure the Requested Qty's are correct.
- Save to ensure the Requisition is Created.
- Select the Submit button to ensure the Requisition is Pending Picking and made available to the selected Warehouse for picking.
In the Warehouse Location:
- In the Inventory menu select the Warehouse Requisitioning menu item. The Warehouse Requisitions screen will be displayed.
- Select the Requisition required to be picked (Pending Picking).
- Enter the quantity picked for each Item.
- Select the Transfer button to ensure a Packing Slip is printed to enable the transfer of items to the Requisitioning Location.
- If all Items are Fully Supplied, that is, there are no outstanding Qtys to be supplied, then the Requisition will be set to a the status Completed.
- If any Items cannot be Fully Supplied, that is, there are outstanding Qtys to be supplied, then the following prompt will be displayed:
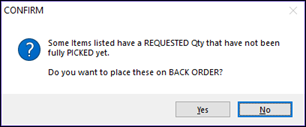
Select YES to ensure Items, that cannot be fully supplied, will be placed on Back Order and the Requisition will be set to Pending Ordering.
- Select Tools > Generate Orders
- he Requisition will now be set to the status Order Created.
- Ensure the Service Monitor is running to ensure the Order is submitted.
- Once submitted the Requisition will now be set to the status Ordered.
- In swiftpos Back Office > Suppliers > Invoices/Receipt Goods - Retrieve the submitted Order and Complete it.
- The Requisition will now be set to the status Pending Picking (PO Received).
- In the Inventory menu select the Warehouse Requisitioning menu item. The Warehouse Requisitions screen will be displayed.
- Select the Requisition required to be picked (Pending Picking (PO Received)) and select the Edit button.
- Enter the quantity picked for each Item.
- Select the Transfer button to ensure a Packing Slip is printed to enable the transfer of items to the Requisitioning Location. If any Items exist that cannot be fully supplied, these will be ignored.
- The Requisition will now be considered complete.
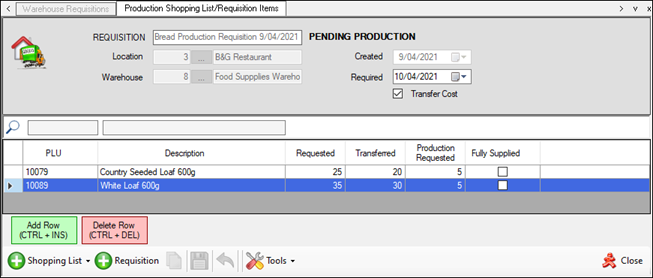
Create A Production Requisition ▲ ▼
- In the Search Shopping Lists screen, select a Production Shopping List.
- In the Production Shopping List/Requisition Items screen, ensure an appropriate Description is entered for the newly created Production Requisition.
- Ensure the correct Required date is selected.
- Ensure the Requested Qty's are correct.
- Save to ensure the Requisition is Created.
- Select the Submit button to ensure the Requisition is Pending Picking and made available to the selected Warehouse for picking.
In the Warehouse Location:
- In the Inventory menu select the Warehouse Requisitioning menu item. The Warehouse Requisitions screen will be displayed.
- Select the Production Requisition required to be picked (Pending Picking).
- Enter the quantity picked for each Item.
- Select the Transfer button to ensure a Packing Slip is printed to enable the transfer of items to the Requisitioning Location.
- If all Items are Fully Supplied, that is, there are no outstanding Qtys to be supplied, then the Requisition will be set to a the status Completed.
- If any Items cannot be Fully Supplied, that is, there are outstanding Qtys to be supplied, then the following prompt will be displayed:
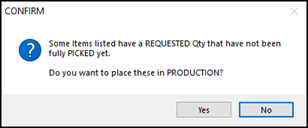
Select YES to ensure Items, that cannot be fully supplied, will be placed on Back Order and the Requisition will be set to Pending Ordering.
- Select Close to exit the Production Shopping List/Requisition Items screen.
- Select Inventory > POS Stock Requisitions and select/enter the Required By date to list the Production Requisitions required to be produced.
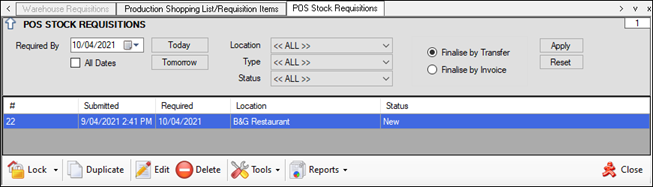
Using the POS Stock Requisitions screen, process the Production Requisitions through the following stages:
- Select the Finalise by Transfer option
- Tools > Queue for Production
- After Production, select Tools > Set as Pending Delivery
- After Delivery, select Tools > Finalise Request
- In the Inventory menu select the Warehouse Requisitioning menu item. The Warehouse Requisitions screen will be displayed.
- Select the Requisition required to be picked (Pending Picking).
- Enter the quantity picked for each Item.
- Select the Transfer button to ensure a Packing Slip is printed to enable the transfer of items to the Requisitioning Location. If any Items exist that cannot be fully supplied, these will be ignored.
- The Requisition will be set to a the status Completed.
End of article. ▲