
This outlines How To Configure For Group Orders placed via OrderAway (OA) and/or TouchMini (TM). Refer to Group Ordering for an overview of this feature.
Subjects ▼
To Be Considered ▲ ▼
- On Order Submission:
- Orders will ONLY be grouped if, they that have scanned the same QR Code as the first Order, and have been submitted within the time (Auto group delay) set after the 1st Order was submitted.
- The Enable Auto Finalise option may be useful and should be considered when implementing Group Ordering. This is so once the orders are sent for preparation, they are auto-finalised/closed if they have been paid in-full.
How To Configure For Group Orders? ▲ ▼
For OrderAway ▲ ▼
What Is Required? ▲ ▼The grouping of Orders is enabled in the Service tab of a OA Location's Settings menu. Refer to How To Access The Configuration Menus for more information. To configure OA for Grouping Orders, do as follows:
- It is recommended that the Capture name option is selected, however this is not mandatory.
- Optionally consider the selection of the Capture phone option.
- Ensure the Enable Group Ordering option is selected and the Auto group delay time in minutes is set.
- It is recommended to ensure the Enable Auto Finalising option is selected when OA is configured in such a manner. This is so once the orders are sent for preparation, they are automatically finalised/closed when they have been paid in-full.
- Ensure QR Codes available to be scanned by patrons for ordering, include a Location Suffix.
Notes...
Orders are grouped when associated with an Order Location. For example, a Table identified by a Location Suffix. A location suffix of ?location=Table%2015, suffixed to the OA Location's URL and scanned as a Table's QR Code will identify the Table as Table 15, meaning it will group all Orders that have scanned the same QR Code within the Auto group delay time set.
Notes...
If the Print delayed orders setting in Touch is set to a value of -1 (meaning always print immediately), this is IGNORED for orders which have been placed when the Enable Group Ordering option is selected.
Steps To Follow ▲ ▼
- Patron 1 scans the Table's QR Code.
- Selects items to order from the OrderAway menus.
- Selects Checkout to review the Order.
- Selects Proceed to Payment.
- Selects the Yes, hold my order button to initiate a Group Order, which will then ensure any further Orders placed from the same location within the (time (in minutes) set will be grouped and sent to the kitchen together as one Order.
- Selects Make Payment.
- Pays for the Order and submits it.
- Patron 2 scans the same Table's QR Code.
- Selects items to order from the OrderAway menus.
- Selects Checkout to review the Order.
- Selects Proceed to Payment.
- Selects the Yes, hold my order button to add their Order to the Group Order started by Patron 1. This will ensure any Orders placed from the same location within the (time (in minutes) set will be grouped and sent to the kitchen together as one Order.
- Selects Make Payment.
- Pays for the Order and submits it.
- This is repeated until all patrons at the Table have submitted their Orders.
- On submission, each Order will be placed in a Pending status and their Print time determined. This is done as follows:
- For each Order submitted, a search will be done to locate any other Orders grouped to the same Table. If:
- NOT FOUND - This will indicate it is the 1st Order and the Print time will be set to NOW + the minutes set in the Auto group delay time setting.
- If FOUND, - The Print time will be set to the same time as that of the 1st Order submitted for the Table.
- Hence, the 1st Order submitted dictates the delay and Print time.
- For each Order submitted, a search will be done to locate any other Orders grouped to the same Table. If:
- Orders in a Pending status can be accessed via the can be accessed via the Orders Pending button.
- The Table number and Patron's name is displayed in the Name column.
- The Print time is displayed in the Delivery/Pickup Date-Time column. This should be the same for all Grouped Orders.
- The Order number for each Patron's Order is displayed in the Remote id column.
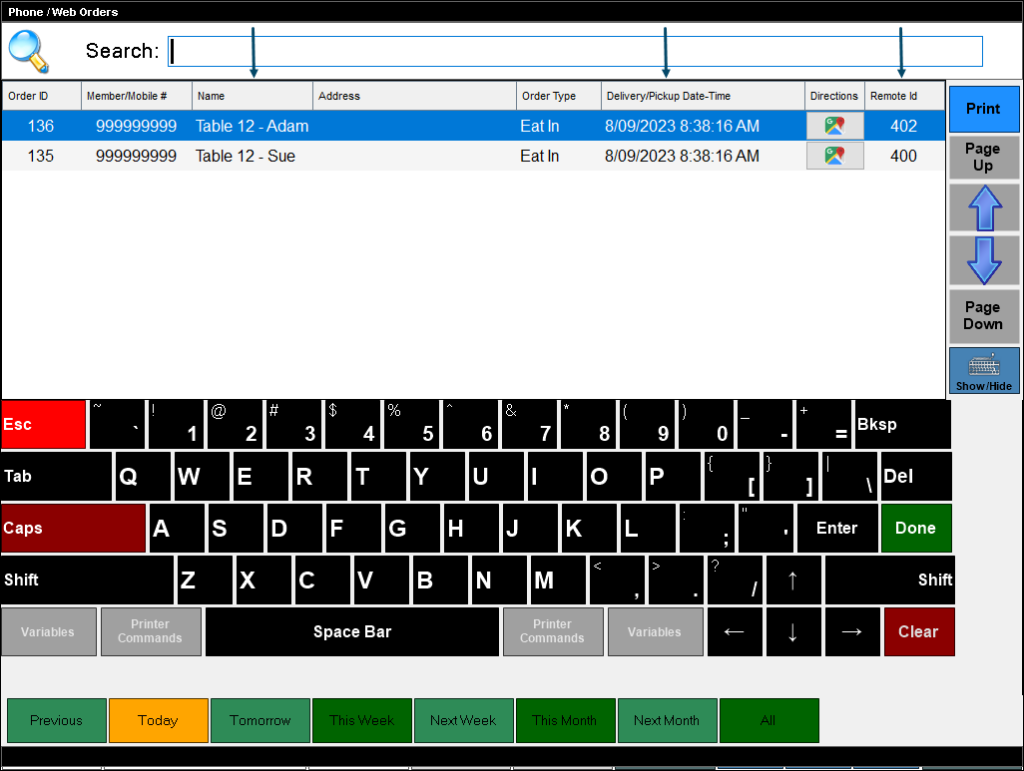
Example of OA Grouped Orders displayed via Orders Pending in Touch. Refer to the Phone/Web Orders Screen for more information.
- Once the Auto group delay time has elapsed after the first Order was submitted, all grouped Orders for the Table will be sent to their respective Kitchen/Order Printers and/or KVSs. This is done by the Orders Master terminal. It will periodically (every 30 secs) check to see if any Orders are due to be printed, based on their Print time displayed in the Delivery/Pickup Date-Time column. If found, it will group them together as one Order and send them to either the Kitchen Printer or KVS.
- If the Enable Auto Finalise option:
- IS selected, then it will finalise each of the Orders and submit them to Back Office as individual sales. From a reporting perspective, each Order/Sale will be reported using the date/time they were originally submitted by the patron, and NOT the Print time.
- IS NOT selected, then the Orders will remain in Orders Pending until such time as they are finalised.
- If KVSs or Kitchen Printer peripherals are in use, then it will send/print dockets to their respective KVS/Printer as a combined Order based on the Table number.
- If Order Printer peripherals are in use, then Order dockets will be generated for each individual Order.
- Each Order sent will however, be associated with the first patron, and where configured, that person's name will appear on the Kitchen/Order docket/KVS screen.
- If the Enable Auto Finalise option:
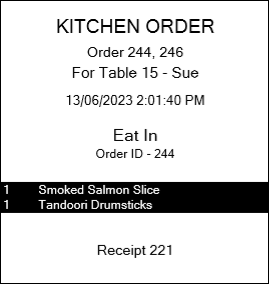
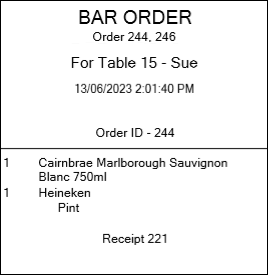
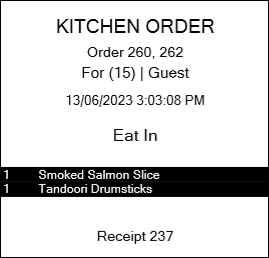
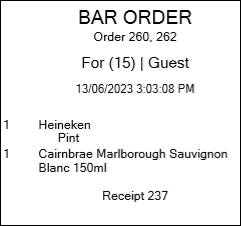
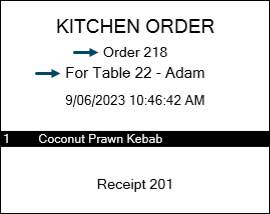
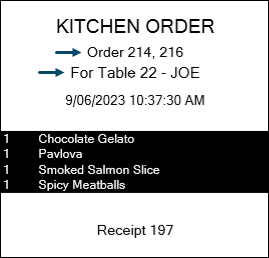
Examples of OA Grouped Orders printed for the Kitchen and the Bar.
For TouchMini ▲ ▼
What Is Required? ▲ ▼The grouping of Orders is enabled in the Service tab of a TM Device's Settings Tabs. Refer to How To Access The Configuration Menus for more information. To configure TM for Grouping Orders, do as follows:
- Ensure the Quick service option is selected.
- Ensure the Prompt for an Order Tag option is selected and it's Prompt and Prefix values are configured as is appropriate.
- Ensure the Enable Group Ordering option is selected and the Auto group delay time in minutes is set.
- It is recommended to ensure the Enable Auto Finalise option is selected when TouchMini is configured in such a manner. This is so once the orders are sent for preparation, they are automatically finalised/closed when they have been paid in-full.
- Ensure QR Codes available to be scanned by patrons for ordering, include a Location Suffix.
Notes...
If the Print delayed orders setting in Touch is set to a value of -1 (meaning always print immediately), this is IGNORED for orders which have been placed when Auto Grouping is enabled.
Steps To Follow ▲ ▼
Similar to OA above the steps are predominantly the same, however, in the case of TM a Clerk/Staff Member takes the Orders instead of each patron placing their own Order. The steps are:
- A Clerk/Staff Member enters the Table number at the prompt on the TM Device, and takes the 1st Order. The Order is then also finalised.
- This is repeated until all other patrons at the same Table, have had their Orders taken and have paid for them in full.
- On submission, each Order will be placed in a Pending status and their Print time determined. This is done as follows:
- For each Order submitted, a search will be done to locate any other Orders grouped to the same Table. If:
- NOT FOUND - This will indicate it is the 1st Order and the Print time will be set to NOW + the minutes set in the Auto group delay time setting.
- If FOUND, - The Print time will be set to the same time as that of the 1st Order submitted for the Table.
- Hence, the 1st Order submitted dictates the delay and Print time.
- For each Order submitted, a search will be done to locate any other Orders grouped to the same Table. If:
- Orders in a Pending status can be accessed via the can be accessed via the Orders Pending button.
- The Table number and text Guest is displayed in the Name column.
- The Print time is displayed in the Delivery/Pickup Date-Time column. This should be the same for all Grouped Orders.
- The Order number for each Patron's Order is displayed in the Remote id column.
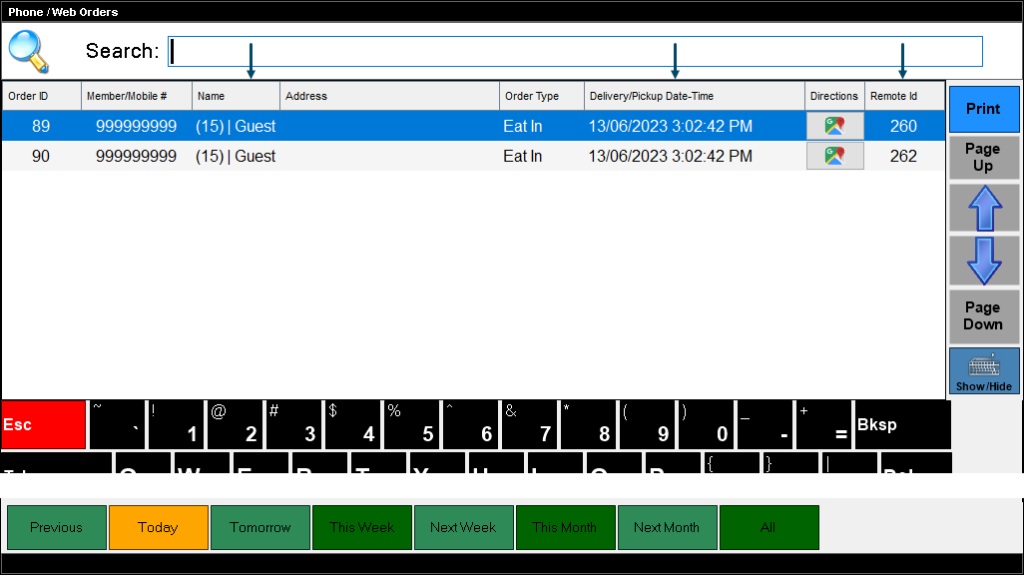
Example of TM Grouped Orders displayed via Orders Pending in Touch. Refer to the Phone/Web Orders Screen for more information.
- Once the Auto group delay time has elapsed after the first Order was submitted, all grouped Orders for the Table will be sent to their respective Kitchen/Order Printers and/or KVSs. This is done by the Orders Master terminal. It will periodically (every 30 secs) check to see if any Orders are due to be printed, based on their Print time displayed in the Delivery/Pickup Date-Time column. If found, it will group them together if they were originally grouped when they were submitted.
- If the Enable Auto Finalise option:
- IS selected, then it will finalise each of the Orders and submit them to Back Office as individual sales. From a reporting perspective, each Order/Sale will be reported using the date/time they were originally submitted by the patron, and NOT the Print time.
- IS NOT selected, then the Orders will remain in Orders Pending until such time as they are finalised.
- If KVSs or Kitchen Printer peripherals are in use, then it will send/print dockets to their respective KVS/Printer as a combined Order based on the Table number.
- If Order Printer peripherals are in use, then Order dockets will be generated for each individual Order.
- If the Enable Auto Finalise option:
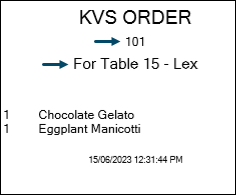
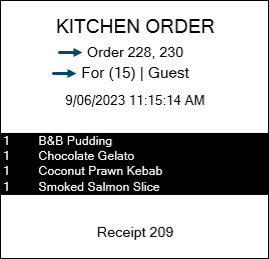
Examples of TM Grouped Orders printed for the Kitchen and the Bar.
KVS ▲ ▼
What Is Required? ▲ ▼When Group Ordering and KVS are in use at a Venue, and from a KVS configuration perspective no specific configuration is required, other than considering the following:
- Potentially selecting the Show Seats option in the settings for the Bump Item Printer and/or the Complete Bump Printer printer peripherals configured in the KVS. Once selected this will print the Order number associated with each item, on the docket.
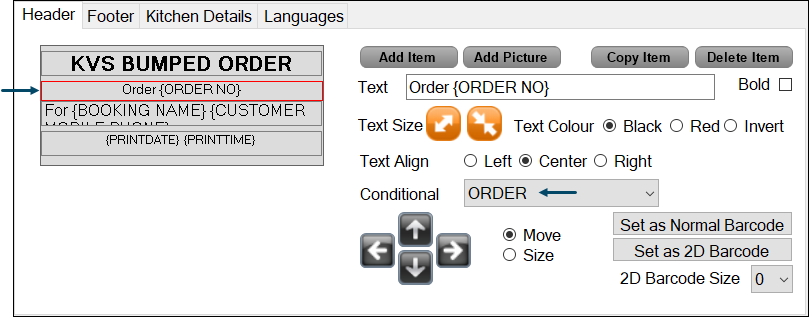
- Potentially adding the {ORDER NO} Print Field/Item/Variable to the docket's Header to ensure all Order numbers that this Order represents, are listed. Consider selecting the Order option in the conditional drop down list to ensure that it only prints if the Order is an OA Order. Refer to the In Docket Printing section to see how the Order numbers will print.
Steps To Follow ▲ ▼
From an operational perspective, there are no steps to follow with regards to the KVS. Once the Auto group delay time has elapsed after the first Order was submitted, all grouped Orders for the Table will be sent to their respective Kitchen/Order Printers and/or KVSs. In the case of KVSs, Orders will be grouped together based on their Location Suffix (OA) or Order Tag (TM) and sent to their respective KVS. The Order numbers will display at the top of the Order. Examples of which can be seen below.
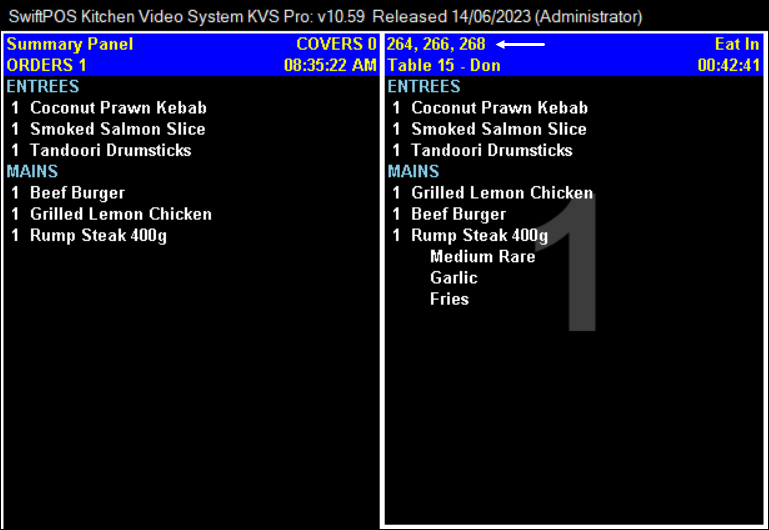
Example of grouped Orders displayed at the Kitchen KVS.
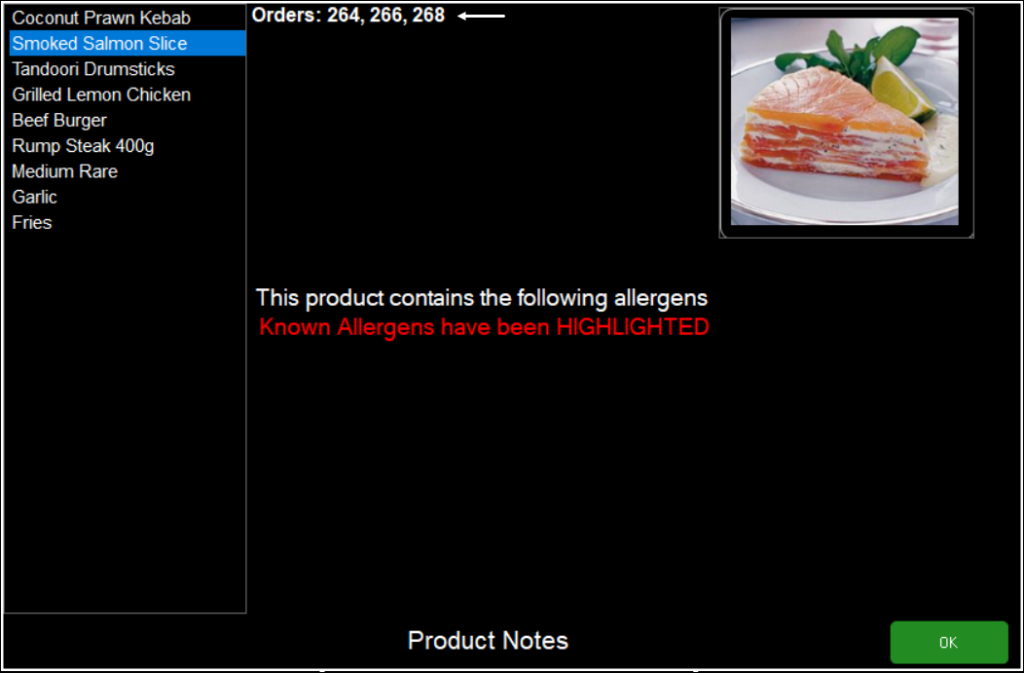
Example of Product Notes displaying grouped Orders when a Grouped Order and the Notes button are selected.

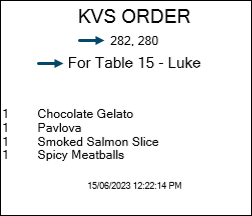
Example of grouped Orders displayed at the Drinks KVS.
Once Items/Orders are bumped from the KVS, they will print to their respective printers if these are configured. Refer to the Printing Tab in the KVS Settings for more information. Also, refer to the In Docket Printing section to see how the Order numbers will print.
Docket Printing ▲ ▼
In The Header ▲ ▼Kitchen Printer dockets will look very much the same whether they originate from single or grouped Order. However, there is a Print Field/Item/Variable that can assist to help distinguish a single Order from a Grouped Order. This is:
- {ORDER NO} - Include this in the docket's Header to ensure all Order numbers that this Order represents, are listed. Consider selecting the ORDER option in the Conditional drop down list to ensure that it only prints if the Order is an OA Order. Refer to the examples below.
Also, some Print Fields/Items/Variables will only print information that is associated with the 1st Order submitted in a Grouped Order. These are:
- {BOOKING NAME}
- In OA - Include this to print the Table number (Location Suffix), patron's name and/or mobile number entered for the first Order submitted. The Capture name option will need to be selected to ensure the patron's name is captured.
- In TM - This will include Table number and the text Guest.
- {CUSTOMER MOBILE PHONE}
- In OA - Include this to print the patron's phone number entered for the first Order submitted. The Capture phone option will need to be selected to ensure the patron's phone number is captured.
In the examples below, the following Print Fields/Items/Variables were added to the Header when configuring the Print Peripheral:
- {ORDER NO} with the ORDER option selected in the Conditional drop down list.
- For {BOOKING NAME} {CUSTOMER MOBILE PHONE}
In KVS
Single Order
Grouped Orders
In OrderAway
Single Order
Grouped Orders
In TM
Single Order
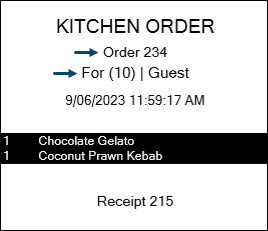
Grouped Orders
In The Body ▲ ▼
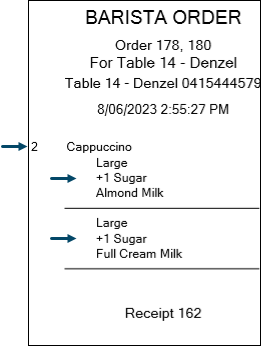
The existing rules governing the grouping of Products on dockets still apply to Grouped Orders. For example, if the Group By Product option is selected, then if the same Product is ordered in more than one Order in the Group, these will be combined and the Qty adjusted to reflect the correct number ordered. Also, for Products with instructions/modifiers, these will also be grouped appropriately. For example, if 2 of the same coffees are ordered by different patrons in the same Group Order, and each order a different type of milk, the docket printed may look something like this:
Notes...
By default the body of the docket won't show any information as to what Order belongs to which patron.
- Show Seats Option - Also, by default the body of the docket won't show any information as to which Item belongs to which patron. To do this, ensure the Show Seats option is selected. See below. Once the Show Seats option is selected the Order numbers will print opposite each Item on the docket. For example:
Grouped Orders
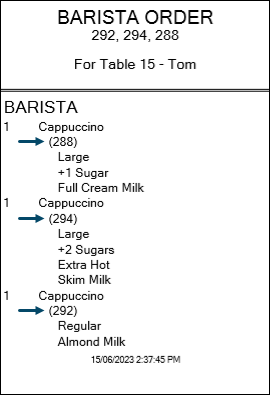
Show Seats option prints the Order number (288) opposite each item.
* Be mindful though, when the Show Seats option is selected, this may have ramifications for other Orders.
Single OrderAway Order
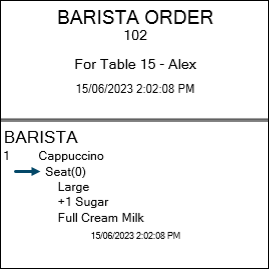
Show Seats option prints Seat(0).
Touch Order
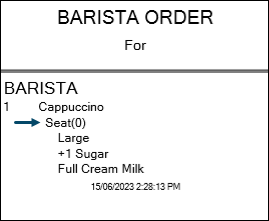
Show Seats option prints Seat(0) where Bistro Tables are NOT in use.
End of article. ▲