Touch
Provides an outline of the options available when configuring Finalise POS Keys in Touch. These are generally used to associate SwiftPOS Medias to individual POS Keys to enable the finalising of an Order/Sale.. For example, these can include Media such as Cash, EFTPOS, Cheque, etc.
Tabs ▼
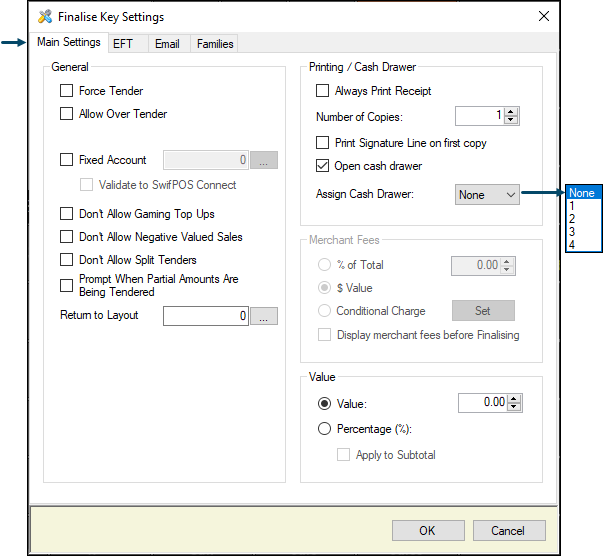
Main Settings Tab ▲ ▼

Accessed from HERE.
General Section ▲ ▼
- Force Tender - Select to force the Clerk/Staff Member to enter the tender amount. This is another method of enforcing accuracy and the Clerks/Staff to return the correct change.
- Allow Over Tender - Select to allow over tendering. This ONLY applies to the Loyalty Redemption (#529) POS Key which has been replaced with the Charge / Redemption (#151) POS Key.
- Fixed Account - Select to assign a specific Account to the selected Finalise POS Key and enable the Validate to swiftpos Connect option. Generally used for Venue Functions where Orders/Sales are charged to a Function Account, rather than selecting an Account for each Order/Sale. The Account is no longer validated via swiftpos Connect. This is done via NetPOS.Net
- Don't allow Gaming Top Ups - Select to ensure that Gaming Account Top-Ups are NOT ALLOWED using the Finalise POS Key. In some instances it is illegal to use EFTPOS to Top-Up a Gaming Account.
- Don't Allow Negatives Valued Sales - Select to ensure that the tendering of negative valued Orders/Sales (in the form of Refunds, etc) is prohibited.
- Don't allow split Tenders - Select to ensure the finalising a Order/Sale is limited to a single Media.
- Prompt When Partial Amounts Are Being Tendered - Select to ensure that a confirmation prompt is displayed when a partial payment is being tendered. The Clerk/Staff Member can then decide whether to proceed or not. This is generally used to avoid the incorrect amount being finalised, as a result of Clerk/Staff Member being distracted and NOT completing a previous Order/Sale. When selected, a confirmation prompt will be displayed providing Clerks/Staff the opportunity to take stock of the amount being tendered and ensure it is correct before proceeding.
- Return to Layout - Select to open the Search Layouts screen to select a Layout to which focus will return once the finalisation of a Order/Sale is completed.
Notes...
This will override any Layout changes configured via a Post Link.
Printing / Cash Drawer Section ▲ ▼
- Always Print Receipt - Select to override Printer Off settings in Touch. Recommended for where a signature is needed. For example, for a EFTPOS POS Key.
- Number of Copies - Displays/Set the default number of copies of Receipts to be printed.
- Print Signature Line on first copy - Select to print a signature line on the first copy of the receipt. Useful for where a signature is needed. For example, for a EFTPOS POS Key.
- Open Cash Drawer - Select to ensure the Cash Drawer is opened.
- Assign Cash Drawer - Select from the drop down list to a assign a specific Cash Drawer to the selected Finalise POS Key. Mainly used when a specific Cash Drawer is assigned to an Event or Venue Function.
Notes...
Clerk assigned Cash Drawers take precedence over this setting.
Merchant Fees Section ▲ ▼
- % of Total Sale or $ Value - Select to enter a Merchant surcharge that will be added to the sale. The surcharge will be calculated as either a percentage or added as a fixed value. Used for surcharges applicable to Credit Cards. For example AMEX, DINERS etc.
- Conditional Charge - Select the Set button to open the Conditional Fees screen to apply conditional Merchant/Surcharge Fees based on a Min & Max threshold.
- Display Merchant Fee before Finalising - Select to show the Merchant Fee that has been added to the sale. This can be used to assist in entering amounts into a non-integrated EFTPOS Terminal. The prompt displayed will look similar to this:
Conditional Fees Screen ▲ ▼

Accessed from HERE and is used to configure value ranges for which Merchant Fees/Surcharges apply.
Value Section ▲ ▼
- Value - Select enter a fixed value that will be associated with the Finalise POS Key. This is usually used to configure POS Keys for the tendering of Cash in the form of dollar notes. For example, $10, $20, $50 etc.
- Percentage (%) - Select to enter a percentage (%) to determine the value that will be associated with the Finalise POS Key.
- Apply to Subtotal - Select to ensure the % calculated will be based on the total of the items in the sales grid. If NOT selected, then the % calculated will be based on the item currently selected in the sales grid.
Notes...
Once the calculated percentage has been applied to a sale, it cannot be applied again. To remove it, select it and use the Clear Item (#2) POS key.
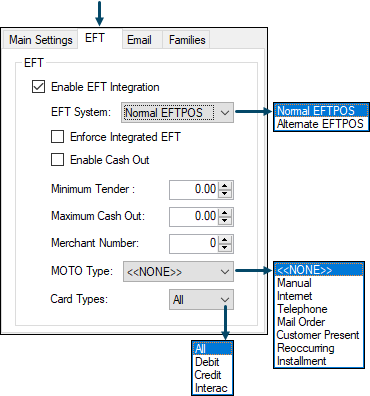
Eft Tab ▲ ▼

Accessed from HERE.
- Enable EFT Integration - Select to ensure the EFTPOS acquires authorisation with EFTPOS integration.
- EFT System - Select from the drop down list one of the options available.
- Enforce Integrated EFT - When enabled, Integrated EFTPOS will fail if the Touch Peripheral can not be found.
- Enable Cash Out - Select to enable Cash Out with EFTPOS integration.
- Minimum Tender - Displays/Enter the minimum amount that you will accept on EFT. Some sites set this to $10 to cover the transaction fees associated with EFT transactions.
- Maximum Cash Out - Displays/Enter the maximum amount that is allowed to be withdrawn in Cash.
- Merchant Number - Displays/Enter the Merchant Number here.
- MOTO Type - Select from the drop down list one of the options available, to provide additional information about the transaction in order to customise the payment prompts. Applies ONLY to PC EFTPOS.
- Card Types - Select from the drop down list one of the options available.
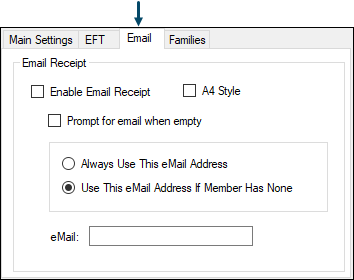
Email Tab ▲ ▼

Accessed from HERE.
This is only applies to the Room Charge (#59) and Account Charge (#90) POS Keys.
Email Receipt Section ▲ ▼
- Enable Email Receipt - Select to enable. Email settings can be configured HERE.
- A4 Style - Select to ensure the Receipt is emailed in A4 format.
- Prompt for email when empty - Select to prompt for the entry of an email address when empty.
- Always use this email address - Select to always use the email address entered below. For example, this could be used for sending emails to a Hotel for Room Charges.
- Use this email address if the Member has none - Select to use the email address entered below, if the Member in the sale does not have an email address.
- Email - Displays/Enter the email address to be used.
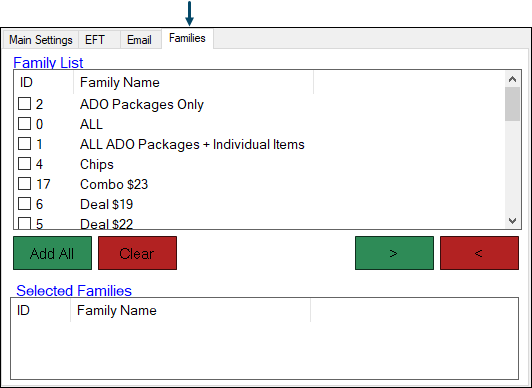
Families Tab ▲ ▼

Accessed from HERE and used to restrict the Finalise POS Key to be ONLY available when Products are sold that are assigned to the Families listed in the Selected Families section. If no Families are listed in the Selected Families section, then there is NO restriction imposed on the used of the Finalise POS Key.
- Add All - Select to add all the Families listed in the Family List to the Selected Families.
- Clear - Select to remove all the Families from the Selected Families.
- Right/Left Arrow >< - Select to add/remove the Family selected in the Family List section to/from the Selected Families section.
End of article. ▲
