
To access, select the Event Records menu option from the Events menu in Back Office. Used to configure Events/Sessions to support the managing and reporting of Event related sales as well as the export of Event Analysis related sales data.
Sections ▼
Events Screen ▲ ▼
This screen is accessed from the Back Office > Events > Event Records menu option.
Filters Section ▲ ▼

Used to limit the number of rows displayed in the grid. The filters include the following types:
- Date Range From/To - The fields of this type are: Period and From/To Dates.
- Drop Down Lists - The fields of this type are: Status.
- Apply
- Reset
Events Section ▲ ▼
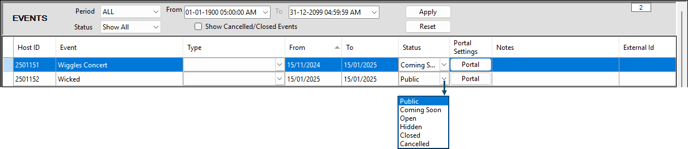
Grid
Displays a list of Events along with their Host ID, Event, Type, From/To dates, Status, Portal Settings, Notes and External ID.
Noteworthy
- Type - Select from the drop-down list of Event Types.
- Status - Select from the drop-down list one of the following:
- Public - This is the default setting.
- Coming Soon - Select to indicate that the Event has been flagged as an upcoming Event.
- Open - Select to indicate that the Event is open for Advance Day Orders (ADOs).
- Hidden - To be continued ...
- Cancelled - Select to indicate that the Event has been cancelled.
- Closed - Select to indicate that the Event has been closed.
Notes ...
The status selected here only has a bearing on Back Office functions and does NOT impact the Events Portal in any way.
- Portal Settings - Select to open the Event Portal settings screen to configure the settings.
- Notes - Select in any one of the cells opposite and Event to open the Notes screen and record notes relevant to an Event.
- External ID - Enter an External ID unique to the Event.
Notes ...
Rows displayed in the grid can be sorted by toggle selecting the column headings.
Event Sessions Section ▲ ▼

Grid
Displays a list of Sessions, associated with the Event selected above, along with their Host ID, Name, From/To dates, Start/End times, Locations, Areas, Portal Status and Process Status.
Noteworthy
- Locations - Select to open the Locations screen to view/select/unselect Locations associated with the selected Session.
- Areas - Select to open the Event Session screen which lists the Areas associated with the selected Session.
- Portal Status - Select to open the Event Portal Session tab to configure the settings for the Events Portal.
- External ID - Enter an External ID unique to the Event Session.
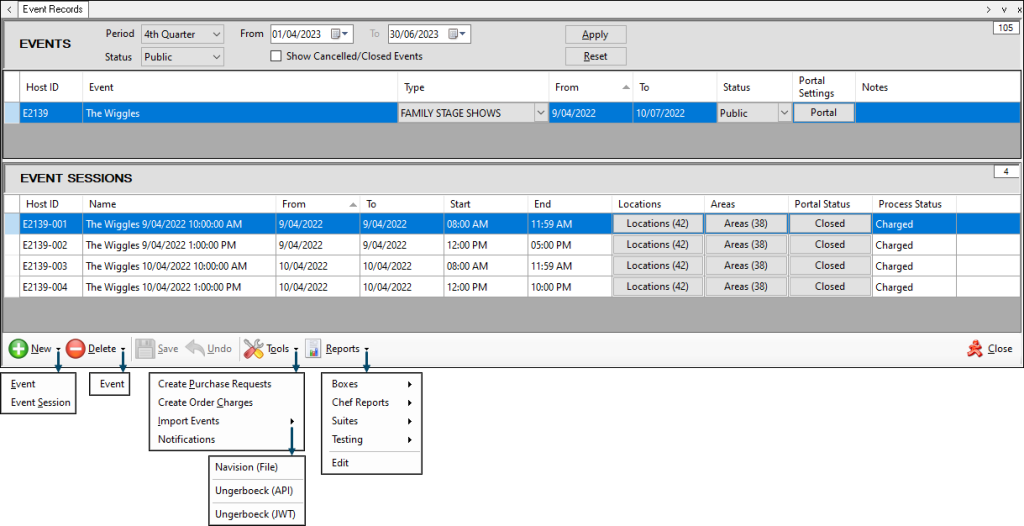
Footer Section ▲ ▼
![]()
- New - Select to from the drop-down list one of the following:
- Event - Select to open the New Event screen to add a new Event.
- Session - Select to open the New Event Session screen to add a new Session.
- Save/Undo - Select to save/undo changes.
- Delete - Select from the drop-down list one of the following:
- Event - Select to delete the selected Event.
- Event Session - Select to delete the selected Session.
- Tools - Select from the drop-down list one of the following:
- Create Purchase Requests
- Create Order Charges
- Import Events - Select one of the following:
- Navision (File) - Select to open File Explorer to select a CSV file to import.
- Ungerboeck (API) - Select to display the Ungerboeck Events Importer prompt to import Ungerboeck Events.
- Ungerboeck (JWT) - Select to display the Ungerboeck Events Importer prompt to import Ungerboeck Events.
- Notifications - Select to open the Notification Configuration screen to configure patron notifications for Events and Events Portal.
- Reports - Select from the drop-down list one of the following:
- Boxes
- Chefs Reports
- Suites
- Testing
- Edit - Select to open the Reports screen and edit reports and their filters/options.
- Close - Select to exit..
End of article ▲