
Orderaway & Touchmini - How To
This outlines How To Create And Manage Menus for Orderaway and/or Touchmini.
Subjects ▲ ▼
About ▲ ▼
What Is It? ▲ ▼
A Menu is a collection of Items/Products which are available for ordering within a Venue. Menus are created and managed in Back Office. The attributes of a menu which need to be considered and managed include:
- The Items/Products available for ordering.
- The grouping of the Items/Products to ensure they are easy to locate.
- Instructions or Modifiers which may need to be linked to certain Items/Products when ordered.
What Is Required? ▲ ▼
- Ensure at least one Clerk/Staff Member have the following Clerk Group Permissions the configured in Clerk Security Groups:
- In Products >
- Product Records
- And/or Product Quick Edit
- Families
- In Touch Settings > Keyboard
- In Administration > Cloud Connectivity
How To? ▲ ▼
How To Create And Manage Menus? ▲ ▼
Do as follows:
- Ensure Items/Products Exist
- Ensure Modifiers/Instructions Exist
- Creating and Maintaining A Menu
- Assigning A Home Layout
Creating And Maintaining A Menu ▲ ▼
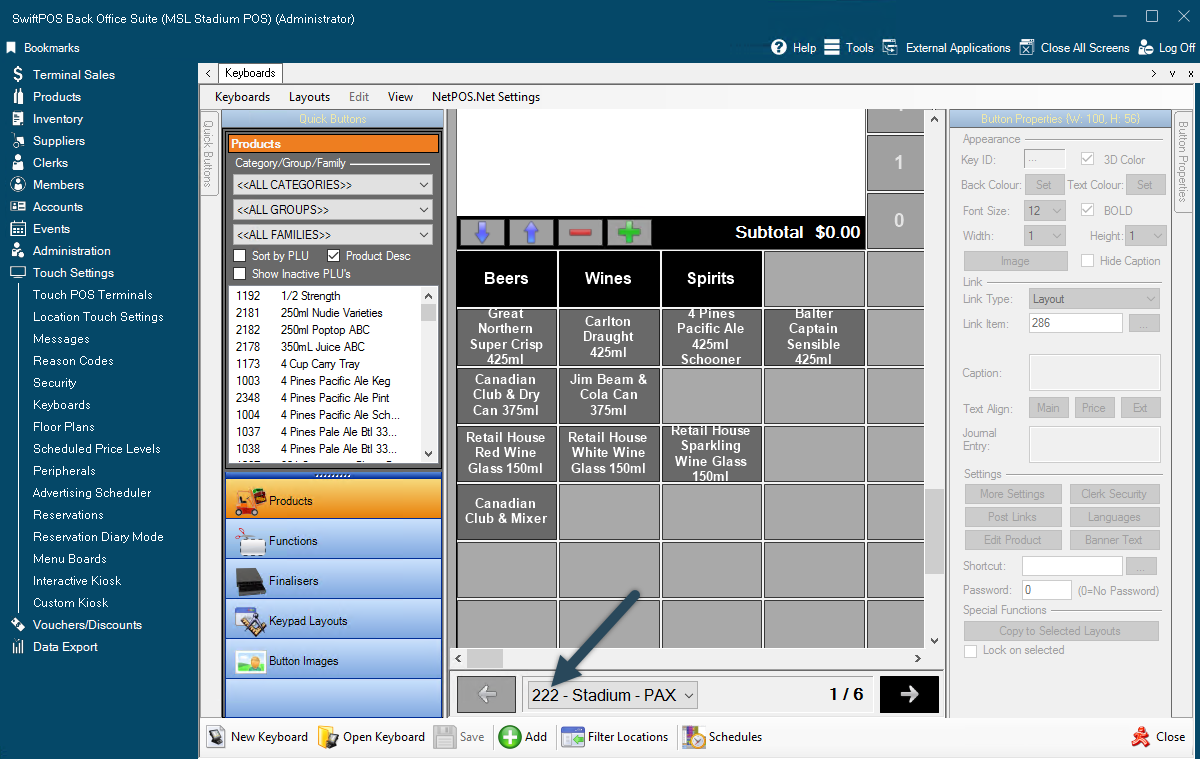
A Menu can be created and maintained using the Back Office Keyboard feature. One of the Layout's associated with a Keyboard can then be assigned to Orderaway and/or Touchmini. Once assigned this Layout will be considered the Home Layout and will be presented each time a new Order commences, or the Menu option is selected in Touchmini. From the Home layout patrons/staff can then navigate to find Items/Products that can be ordered.
The parts to a Keyboard that require further explanation are:
- A Keyboard is a group of Layouts together which can then be made available to Orderaway and/or Touchmini. For example, Keyboards which may need to exist include.
- Main Bar Keyboard
- Restaurant Keyboard
- Use the New Keyboard or Copy / Clone a Keyboard options to create a new Keyboard shown below:
- Ensure for any new Keyboard created, use the Filter Locations option (located within the bottom toolbar of the Keyboard designer) to limit the Locations which the Keyboard is active/available in. This is especially important for multi-venue businesses.
- Consider the naming convention of Keyboards. It's suggested adding the primary use-case into the description, so they are easy to find. Prefix examples/suggestions:
- POS - for any Touch POS Terminal specific keyboards. Examples:
- Main Bar - POS Keyboard
- Restaurant - POS Keyboard
- OA - for any Orderaway specific keyboards. Examples:
- Main Bar - OA Keyboard
- Restaurant - OA Keyboard
- TM - for any Touchmini specific keyboards. Examples:
- Main Bar - TM Keyboard
- Restaurant - TM Keyboard
- POS - for any Touch POS Terminal specific keyboards. Examples:
- Use the Open Keyboard option to open an existing Keyboard to view/edit it as shown below:
- These are the individual menus that contain all the Items/Products which need to be available for ordering. Examples of Layouts which may need to exist include:
- Home Layout
- Beer Layout
- Wine Layout
- Entrees Layout
- Mains Layout
- Use the Add New Layout OR Add options within the Keyboard designer to create a new Layout as shown below:
- Consider the naming convention of Layouts. Back Office enforces unique descriptions for Layouts meaning you can't have two layouts that exist within Back Office with the name Wines for example. So, it's suggested to prefix the Layout descriptions with part of the Keyboard name to make them unique. Examples/suggestions:
- Main Bar - Home
- Main Bar - Beer
- Main Bar - Wine
- Restaurant - Home
- Restaurant - Entrees
- If you're creating Layouts specific to different use-cases, you could choose to also use this in the naming of the Layouts. Examples/suggestions:
- Main Bar - POS - Home
- Main Bar - POS - Beer
- Main Bar - POS - Wine
- Main Bar - OA - Home
- Main Bar - TM - Home
- Consider that a Layout can be linked/shared between multiple Keyboards. This helps minimise the admin effort when needing to add/remote Items/Products. Use the Layouts > Link a Layout option to link an existing Layout to the Keyboard you have open as shown below:

- Layouts can also be duplicated. This helps where you have an existing Layout that's close to what you may require for a new scenario or where you may wish to prepare for an upcoming menu change. Use the Layouts > Copy Current Layout function to duplicate a Layout that exists in Back Office into the Keyboard you have open as shown below:

When designing a Menu and using the Keyboard feature to do it, it is important to structure it in such a way so that it is intuitive and Items/Products can be found with the least amount of clicks possible:
Design Considerations The things to consider when designing a Menu are:
- Accessing Orderaway and/or Touchmini will generally be via smaller screens than Touch POS terminals so this will need to be taken into account.
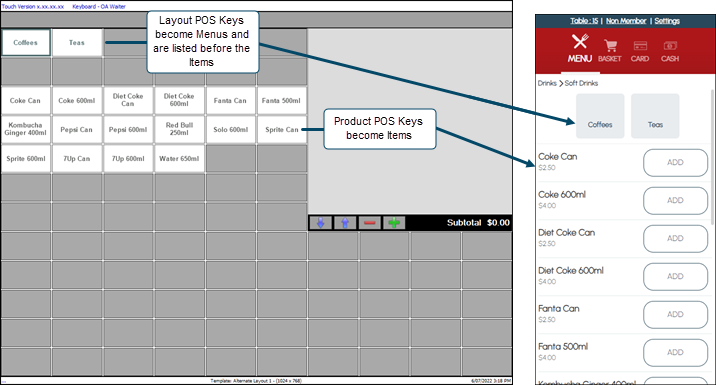
- There are two types of POS keys (options) which can be added to a Keyboard design which show on Touchmini devices.
- Layout POS Keys – These will appear in Orderaway and/or Touchmini as menu options and will always appear in the top portion of the screen, above any Items/Products. Use the Layout grid in Back Office to sort the menus (top left being highest priority & bottom right being lowest priority).
- Product POS Keys - These will appear in in Orderaway and/or Touchmini as products/items and will always appear below any menu options which are configured to show on the same screen. Use the Layout grid in Back Office to sort the Items/Products (top left being highest priority & bottom right being lowest priority).
- It's suggested to have similar types of Items/Products on the same row so they are listed one after the other in Orderaway and/or Touchmini.
Tips
Deciding what's required on the Home Layout:
- The Home Layout should have popular Items/Products which you wish to have one-click access too when starting a new Order.
- For where a device needs access to more than 15-20 Items/Products, the Home Layout should have Layout options that can take Clerks/Staff to sub-menus which contain more Items/Products on them. There's no limit to how many sub-menus you can have.
Layout vs Item/Product options
- Viewing the options on sub-layouts can be done by selecting on a Layout option, then right-selecting and selecting Go to Layout as shown below:

- The Caption of Layout options is what's displayed in Orderaway and/or Touchmini. So, these can be customised/shortened so the full Layout name isn't displayed.
- Use the drop-down in the bottom toolbar to navigate directly to certain Layouts. The Home Layout is usually up the top of the list.
- Save the changes.
Assigning A Home Layout ▲ ▼
Once a Keyboard and it's Layouts have been designed and configured, one of the Layouts can then be designated as the Home Layout and assigned to Orderaway and/or Touchmini. The Home Layout is normally the Layout at the top of the tree, that is all other Layouts are accessed from it. To assign the Home Layout to Orderaway and/or Touchmini, do as follows:
- Note the ID of the Home Layout. This can be seen as indicated below:
- Now for:
- Orderaway:
- Navigate to the POS tab in Orderaway.
- Enter the ID of the Layout noted above into the Layout ID For Home Menu field.
- Save the changes.
- Touchmini
- Navigate to the POS tab in Touchmini.
- Enter the ID of the Layout noted above into the Default Layout ID to display setting
- Save the changes.
- Orderaway:
- The next time a new Order is started using either Orderaway or Touchmini, the Home Layout will be displayed.
End of article ▲