
-
Installers / Links / Releases
-
API
-
Back Office
-
Back Office Cloud
-
Events
-
Events Portal
-
How To
- API
- Back Office
- Clerks / Staff
- Cloud
- Combos
- Customers / Members
- Events
- Events Portal
- Guests
- Items / Products
- KVS
- Member Portal
- Notify
- Oolio Pay
- OrderAway
- Orders / Sales
- POS Keys
- Self Service
- swiftPOS
- Tables
- Thirsty Camel Hump Club
- Touch
- TouchMini
- TouchMini v2
- Venue Hub
- Venue Manager
- XERO
- XERO Pro
- Zen Global
-
KVS
-
Member Portal
-
Notify
-
Oolio Pay
-
OrderAway
-
POS Keys
-
Self Service Kiosk
-
Self Service POS
-
swiftpos
-
Touch
-
TouchMini
-
TouchMini v2
-
Troubleshooting
-
Venue Manager
-
Venue Hub
-
3rd Party Integrations
- Business Intelligence
- Cash Management
- eCommerce
- Exports / Imports
- Front Office Systems
- Fuel Systems
- Gaming
- General Ledger
- Gift Cards / Promotions / Vouchers
- Membership / Loyalty
- Middleware Applications
- Payment Integrators
- Product Level Blocking
- Reservations
- Tab Management
- Time & Attendance
- Value Added Services
-
Uncategorized
Configure The POS API Interface
This outlines how to configure the POS API Interface in Touch.
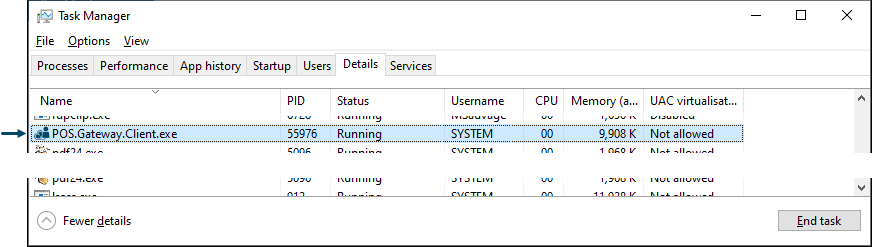
The POS API Interface is identified in Windows by the POS.Gateway.Client.exe application, and is used to process TouchMini Orders/Sales. It runs on the designated Orders Terminal for the selected Location.
Subjects ▼
What Is Required? ▲ ▼
- Ensure the Touch (SwiftPOS.Touch.exe) application has been started (at least once in the past) with the right click Run as Administrator option selected, on the Terminal that is designated as the Orders Terminal for the selected Location.
To confirm this has been the case, check that the POS.Gateway.Client.exe entry is visible in the Windows Task Manager and has a status of Running. To do this refer to the Confirm Resolution section for more information. If it is NOT visible then refer to How To Run Touch As Administrator for more information.
How To Configure The POS API Interface? ▲ ▼
Once the What is Required? above has been completed, do as follows:
- Start Touch on the Terminal that is designated as the Orders Terminal for the selected Location.
- Then navigate to the Interface List menu option of the Terminal Settings menu.
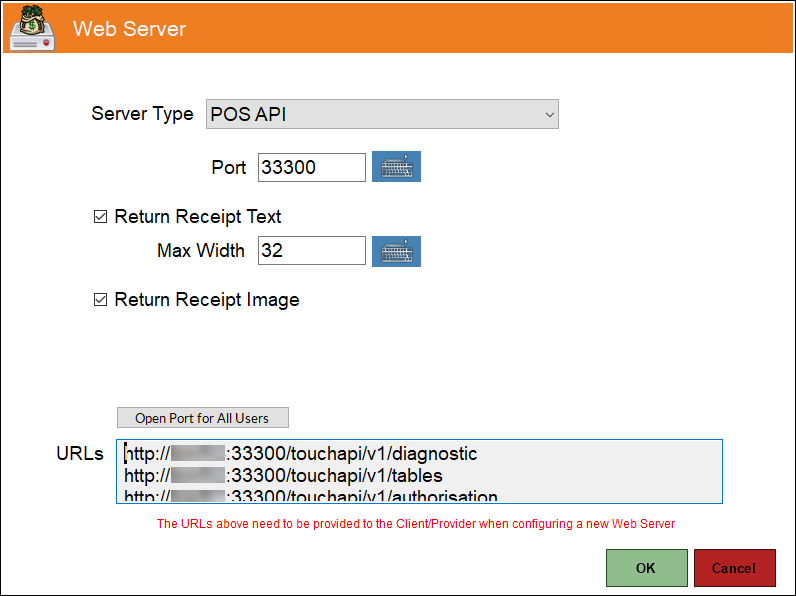
- Select the POS API entry and then select the Edit button to open the Web Server settings screen.
- Ensure the Server Type field is displaying the POS API option.
- Ensure the Port setting is set to 33300.
- Ensure the Return Receipt Text option is selected and the Max Width setting is configured for the best result. A width of 32 is recommended.
- Ensure the Return Receipt Image option is selected.
- Ensure the Open Port for All Users option is selected.
- Select OK to save any changes and close the Web Server settings screen.
- Select the Edit button again to open the Web Server settings screen.
- Confirm that the URLs field now lists entries. Refer to the example screenshot below.
End of article. ▲