
This outlines How To Configure And Order At Table in Orderaway.
Subjects ▲ ▼
About ▲ ▼
What Is It? ▲ ▼
Order At Table allows patrons to place/submit Orders from their Table.
How To? ▲ ▼
How To Configure For Order At Table? ▲ ▼
In a Test or Demonstration environment, identify a suitable Location to install Orderaway against and then follow the steps below:
- In GET STARTED, familiarise oneself with the content of each of the Steps to Follow.
- Create a QR Code for an ordering location within the Venue using the Orderaway URL and the Location Suffix.
- Via the Orderaway Configuration tabs, ensure the following:
- In the POS tab:
- The Orders are sending to Location ID option is displaying the correct ID of the Venue's Location.
- The Layout to show setting is configured with the correct ID of the Keyboard Layout configured for the Home Menu.
- If required, the Enable Quantity Checks option is selected. This will ensure Limited Stock and/or Out of Stock warnings to be displayed against individual Products when stock levels reach the configured quantities.
- In the Appearance tab:
- The Title setting is configured so that the name of the Menu will be displayed to patrons when using Orderaway. This would normally be a name that includes a reference to the Venue and additionally the Location (if required), and the Menu being used to order from (if required).
- In the Member tab:
- The Allow member sign in option is selected. If Member Loyalty is not available, leave this option unselected.
- In the POS tab:
Notes ...
An existing Member from the Demo/Test database should be used at login to enable Loyalty Points earnings/redemptions.
- Via the Orderaway Configuration tabs continued ...
- In the Service tab:
- Ensure the consideration is given to enable the Capture Name and Capture Phone options.
- In the Payment tab:
- The Points charge/redemption option is selected. If Member Loyalty is not available, leave this option unselected.
- In the Confirmation tab:
- Ensure the consideration is given to configure for Send Order Success Message notifications using either or both the Send SMS and/or Send Email options.
- In the Service tab:
- Refer HERE to configure the Windcave payment option.
- Once the configuration of Orderaway is complete, scan the QR Code from a mobile phone and Orderaway!
How To Order At Table? ▲ ▼
Example
The following three QR codes connect to the same Swiftpos Location – Club MSL – with Orders submitted against three different in-Venue order locations – Tables 12, 15 and 18.

Resolves to https://order.micropower.com.au/msl?location=Table%2012

Resolves to https://order.micropower.com.au/msl?location=Table%2015

Resolves to https://order.micropower.com.au/msl?location=Table%2018
The QR Code Monkey website was used to generate the QR Codes. These can then be inserted into the QR Code scan document used to place on each of the Venue’s tables. Refer HERE topic for more information.
Scanning any one of the QR Codes above, will reveal a patron's experience while using Orderaway:
- Patrons will be presented with the message Your order will be delivered to Table 12 and the Home Layout showing DRINKS, ENTREES, MAINS and DESSERTS Menu options.
- Navigating the Menu options, patrons will be presented with the Products/sub-Menus available for order/selection.
- Add items to an Order while navigating the Menus.
- Under the Menu Drinks > Alcohol, a Menu structure exists that seeks to confirm a patron’s age. Namely, over 18 or under 18. This is achieved using Keyboard Layouts in Swiftpos.
- The Enable Quantity Checks option is selected. Several Products will have Limited Stock or Our of Stock warnings displayed.
- Several Products have modifiers/instructions configured that will require patrons to select further options when the ADD option is selected. For example, try the Rump Steak 250 in the Mains Menu.
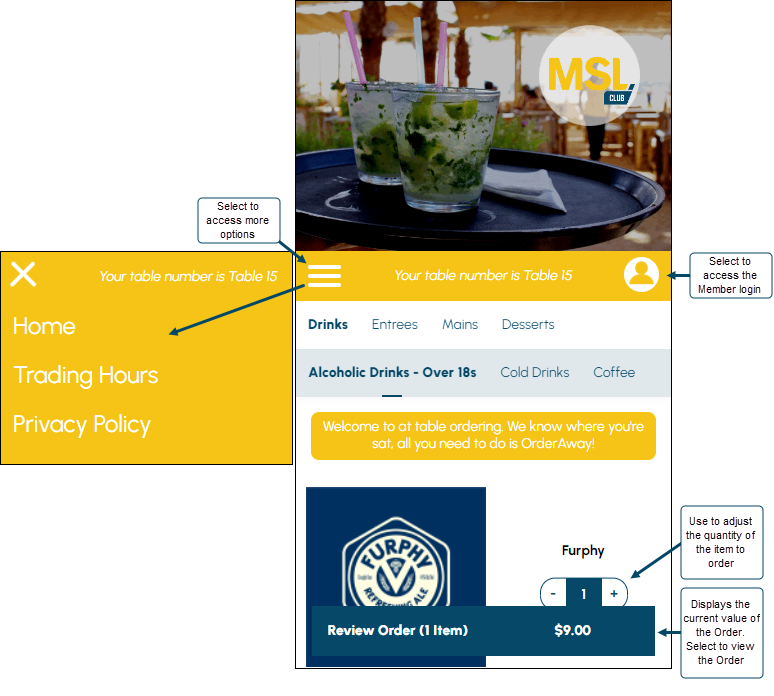
- At the top right of any menu, the Member Login icon can be selected to prompt Members to login. Enter the Member Number 1001 with password 1001 to login as John Smith. This Member has significant Loyalty Points that can be used to purchase items. The Sign In icon will now display the first letter of the Member's Name. For example, J.
- At the top left of any menu, the Menu icon can be selected to access more options. For example, Trading Hours. Select this to view the Venue’s trading hours. These are configured either in Back Office HERE or overridden in Orderaway via the Trading Periods tab.
- At the bottom of any menu, the current value of the Order is displayed along with the number of items. Select to view a summary of the Order.
- Once selected, patrons will be prompted to enter a Name, Mobile number, and an Email address. All can be optionally enabled/disabled in the Confirmation tab.
Notes ...
Emailing of receipts does require an email address. If John Smith’s credentials were used to login, his email address (if available) will be used to prefill the email address field. However, this can be overridden by entering any valid email address.
- Item quantities can be adjusted on the Order summary screen using the +/- options
- Payment Options are also displayed in the Order Summary
- Select the CREDIT CARD option
- Select the Proceed to Payment option (patrons may have to scroll down for it to be visible)
- Patrons will then be presented with the following options
- Cancel Order
- Make Payment - Credit card details can then be entered, or APPLE PAY / GOOGLE PAY wallet cards can be used to pay
IMPORTANT
Club MSL is linked to a test Windcave account. Paying for transactions using real APPLE PAY or GOOGLE PAY wallet cards will not result in the transaction being processed and will not debit any monies. Simulating manual card entry transactions should use the credit card details below. Using APPLE PAY or GOOGLE PAY demonstrates the best user experience. When demonstrating/testing and simulating entry of Credit Card details, use the following details:
- Card Number - 4111 1111 1111 1111
- Expiry - Any future date
- CSV - 123
- Once the payment process is complete, the user is returned to the Orderaway confirmation screen. If a valid email address was used, a Tax Invoice will be sent to that address.
End of article ▲