

This provides an overview of the Charge /Redemption (#151) POS Key in Touch.
Subjects ▲ ▼
About ▲ ▼
What Is It? ▲ ▼
This POS Key is used to charge the partial/full amount of an order/sale in Touch, to a patron's account. Refer to HERE for more information.
What Is Required? ▲ ▼
- Ensure this POS Key is added to the appropriate Keyboard Layout using the Designer. Refer to HERE for more information.
- Ensure it is configured as required. Refer to HERE for more information.
What To Consider? ▲ ▼
- If required, access to this POS Key can be restricted by the Clerk Security feature.
- Account Charges / Redemptions are immediately processed via the NetPOS service resulting in patron account balances being immediately updated.
How To? ▲ ▼
GET STARTED? ▲ ▼
- Review About and ensure the steps outlined HERE are addressed.
- In Keyboard Designer, ensure the Charge / Redemption (#151) POS Key has been added to a Layout.
- Ensure it is given an appropriate Caption. For example, Charge/Redeem.
- Select the More Settings option to display the Settings screen and configure the POS Key as required.
- Once configured, ensure a Full Update is sent to all the Touch terminals that will be using the POS Key. Refer HERE for more information.
Screens ▲ ▼
Settings Screen ▲ ▼
Tabs
Main Settings Tab ▲ ▼
Accessed from HERE.
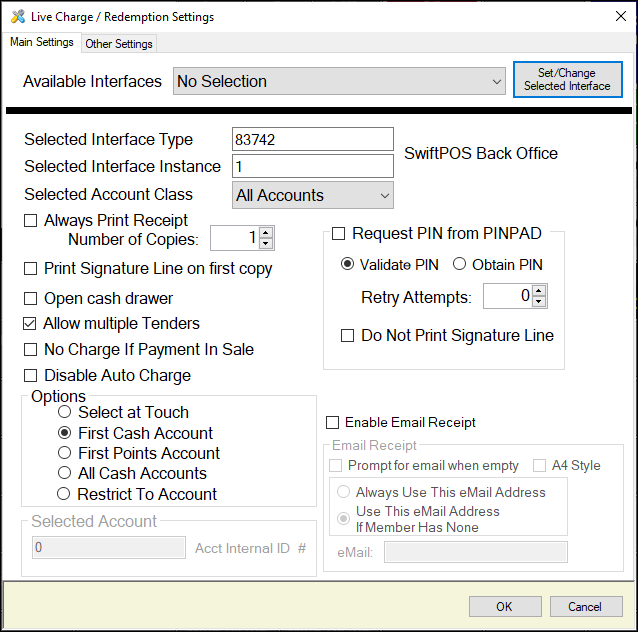
- Available Interfaces - Select from the drop-down list the required Interface.
Notes ...
If no interface is selected, the default used will be the interface which is set as default in NetPOS.
- Set/Change Selected Interface - Select to select the interface selected above and set the Selected Interface Type and Instance values.
- Selected Interface Type - Displays the Type selected.
- Selected Interface Instance - Displays the Instance selected.
- Select Account Class - Select from the drop-down list one of the following:
- All Accounts
- Loyalty Accounts
- Room Accounts.
- Always Print Receipt - Select whether to ensure a receipt is always printed. If required set the number of copies.
- Request PIN from PINPAD - Select to ensure a prompt is displayed requesting the entry of the Customer/Member's Pin number (which is equivalent to their Web Password). Once selected the following options will be enabled:
- Validate PIN - Select to Validate the PIN entered.
- Obtain PIN - Select to retrieve the PIN.
- Retry Attempts - Displays/Set the number of attempts permitted. A value of zero indicates NO limit to the number of attempts.
- Do Not Print Signature Line - Select to ensure the signature line does NOT appear if a PIN has been entered.
- Print Signature Line on First Copy - Select to print a Signature line on first copy of the Receipt.
- Open Cash Drawer - Select to ensure the cash drawer is opened when this POS Key is selected.
- Allow Multiple Tenders - Select to ensure multiple media can be used. That means a sale can be partially charged to an Account, redeemed in points and/or paid in cash. When selected, use the keyboard icon opposite the account to enter a partial amount. If no other account is selected, then the remaining amount will be displayed in the sales grid and can be tendered using one of the Finalise POS Keys.
Notes ...
If the No Other Media with Redemptions is selected in Touch, it will override this option (if selected).
- No Charge if Payment in Sale - Select to ensure that an Account Charge cannot be included in the same sale as that of an Account Payment/Top-up.
- Disable Auto Charge - Select to ensure the Auto Charge option in the Live Charge screen is disabled.
- Options - Select one of the following:
- Select at Touch - Select to ensure the Live Charge screen is displayed.
- First Cash Account - Select to automatically charge to accounts. The Live Charge screen will not be displayed.
- First Points Account - Select to automatically redeem points. The Live Charge screen will not be displayed.
- All Cash Accounts - This will charge to across multiple cash accounts if the first cash account does not have sufficient balance to complete the charge.
- Restrict To Account - Select to enabled the entry of the Selected Account below:
- Selected Account - Displays/Enter the Account ID # of the Account to which this charge will be applied. For example, the redemption of points can now be restricted to certain Families (via the Other Settings tab) and be charged to a specific internal Account.
- Enable Email Receipt - Select to ensure receipts are emailed and the Email Receipt settings are enabled:
- Prompt for email when empty - Select to prompt for email.
- A4 Style - Select to ensure the Receipt generated is in the A4 style.
- Always Use This eMail address - Select to enable.
- Use This eMail Address if Member Has None - Select to enable.
- Email - Displays/Enter the default email address.
- OK - Select to save any changes and exit.
- Cancel - Select to exit without saving.
Other Settings Tab ▲ ▼
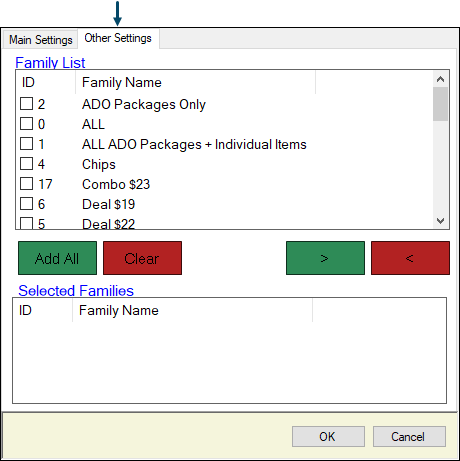
To access, select the More Settings option in Keyboard Designer. Used to configure the settings to restrict this POS Key to be ONLY available when Products are sold that are assigned to the Families listed in the Selected Families section. If no Families are listed in the Selected Families section, then there is NO restriction imposed on the use of this POS Key.
- Add All – Select to add all the Families listed in the Family List to the Selected Families.
- Clear – Select to remove all the Families from the Selected Families.
- Right/Left Arrow >< – Select to add/remove the Family selected in the Family List section to/from the Selected Families section.
End of article ▲