This menu option is used to manage Shopping Lists and Requisitions that are used to source stocked items from a Warehouse. A Warehouse is a Location that is of the type Warehouse.
Refer to How To Requisition From A Warehouse for more information.
Subjects ▼
- Warehouse Requisitions Screen
- Purchasing Shopping List / Requisition Items - Shopping List Screen
- Purchasing Shopping List / Requisition Items - Requisition Items Screen
- Generate Purchase Orders Screen
What Is Required? ▲ ▼
- Venues will need to be registered for the Advanced eTrade for access to this feature.
- The Service Monitor must be running and the Enable Automatic Orders from this PC option must be selected. This will ensure that Purchases Orders are generated automatically when Warehouses are unable to supply a requisitioned Item.
- Ensure the steps outlined in How To Configure For Warehouse Requisitioning have been completed.
Warehouse Requisitions Screen ▲ ▼

Accessed from the Inventory menu.
Filters Section
The filters at the top of the screen can be used to limit the number of rows displayed in the grid. The filters include the following types:
- Date Range From/To - The filter fields of this type are: Required and From/To Dates.
- Full/Partial Texts - The filter fields of this type are: Description.
- Full/Partial Numbers - The filter fields of this type are: ID.
- Check Boxes - The filter fields of this type are: Hide Completed and Hide Past Required.
- Drop Down Lists - The filter fields of this type are: Ordered By (enter the name of a Clerk/Staff Member), Type and Status.
- Search Screens - The filter fields of this type are: Location and Warehouse.
- Top #
- Apply
- Reset
Grid Section
Refer HERE for more information.
- ID - Displays the Warehouse Requisition/Shopping List ID
- Description - Displays the Requisition/Shopping List Description.
- Required - Displays the Required/Created date for the Requisition/Shopping List respectively.
- Type - Displays the type of Requisition/Shopping List.
- Status - Displays the status of the the Requisition/Shopping List.
- Location - Displays the Location for which the Warehouse Order is required.
- Warehouse - Displays the Warehouse from which the Warehouse Order will be supplied.
- Ordered By - Displays the name of the Clerk that created the Warehouse Order.
- Created - Displays the date/time the Requisition/Shopping list was created.
Notes ...
Rows displayed in the grid can be sorted by selecting the column headings. Toggle select to alternate the sort between ascending and descending.
Footer Section
- Shopping List - Select from the drop down list one of the following:
- Purchasing - Select to open the Search Location screen to select the Location for which the order is destined. Once selected the Search Warehouse locations screen will be opened to select the Warehouse from which ordered items will initially be sourced. Once selected, the Requisition Items screen will be opened allowing the adding of Purchased Items only.
- Production - Similar to the Purchasing option described above, however the Shopping List created will only allow Production type Products to be added.
- Requisition - Select to open the Search Shopping Lists screen to select a Shopping List.
Notes ...
A Shopping List must first be created before a Requisition can be created. Requisitions are based on Shopping Lists.
- Copy - Select to copy the currently selected Shopping List.
Notes ...
This only applies to Shopping Lists.
- Edit - Select to open the Requisitions Items screen to edit either the selected Shopping List or Requisition.
- Delete - Select to delete the the selected Shopping List or Requisition.
- Tools - Select from the drop down list one of the following:
- Generate Purchase Orders - Select to open the Generate Purchase Orders screen, to generate Purchase Orders for those items placed on Back Order. Orders that cannot be generated, will be displayed in the Generate Purchase Orders screen screen.
- Preview Proposed Orders
- Preview Orders
- Search Orders
Notes ...
When either Generate Orders or Preview Proposed Orders is selected and Items exist in the Order that do NOT have a Supplier assigned, OR the Warehouse Location is NOT selected as a Preferred Location for the Supplier, then the Generate Purchase Orders screen will be displayed list those Items.
Also, logging of POs generated will only occur, if the Log Data Changes option has been selected.
- Close - Select to exit.
Purchasing Shopping List / Requisition Items - Shopping List Screen ▲ ▼
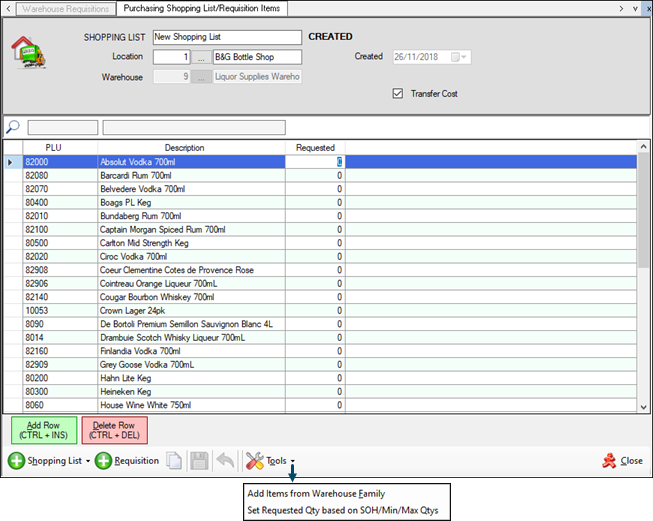
Accessed from the Edit button.
Header Section
- Shopping List - Displays/Enter the description for the Shopping List.
- Status - Displays the current status of the Shopping list.
- Location - Display/Select the Location for which the Shopping List is applicable.
- Created - Displays the date the Shopping List was created.
- Warehouse - Displays the Warehouse from which the items in the Shopping List will initially be sourced.
- Transfer Cost - Select to ensure Product costs are transferred along with the Stock to the requisitioning Location. Selecting or unselecting this option will also ensure the same is applied to Batch Transfers and Transfers.
Notes ...
When selected, cost of stock in the requisitioning Location will be determined depending on that Location's Transfer In Cost method setting. Examples of how this is determined and the formula used to calculate the Average Cost, can be found HERE.
Search Fields Section
- PLU - Enter text to search the grid and return all Shopping List Items with a PLU containing the text entered.
- Description - Enter text to search the grid and return all Shopping List Items with a Description containing the text entered.
Grid Section
Displays/Edit the PLU, Description and Requested (Qty required) of the items added to the Shopping List.
Grid Footer Section
- Add Row - Select to add a row to the grid.
- Delete Row - Select to delete the selected row.
Footer Section
- Shopping List - Select to open the Search Location screen to select the Location for which the order is destined. Once selected the Search Warehouse Locations screen will be opened to select the Warehouse from which ordered items will initially be sourced. Once selected, the Shopping List/Requisition Items screen will be opened displaying the newly created Shopping List.
- Requisition - Select to open the Search Shopping Lists screen to select the Shopping List on which the Requisition will be based.
Notes ...
A Shopping List must first be created before a Requisition can be created. Requisitions are based on Shopping Lists.
- Copy - Select to copy the currently selected Shopping List.
Notes ...
This only applies to Shopping Lists.
- Save - Select to save changes.
- Undo - Select to undo changes made.
- Tools - Select from the drop down list one of the following:
- Add Items from Warehouse Family - Select to add all Products, assigned to the Family associated with the Warehouse, to the grid.
- Set Requested Qty based on SOH/Min/Max Qtys - Select to set the Requested Qty for the items in listed in the grid, based on their current SOH, and Min/Max Qtys.
- Close - Select to exit.
Purchasing Shopping List / Requisition Items - Requisition Items Screen ▲ ▼
Accessed from the Edit button.
Header Section
- Location - Display/Select the Location for which the Requisition is applicable.
- Date Created - Displays the date the Requisition was created.
- Warehouse - Displays the Warehouse from which the items in the Requisition will initially be sourced.
- Date Required - Displays the date the items are Required to be available in the Location displayed above.
- Description - Displays/Enter the description for the created Requisition.
- Transfer Cost - Select to ensure Product costs are transferred along with the Stock to the requisitioning Location. Selecting or unselecting this option will also ensure the same is applied to Batch Transfers and Transfers.
Notes ...
When selected, cost of stock in the requisitioning Location will be determined depending on that Location's Transfer In Cost method setting. Examples of how this is determined and the formula used to calculate the Average Cost, can be found HERE.
Search Fields Section
- PLU - Enter text to search the grid and return all Requisition Items with a PLU containing the text entered.
- Description - Enter text to search the grid and return all Requisition Items with a Description containing the text entered.
Grid Section
Displays/Edit the PLU Number, Description and Requested (Qty required) of the items added to the Requisition.
Grid Footer Section
- Add Row - Select to add a row to the grid.
- Delete Row - Select to delete the selected row.
Footer Section
- Shopping List - Select to open the Search Location screen to select the Location for which the order is destined. Once selected the Search Warehouse Locations screen will be opened to select the Warehouse from which ordered items will initially be sourced. Once selected, the Shopping List/Requisition Items screen will be opened displaying the newly created Shopping List.
- Requisition - Select to open the Search Shopping Lists screen to select the Shopping List on which the Requisition will be based.
Notes ...
A Shopping List must first be created before a Requisition can be created. Requisitions are based on Shopping Lists.
- Copy - Select to copy the currently selected Requisition.
Notes ...
This only applies to Requisitions.
- Save - Select to save changes.
- Undo - Select to undo changes made.
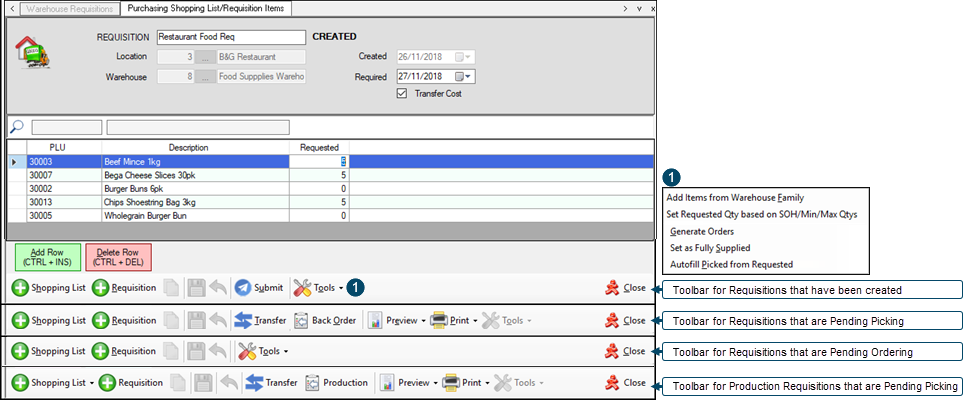
- Submit - Select to ensure the Requisition is submitted and made available to the selected Warehouse for picking. Once submitted, the grid will display the following additional columns:
- Picked - Displays/Enter the Qty picked.
- Transferred - Displays the Qty Transferred to the Requisitioning Location.
- Outstanding - Displays the Qty that was NOT able to be supplied, and will require further actioning (for example, Generating a Purchase Order).
- Production Requested - Displays the Qty that was NOT able to be supplied, and is now Pending Production.
- Fully Supplied - Indicates whether the Requested Qty has been fully supplied.
In addition, the following Toolbar buttons will appear at the bottom of the screen:
- Transfer - Select to ensure Items Picked are Transferred to the Requesting Location.
- Back Order - Select to ensure a Back Order is generated for those Items that were not Picked.
- Preview - Select to Preview the Picking or Packing Slip.
- Production - Select to ensure Items requisitioned and NOT Picked are placed in Production Pending.
- Print - Select to Print the Picking or Packing Slip.
- Tools - Select from the drop down list one of the following:
- Add Items from Warehouse Family - Select to add all Products, assigned to the Family associated with the Warehouse, to the grid.
- Set Requested Qty based on SOH/Min/Max Qtys - Select to set the Requested Qty for the items in listed in the grid, based on their current SOH, and Min/Max Qtys.
- Generate Purchase Orders - Select to generate Purchase Orders for those items placed on Back Order. Orders that cannot be generated, will be displayed in the Generate Purchase Orders screen.
Notes ...
Logging of POs generated will only occur, if the Log Data Changes option has been selected.
- Tools continued ...
- Set as Fully Supplied - Select to ensure that all Items listed are flagged as Fully Supplied.
- Autofill Picked from Requested - Select to ensure the Qtys in the Picked column are automatically filled with the Qtys in the Requested column.
Notes ...
When either Generate Orders or Preview Proposed Orders is selected and Items exist in the Order that do NOT have a Supplier assigned, OR the Warehouse Location is NOT selected as a Preferred Location for the Supplier, then the Generate Purchase Orders screen will be displayed listing those Items. Refer to the Generate Purchase Orders screen for more information.
- Close - Select to exit.
Generate Purchase Orders Screen ▲ ▼
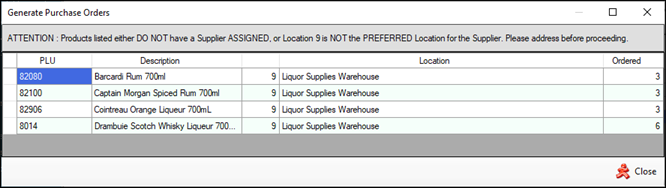
Accessed from the Tools button HERE and HERE.
The items listed in this screen either do NOT have a Supplier assigned, OR the Warehouse Location is NOT selected as a Preferred Location for the Supplier. Either or both of these issues will need to be addressed proceeding.
End of article. ▲