
This outlines How To Perform A Stocktake in Back Office. The following is intended to be a step by step guide to assist when undertaking a manual stocktake for the first time using Swiftpos. Refer HERE for information when using a PDE. Also, refer HERE for configuration options that may affect how the stocktake feature functions.
Summary Of Steps ▲ ▼
| 1 | SELECT the ADD option to LOCK required Location in preparation for stocktaking. This will ensure stock is held for the duration of the stocktake and not affected by orders/sales made during the stocktake |
| 2 | SELECT one of the LOCATIONS in the grid that have been locked |
| 3 | SELECT the COUNT ENTRY option to add the ITEMS/PRODUCTS to be counted to the stocktake |
| 4 | GENERATE the COUNT SHEETS |
| 5 |
COUNT the stock and record the count using the COUNT SHEETS |
| 6 |
ENTER the COUNT data into Swiftpos |
| 7 |
SELECT the SAVE CHANGES option |
| 8 |
Select the RECALCULATE VARIANCES option to ensure the Variance values displayed in the grid are recalculated |
| 9 |
SELECT the COMMIT option to commit the stocktake. SOH quantities will be updated |
| 10 |
SELECT the RELEASE option to release the held stock and UNLOCK the Location. SOH quantities will be updated with the held stock released |
| 11 |
REVIEW the REPORTS generated in the folder specified at the time the stocktake was committed |
How To? ▲ ▼
To perform a stocktake, do as follows:
-
Prior to commencing ensure the following are processed to ensure the current Stock on Hand (SOH) quantities are as accurate as is possible:
-
Unposted Supplier Invoices
-
Unposted inventory movements such as Transfers and Adjustments. Some adjustments and transfers may have been entered into Swiftpos but have not been posted.
-
- Navigate to the Stocktake & Period End screen in Back Office.
- Select the Add option in the footer to display the Locations screen to select a Location for which the stocktake is to occur.
- Select a Location and select OK. The following prompt will be displayed:
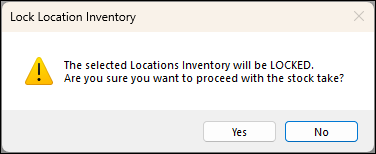
- Select Yes to lock the Location. This means that while the stocktake is in progress, the SOH quantities will be locked and remain unchanged while the stocktake is in progress. That is, the stocktake remains uncommitted.
- Ensure the Location that was just added is selected in the grid of the Stocktake & Period End screen.
- Select the Count Entry option in the footer section of the screen to open the Location Inventory Count screen.
- Those items/products that will be included in the stocktake for the selected Location, need to be added to the grid. This can be done by either:
- Selecting the Add Item option to add items/products manually one at a time.
OR - Selecting the Add Products Wizard option to add items/products in bulk using the Products Wizard screen. Follow the steps in the wizard to add the required items/products.
- Selecting the Add Item option to add items/products manually one at a time.
- Once all required items/products have been selected and added, they will appear in the grid of the Location Inventory Count screen.
- Generate the stock Count Sheets by selecting the Count Sheets option from the Reports option in the footer section. The stock Count Sheets generated will be based on the items/products listed in the grid.
- Count the quantity of each item/product listed on the printed stock Count Sheet and record the count on the sheets.
- Once a stock Count Sheet has been completed it can then be entered into Swiftpos to record the stocktake. This can be done by selecting the row in the grid displaying the same item/product on the stock count sheet and entering the counted quantity in the Count column opposite it.
Notes ...
It is recommended that the grid be sorted in the same order as the order in which the items/products appear on the stock Count Sheets. This makes the entering of the counted quantity a whole lot easier. Basically, the counted quantity is entered into the Count column of the first row and then the enter key is selected to move to the next row. Now the counted quantity of the next item/product can be immediately entered. This can be repeated until all the counted quantities have been entered into the Count column.
- Preview any variances by selecting the Variance Report option from the Reports option in the footer section.
- Select the Commit option to commit and complete the stocktake. The following confirmation message will be displayed:
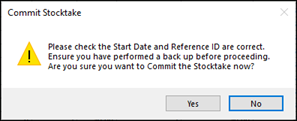
- Confirm that the correct stocktake is selected, by checking the start date and Reference ID.
- Make a backup of the Swiftpos database. Refer HERE for more information.
- Select Yes to commit.
- Once a stocktake is committed a Browse For Folder prompt will be displayed. Select the folder in which the reports relating to the stocktake will be saved.
Notes ...
The reports saved are prefixed with the date/time the stocktake was committed. For example:
20260322T145855 Location 3 ValueByLocation.pdf
20260322T145855 Location 3 StatusReport.pdf
20260322T145855 Location 3 PDEExpectedVarianceReport.pdf
20260322T145855 Location 3 PDEInventoryCountInScanOrder.pdf
- Run the Period Location Summary (INV018) report for the date range of the previous trading period and that will provide the opening inventory and closing inventory for the current period.
- Once satisfied with the report, and a printed/electronic copy of it has been made, select the Release option to unlock the Location. To unlock all Locations, select the Release All option from the Release option.
- This ensures the current Closing Stock will become the Opening Stock for the next period. Also, any invoices/sales processed while the Location was locked, that would have an affect on stock levels, will now be applied, thus decrementing/incrementing stock on hand (SOH) quantity accordingly.
End of article ▲