This outlines How To Create A Clerk Group in Back Office.
Subjects ▼
When Is It Used? ▲ ▼
Used when Clerks/Staff Members need to be grouped, so that they can be assigned/unassigned to specific Location Groups (Venues). Once assigned, they will only be able to access Touch and/or TouchMini devices located in the Locations assigned to the Location Groups (Venues) assigned to their Clerk Group.
What Are The Benefits? ▲ ▼
The benefits to Venues are:
- Venues can restrict Clerks/Staff Members to only accessing POS devices in the Location Groups (Venues) to which their Clerk Group is assigned.
What Is Required? ▲ ▼
- swiftpos V10+
- swiftpos Touch V10+
- swiftpos TouchMini App Version 2.63+
To Be Considered ▲ ▼
- It is recommended to create a Clerk Group that is given access to all Location Groups (Venues), so that whenever necessary individual Clerks/Staff Members can be assigned to it, and therefore be granted access to all Locations in all Location Groups (Venues). This will come in handy when configuring a Default POS Clerk for Touch and/or TouchMini v2. Refer to How To Configure A Default POS Clerk for more information.
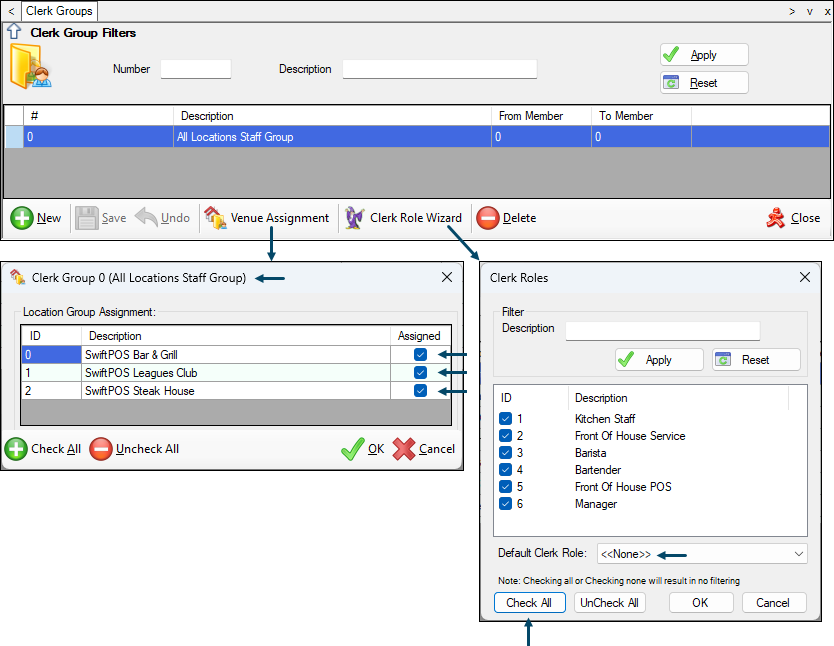
Refer to the screenshots below as a guide when configuring an All Locations Staff Group. Ensure that all Location Groups (Venues) are selected using the Venue Assignment button. Also, it Clerk Roles have been configured, ensure all Roles have been selected using the Check All button and ensure the Default Clerk Role is set to <<None>>.
How To Create A Clerk Group? ▲ ▼
In Back Office, do as follows:
- Navigate to and select the Clerk Groups menu option in the Clerks menu.
- Once the Clerk Groups screen is displayed, select the New button to add a new group to the grid.
- Give the new Clerk Group an appropriate name. For example, Administrators, Managers, POS Clerks, etc.
- If the Clerk Group being added is going to be Location Group (Venue) specific, then you may want to prefix the Clerk Group name with the Location Group (Venue) name. For example, B&G Restaurant POS Clerks. This will make it easier to locate the appropriate Clerk Group when assigning Groups to Clerks/Staff Members.
- Select the Venue Assignment button to open the Location Group Assignment screen.
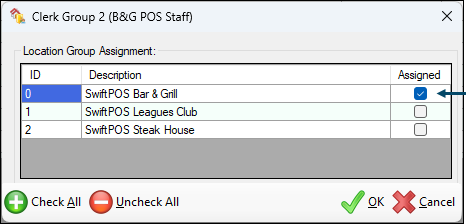
- Select the checkbox in the Assigned column on the right-hand side to ensure the new Clerk Group is assigned to the appropriate Location Groups (Venues).
- Select OK to save the changes and close the Location Group Assignment screen.
- Select Save to save the new Clerk Group.
- Ensure the new Clerk Group has the appropriate Security permissions so that POS Clerks/Staff Members are able to successfully perform all required POS related operations in Touch.
End of article. ▲