This outlines how to import the Chart Of Accounts (COA) into XERO.
Refer HERE for more information.
Subjects ▲ ▼
When Is It Required? ▲ ▼
This is generally required when wanting to test the Swiftpos XERO Basic or XERO Advanced interface in a test environment and hence import into the XERO test (30 Day free trial account) environment.
How To Import The Chart Of Accounts Into XERO? ▲ ▼
In the XERO Test environment, do as follows:
- First the default Chart of Accounts created when the XERO Organisation (Business) was added, need to be deleted. To do this access the Chart of Accounts in XERO. Refer HERE for more information. Then:
- Select the checkbox left of the column heading Code, to ensure all Account Codes are selected.
- Select the Delete button.
- In the Delete Accounts prompt, select OK.
- Select the Import button to Import the Chart of Accounts.
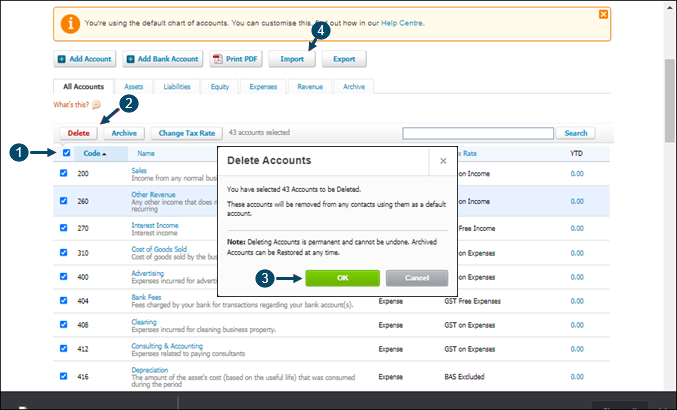
- All unlocked Account Codes will be deleted. Locked Account Codes CANNOT be deleted.
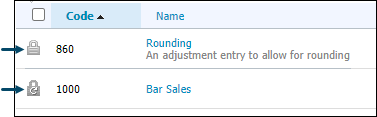
- There are two types of locked Accounts:
- System Accounts - Account 860 in the above screenshot. These Accounts display the padlock icon (without an arrow). These Accounts will be included in the CSV file when exported from XERO. However, they will NOT BE IMPORTED into Swiftpos during the Import Chart of Accounts process. This is because they cannot be used as assign/mapping Accounts in Swiftpos.
- Other Locked Accounts - Account 1000 in the above screenshot. These Accounts display the padlock icon (with an arrow). These Accounts will be included in the CSV file when exported from XERO and WILL BE IMPORTED into Swiftpos during the Import Chart of Accounts process and can be used as assign/mapping Accounts in Swiftpos. These Accounts are locked because they've been used for one of the following purposes in XERO:
- Repeating invoice.
- Bank rule that you have set up.
- Tracked inventory.
- Registered fixed asset.
- As the payment account for a Payment Service.
- In the Import your Chart of Account screen, select the Browse button to select the site's ChartOfAccounts.csv file exported earlier.
- Select the Import button.
- A Confirm your imported accounts screen will be displayed. To complete the import, select the Confirm button.
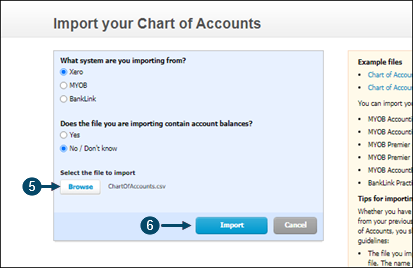
- The Chart of Accounts should now list the imported Accounts.
End of article ▲