

Subjects ▲ ▼
About ▲ ▼
What Is It? ▲ ▼
It is used to manage/setup Clerk Security Groups to control access to Back Office menus, features/functions and reports.
This is achieved by the creation/maintenance of Security Groups which can be configured to allow/deny access to the Security options available. Once a Security Group has been created/configured, when a Clerks/Staff Member is assigned to that Security Group, they will then have access to those Back Office menus, features/functions and reports depending on the Security options selected/not selected against the Security Group.
Refer HERE for more information.
What To Consider? ▲ ▼
- By default, new features/functions and reports added to Swiftpos will NOT have Security Permissions preset. Hence it is recommended to regularly check this menu option and set the appropriate Security Permissions for new features/functions and reports.
- The position of the Security Group listed in the grid, determines a designation of hierarchy. That is, the first Security Group listed has the highest level and the last listed Security Group has the lowest level. That means that a Clerk/Staff Member assigned to a higher Security Group can have access to edit all other Security Groups below it in the grid. However, a Clerk/Staff Member assigned to a lower Security Group will not have access to edit all other Security Groups above it in the grid.
- Refer to How To Plan For Security for more information
Notes ...
The position of a Security Group listed in the grid can be changed by using the Move Up/Down and Top/Bottom buttons in the footer.
Screens ▲ ▼
Clerk Security Groups Screen ▲ ▼
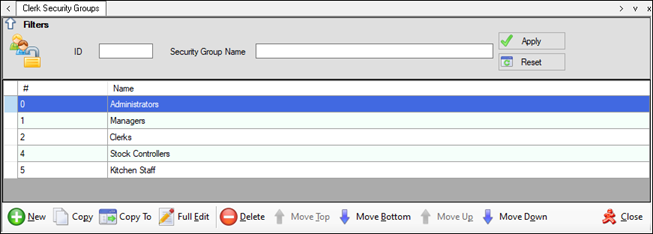
To access select the Clerk Security Groups option from the Clerks menu in Back Office.
Filters Section
The filters at the top of this section can be used to limit the number of rows displayed in the grid. The filters include the following types:
- Full/Partial Numbers - The filter field of this type is ID.
- Full/Partial Texts - The filter of this type is Name. Enter a full or partial text, to search the available Security Groups and return only those that contain an occurrence of the text entered.
- Apply
- Reset
Grid Section
The grid displays a list of the Security Groups currently available, along with their ID and Name.
Footer Section
- New - Select to add a Security Group.
- Copy - Select to copy the selected Security Group.
- Copy To - Select to copy the Permission and Report Settings from one Security Group to another. Once select the following prompt will be displayed, enabling the selection of the From/To Security Groups.

- Full Edit - Select to edit the selected Security Group.
Notes ...
Access to edit Security Groups listed will depend on the Security Group that is assigned to the currently logged in Clerk. If the Clerk currently logged in, is assigned to the Clerks Security Group, then that Clerk will only be allowed to edit its own Security Groups and those listed below it in the grid.
- Delete - Select to delete the selected Security Group.
- Move Buttons - Top/Bottom, Up/Down - Select to move the currently selected Clerk Security Group.
Notes ...
The Move buttons will not be active if the list is filtered.
- Close - Select to exit.
Security Group Full Edit Screen ▲ ▼

To access, select the Full Edit option in the Clerks Security Groups screen.
- Security Group ID - Displays the Security Group Number.
- Security Group Name - Displays/Enter the Security Group Name
- Single Main menu group/Display Menu Items as List - Select this to ensure that the checked software features are displayed as a list down the LHS of the Swiftpos Back Office Main menu rather than as a menu structure (as per the default).
Clerk Group Permissions Section ▲ ▼
Select where appropriate to allow/deny access to the Security Permission options listed. Refer HERE for more information. When a user attempts to access an option for which their Security Group has NOT been given permission to access. That is the option is NOT selected, then the following message maybe displayed.

- Accounts - To ensure that the Accounts menu option is NOT visible in Back Office, ensure that all options listed under Accounts and Invoicing are NOT selected.
- Administration
- Clerks - For more information regarding the options available when the Clerk Report Saved Filters option is selected, refer to HERE for more information.
- Data Export
- Device Settings
- Events
- Fuel
- General - As indicated in the above screenshot. Refer HERE for more information.
- Inventory
- Invoicing - To ensure that the Invoicing menu option is NOT visible in Back Office, ensure that all options listed under Accounts and Invoicing are NOT selected.
- Management App
- Members
- Products - Add Recipe Items to Suppliers - Select/Unselect to allow/deny access to assign Suppliers to Reciped Items via the Product Supplier Records screen.
- Suppliers
- Terminal Sale
- Touchmini Settings - Select/Unselect to allow/deny Clerks/Staff to login when using a Touchmini device. For the Clerk login option to be available at the device, either the Manually login and logout option or the Automatically logout of each sale option must be selected.
- Vouchers/Discounts
- Web
Clerk Group Reports Section ▲ ▼
Select where appropriate to allow/deny access to reports in Swiftpos. When a user belonging to a Security Group that does not have permission to view some reports, the reports will simply not be displayed in the report selection screen.
- Check All/Reset All - Select to ensure ALL Security Permission options are selected/unselected.
- Collapse/Expand All - Select to collapse/expand all options.
Footer Section ▲ ▼
- New - Select to add a Security Group.
- Save - Select to save changes.
- Undo - Select to undo changes made.
- Export Data - Select to export Clerk Security data to 2 (CSV) files. For example:
- ClerkGroupPermissionsForSecurityGroup[3]-Managers.csv - Contains Clerk Group Permissions related data specific to the Clerk Security Group 3 - Managers.
- ClerkGroupReportsForSecurityGroup[3]-Managers.csv - Contains Clerk Group Reports related data specific to the Clerk Security Group 3 - Managers.
Notes ...
Both files contain the column Selected, which can have 3 possible values:
0 - Not Selected
1 - Selected
2 - Partially selected.
- Close - Select to exit.
End of article ▲