
This outlines the information and the steps that are needed to familiarise oneself with the NetPOS 3rd Party Blackhawk Interface, prior to and during it's implementation in Touch.
The content is targeted at Resellers and swiftpos Venue Administrators who have a sound knowledge of and experience with swiftpos. For further information or assistance, please contact your swiftpos Reseller or swiftpos Support.
Steps To Follow ▼
What Is Required? ▲ ▼
- SwiftPOS V10.53+
- A NetPOS registration for Blackhawk.
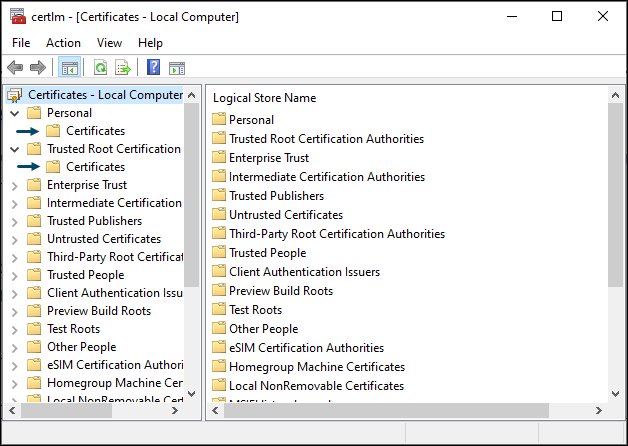
- Ensure an authentication certificate has been obtained from Blackhawk, in the form of a certificate file and accompanying password, this will then need to be imported and installed on the computer running Back Office. To do this, do as follows:
- Referring to How To Import A Windows Authentication Certificate ensure the provided certificate is imported for both the Personal and Trusted Root Certification type certificates.
- For those Venues also wishing to offer Blackhawk Products, in the form of POR (PIN On Request) Products or Digital Accounts, a list of Products will need to be requested from Blackhawk. These will generally be provided in the form of an email containing the Products, their Account Number, UPC (Product ID), Description and Denomination (Transaction Amount). Once obtained these can be added via the VAS Products Links menu option to ensure they are available to be searched/selected in Touch. Refer to How To Manage Blackhawk Products for more information.
Configure NetPOS For The Blackhawk Interface? ▲ ▼
Once the above requirements have been met, then the Blackhawk settings will need to be configured. To do this access the Blackhawk settings screen in NetPOS via the NetPOS Menu.
Once the Blackhawk settings screen is displayed, configure as appropriate.
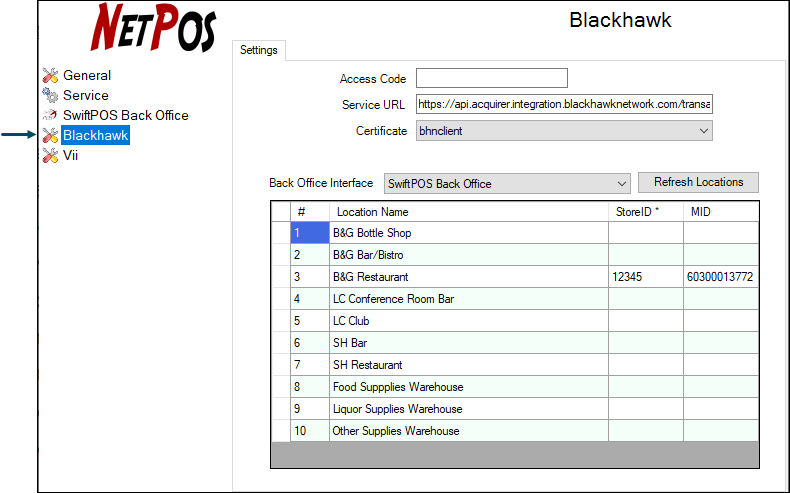
To access this screen refer to How To Access The NetPOS Menu. A NetPOS Registration for the Blackhawk Interface will be required in order to access this screen. This screen is used to configure the settings required to implement the Blackhawk Interface.
- Access Code - Default is blank. Displays/Enter the Access Code that must match the same Access Code configured at the swiftpos Touch terminal. This is not mandatory, but does provide an additional level of security.
- Service URL - Displays/Enter the URL provided by Blackhawk.
- Certificate Authentication - Select to select from the drop down list the Authentication Certificate provided by Blackhawk and imported, For more information regarding the importing and installing of certificates, refer to the What Is Required? section above.
- Back Office Interface - Select from the drop down list the Back Office instance to connect with.
Notes...
In general this will only have one instance listed. However, multiple Back Office instances can be listed, in which case one needs to be selected.
- Refresh Locations - Select to ensure the list of Locations displayed in the grid is refreshed with the latest Locations currently available.
Grid ▲ ▼
The grid displays a list of the Locations, their StoreID and MID details. These values are provided by Blackhawk and will need to be populated opposite each of the Locations that will require access to the Blackhawk Interface.
- Store ID - Displays/Enter the value as provided by Blackhawk.
- MID - Displays/Enter the value as provided by Blackhawk.
Add Blackhawk Provided Products? ▲ ▼
The Blackhawk Products obtained above will need to be added to Back Office. Refer to the How To Add A Blackhawk Product subject for more information.
Configure Touch For Blackhawk Gift Cards? ▲ ▼
Once the Blackhawk Products have been added, then Touch will need to be configured to ensure Blackhawk Gift Cards can be issued and topped up. To do this:
- Ensure the following POS Keys are added to the appropriate Keyboard Layout via the Designer:
- Ensure the POS Keys, added above, are configured appropriately to meet the Venue's requirements.
- Ensure a Full Update is sent to all Touch Terminals that make use of the same Keyboard Layout to which the above POS Keys were added.
Notes...
Refer to Add A POS Key To A Keyboard Layout for more information.
End of article. ▲