
This provides information on How To Configure For Account Charges & ePurse Cash in Orderaway.
Subjects ▲ ▼
About ▲ ▼
What Is Not Supported? ▲ ▼
- Using ePurse Points to pay for Orders.
What Is Required? ▲ ▼
- Sites must be registered for the Accounts & Members module.
- For Members to charge to their Accounts they must have available credit/funds to ensure they can finalise an order in Orderaway.
What Is Supported? ▲ ▼
- Only available to Members that are synced and configured in Swiftpos Back Office.
When Is It Used? ▲ ▼
Used to allow Swiftpos Members to pay for Orders by charging to their Accounts (House Accounts) or using ePurse Cash. It also allows Members to make use of their Membership benefits giving them greater payment options, while still allowing for Member pricing and points accrual and redemption.
How To? ▲ ▼
How To Configure For Account Charges & Epurse Cash? ▲ ▼
Do as follows in:
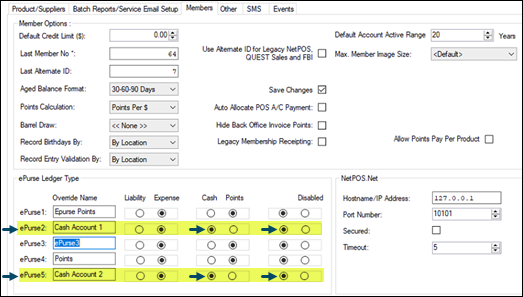
- In Global Preferences > Members tab:
- Ensure the ePurse Ledger Type is set to Cash and Enabled for the ePurse Accounts.
- The Override Name can be used to customise the name of the ePurse Cash Account. However, this will be applied to all ePurse Cash accounts for all Members.
The Account Charge and ePurse Cash Accounts need to be configured in NetPOS so Orderaway has access to allow Members to use these Accounts during Checkout.
- The Account Charge and ePurse Cash Accounts need to be configured in NetPOS so Orderaway has access to allow Members to use these Accounts during Checkout.
- Access the NetPOS Settings screen. Refer HERE for more information.
- Select Swiftpos Back Office from the menu on the left-hand side. The Swiftpos Back Office settings tab will be displayed.
- Ensure the Get Charge Account and the Get ePurse Account options are selected.

- Select Save and Close to save the changes and exit.
- Ensure the Allow member sign in options is selected in the Member tab.
- Ensure the Enable Swiftpos account charge processing option is selected in the Payment tab.
- Select Save to save the changes.
End of article ▲